

|

|

|

|

|
Conditions
|
Condition statements are used in Mini Mouse Macro to add choices to your running macro, to evaluate the environment and to direct the flow and control of your macro.
IF
An IF condition is checking or asking IF the statement evaluates to TRUE or that the condition is correct.
For example consider the example statement below taken from a macro condition:
1 | IF | FILE | C:\MMM\Skip.mmmacro | EXIST | CONTINUE
This reads - IF the FILE c:\MMM\skip.mmmacro exists then CONTINUE the macro. So if the file does exist then the macro will continue.
For example consider the example statement below taken from a macro condition:
1 | IF | FILE | C:\MMM\Skip.mmmacro | EXIST | CONTINUE
This reads - IF the FILE c:\MMM\skip.mmmacro exists then CONTINUE the macro. So if the file does exist then the macro will continue.
if not
An IF NOT condition is checking of asking if the statement is NOT TRUE of if the condition equals FALSE.
For example consider the example statement below taken from a macro condition:
1 | IF NOT | FILE SIZE | C:\MMM\Skip.mmmacro | IS | 2929 | STOP
This reads - IF NOT the FILE SIZE of c:\MMM\skip.mmmacro is 2929 bytes then STOP the macro. So if the size of the file is not 2929 then the macro will stop playing.
IF then ELSE
An if then else statement is a conditional statement that runs a different set of statements depending on whether an expression is true or false.
Here is an example of basic formed IF THEN block:
1 | IF | FILE | C:\Macro\File\output.txt | EXIST | THEN
2 | RUN ACTION | DEFINE INTEGER VARIABLE | COUNT::+1
3 | RUN ACTION | DEFINE STRING VARIABLE | %strFileOutput%::%count%: %date%-%TIME%
4 | RUN ACTION | OUTPUT TO FILE | C:\Macro\File\output.txt::APPEND_NEWLINE::%strFileOutput%
5 | IF | END IF
Here is an example of a formed IF THEN ELSE block:
1 | IF | BOOLEAN VARIABLE | %BOOLEAN% | IS TRUE | THEN
2 | RUN ACTION | MESSAGE PROMPT | TRUE
3 | IF | ELSE
4 | RUN ACTION | MESSAGE PROMPT | FALSE
5 | IF | END IF
Here is another example of a formed IF THEN ELSE block:
1 | IF | DETECT IMAGE | image path C:\File\pics\capture.bmp::match quick::move mouse yes | IMAGE FOUND | THEN
2 | RUN ACTION | MOUSE CLICK | Left click at %mouse_x% %mouse_y% 10 times with 10 ms delay and lock the mouse
3 | RUN ACTION | DEFINE BOOLEAN VARIABLE | %boolImageFound%::TRUE
4 | IF | ELSE
5 | RUN ACTION | DEFINE PIXEL RANGE VARIABLE | %PIXEL_RANGE%::At location [X:89 Y:124 W:100 H:100]::Save image to C:\File\pics\capture.bmp
6 | RUN ACTION | DEFINE BOOLEAN VARIABLE | %boolImageFound%::FALSE
7 | RUN ACTION | WAIT SECONDS | 5
8 | IF | END IF
9 | IF | BOOLEAN VARIABLE | %boolImageFound% | IS FALSE | GOTO MACRO LINE | 1
IF blocks can be nested. Here is an example of a nested block:
1 | IF | FOLDER | C:\Macro\File\pics\ | EXIST | THEN
2 | IF | DETECT IMAGE | image path C:\File\pics\capture.bmp::match quick::move mouse yes | IMAGE FOUND | THEN
3 | RUN ACTION | MOUSE CLICK | Left click at %mouse_x% %mouse_y% 10 times with 10 ms delay and lock the mouse
4 | RUN ACTION | DEFINE BOOLEAN VARIABLE | %boolImageFound%::TRUE
5 | IF | ELSE
6 | RUN ACTION | DEFINE PIXEL RANGE VARIABLE | %PIXEL_RANGE%::At location [X:89 Y:124 W:100 H:100]::Save image to C:\File\pics\capture.bmp
7 | RUN ACTION | DEFINE BOOLEAN VARIABLE | %boolImageFound%::FALSE
8 | RUN ACTION | WAIT SECONDS | 5
9 | IF | END IF
10 | IF | ELSE
11 | RUN ACTION | FILE CREATE | C:\File\pics\capture.bmp::B::1
12 | RUN ACTION | DEFINE PIXEL RANGE VARIABLE | %PIXEL_RANGE%::At location [X:89 Y:124 W:100 H:100]::Save image to C:\File\pics\capture.bmp
13 | RUN ACTION | DEFINE BOOLEAN VARIABLE | %boolImageFound%::FALSE
14 | IF | END IF
15 | IF | BOOLEAN VARIABLE | %boolImageFound% | IS FALSE | GOTO MACRO LINE | 1
Somethings to note with IF THEN blocks within Mini Mouse Macro:
1 - All IF THEN blocks must have a closing END IF.
2 - Once within a IF THEN block it is not possible to escape out with GOTO prior to closing the block.
3 - Classic IF ELSEIF statements are not yet supported at this time.
4 - Statements within IF then blocks do not need to be indented and will work as expected without indentation.
run action
A RUN ACTION condition does not perform any condition evaluation or checking it simply runs the action selected.
For example consider the example statement below taken from a macro condition:
1 | RUN ACTION | SELECT WINDOW BY NAME | my notepad save.txt - Notepad
This reads - RUN ACTION select the window name 'my notepad save.txt - Notepad'. So this will run the action to select a window by its name and the window in this example is the open notepad doc entitled 'my notepad save.txt - Notepad'
FOR
In Mini Mouse Macro a FOR condition allows for flow control through iteration (looping) of files within a single folder or many nested folders, or iteration toward a set numerical value.
FOR loops add several internal Mini Mouse Macro variables that can be used for evaluation. These are:
FOR loops add several internal Mini Mouse Macro variables that can be used for evaluation. These are:
- %I%: The count for the current iteration of the FOR loop
- %LINE%: Used in FOR EACH LINE loops, this variable holds the current text line in a file
- %FILE%: The full file path and name of the current FOR EACH FILE loop file
- %FILE.NAME%: The file name of the current FOR EACH FILE loop file
- %FILE.EXT%: The file extension of the current FOR EACH FILE loop file. For example this may be .txt or .rtf
- %FILE.PATHROOT%: The root of the file path for the current FOR EACH FILE loop file
- %FILE.PATH%: The file path without the file name of the current FOR EACH FILE loop file
- %FILE.ACCESSTIME%: The last file access time of the current FOR EACH FILE loop file
- %FILE.WRITETIME%: The last file write time of the current FOR EACH FILE loop file
- %FILE.CREATIONTIME%: the file creation time of the current FOR EACH FILE loop file
- FOR EACH
- FOR | EACH | FILE IN | FOLDER | DO
- FOR | EACH | FILE IN -R | FOLDER | DO
- FOR | EACH | LINE IN | FILE | DO
- FOR | EACH | LINE IN | FILE | RUN
- FOR | I | = | [NUMBER] TO [NUMBER] | NEXT
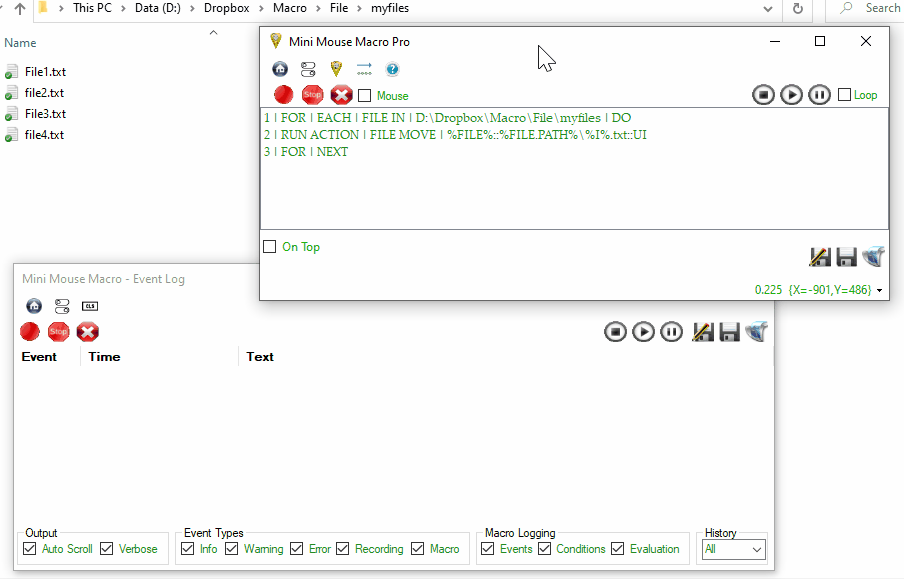
1. FOR | EACH | FILE IN | FOLDER | DO
This FOR loop iterates through each file in a folder. For every file in the folder, the FOR loop will DO a set of actions or evaluations that are listed within the FOR block.
For example consider the basic FOR EACH FILE IN loop below:
1 | FOR | EACH | FILE IN | E:\DOCS | DO
2 | RUN ACTION | MESSAGE PROMPT | %file%::File[%i%]: %file%
3 | FOR | NEXT
In the above example there is one action within the FOR block, line 2. This FOR loop will execute the MESSAGE PROMPT action on every file iteration in the E:\DOCS directory. A file iteration takes place when the macro line reaches the closing FOR block; line 3 in this example is the closing FOR block. This macro will iterate (loop) through all the files in the directory of E:\DOCS one at a time, performing the action at line 2. When all the files have been iterated then the FOR loop ends and the macro continues.
1 | FOR | EACH | FILE IN | E:\docs | DO
2 | IF | STRING VARIABLE | %FILE.EXT% | IS | .txt | DEFINE INTEGER VARIABLE | %INTEGER%::+1
3 | FOR | NEXT
4 | RUN ACTION | MESSAGE PROMPT | %integer%::Number of text files
The example above loops through the files in the E:\Docs directory. If the file extension (internal variable %FILE.EXT%) of the file is .txt then increment the %INTEGER% variable by one. When the loop ends (at line 4) then display the value of %integer% in a MESSAGE PROMPT.
Consider the example below where a FOR loop is used to rename files in a folder.
2. FOR | EACH | FILE IN -R | FOLDER | DO
The FOR EACH FILE IN -R loop recursively iterates through each file in every directory within the chosen path. Like the standard FOR loop above, the FOR loop will DO a set of actions or evaluation that are listed within the FOR block.
For example consider the basic FOR EACH FILE IN -R loop below:
1 | FOR | EACH | FILE IN -R | E:\DOCS | DO
2 | IF | STRING VARIABLE | %FILE.EXT% | IS NOT | .aes | ENCRYPT FILE (AES) | %FILE%::MyPassword::DELETE_ORIGINAL
3 | FOR | NEXT
In the above example there is one condition evaluated against each file recursively within the E:\DOCS directory tree. Line 2 performs a string comparison to evaluate the value of the current variable %FILE.EXT% (the file extension of the file within the FOR loop iteration). IF the value IS NOT .aes then perform the action to ENCRYPT FILE %FILE% (the variable containing the current file within the FOR loop iteration).
1 | FOR | EACH | FILE IN -R | E:\docs | DO
2 | FOR | EACH | LINE IN | %file% | DO
3 | IF | STRING VARIABLE | %LINE% | CONTAINS | %date% - Out | OUTPUT TO FILE | E:\out.txt::APPEND::%file%;
4 | FOR | NEXT
5 | FOR | NEXT
The above macro nests an additional FOR EACH LINE IN loop. This macro recursively iterates through the E:\docs directory and for each line in the current file within the loop it performs a string comparison (IF STRING VARIABLE %LINE% CONTAINS) to determine if the current line does contain %date% - Out. If the %line% value does contain the text then (OUTPUT TO FILE) append to E:\out.txt the text %file%;.
3. FOR | EACH | LINE IN | FILE | DO
The FOR EACH LINE IN FILE DO loop iterates through each LINE in a FILE and performs (DO) a set of actions or evaluations that are listed within the FOR block. LINE IN FILE works well with text based files however may not perform as expected with others (AUG 18).
1 | FOR | EACH | LINE IN | D:\Macro\TX\send.txt | DO
2 | IF | NETWORK HOST PING REPLY | %line% | SUCCESSFUL | SEND UDP PACKET STRING | %line%::41414::BEGIN
3 | IF | RECEIVE UDP PACKET STRING | %LINE%::41413::FIN::30000 | STRING FOUND | SEARCH FOR STRING | OUTPUT TO FILE | D:\Macro\RX\hostRX_110.txt::APPEND::.D.%DATE%.T.%TIME%.Success_
4 | FOR | NEXT
D:\Macro\TX\send.txt
The above macro reads through each line in send.txt performs the condition statements at line 2 and 3. At line 4 the FOR LOOP begins the loop again until each line in the file has been read. This macro sends a ping to the value (NETWORK HOST PING REPLY) of %line% (the current line value). If a successful ping reply it then sends a UDP packed (SEND UDP PACKET STRING) to the value of %line% on port 41414 with the string 'BEGIN'. Line 4 waits 30 seconds for a UDP reply from %line% on port 41413 (RECEIVE UDP PACKET STRING) with the string 'FIN'. If a reply comes in that time frame with the string 'FIN' then it appends (OUTPUT TO FILE) to the file hostRX_110.txt the text value D.%date%.T.%time%.Success_.
4. FOR | EACH | LINE IN | FILE | RUN
The FOR EACH LINE IN FILE RUN steps through each line in a file, parsing it directly to Mini Mouse Macro to run. This works best with saved .mmmacro files. Regardless of file extension, Mini Mouse Macro expects the same format as a saved .mmmacro file with macro conditions. Also, this works best for macro files that contain no flow control. Mini Mouse Macro can not redirect flow control within these files. For example, FOR loops within this file will not work and GOTO statements will not work.
1 | FOR | EACH | LINE IN | D:\Macro\commands1.mmmacro | RUN
2 | FOR | EACH | LINE IN | D:\Macro\commands2.mmmacro | RUN
3 | FOR | EACH | LINE IN | D:\Macro\commands3.mmmacro | RUN
4 | FOR | EACH | LINE IN | D:\Macro\commands4.mmmacro | RUN
This macro steps through each command in each .mmmacro file listed. Line 2 will begin when all the lines in commands1.mmmacro has executed.
5. FOR | I | = | %INTEGER% TO %INTEGER1% | NEXT
The FOR I = NUM to NUM NEXT loop is a classic FOR counter loop. This loop steps from the first number to the last number by the value of 1. The value for the numbers can be any variables that can contain numbers (%INTEGER% TO %INTEGER1% or %STRING% TO %STRING1% or %CLIPBOARD% TO %RANDOM_5-10%) or can be set to numbers (1 TO 50).
1 | FOR | I | = | 130 TO 150 | NEXT
2 | IF | NETWORK HOST PING REPLY | 10.0.0.%i% | SUCCESSFUL | OUTPUT TO FILE | D:\Macro\RX\hosts.txt::APPEND::%i%,
3 | FOR | NEXT
The macro above counts up from 130 to 150. Each count increment it performs the condition at line 2. Line 2 pings the host 10.0.0.%i%. %i% is the internal variable that holds the current count value. If the ping is successful the macro writes out to d:\macro\rx\hosts.txt with the value of %i%,.
else
ELSE is used with either IF or the IF NOT conditions to allow further evaluation to continue if the condition does not evaluate to TRUE. To put it another way, ELSE can be thought of as 'otherwise do this' if the first condition fails. An ELSE condition can not be used when the initial condition has the CONTINUE action. This is because with the CONTINUE action the condition must evaluate to TRUE prior to continuing the macro.
Consider the following example:
1 | IF | FILE | C:\MMM\Skip.mmmacro | EXIST | GOTO MACRO LINE | 5 | ELSE | 1 | RUN ACTION | GOTO MACRO LINE | 2
So if the file C:\MMM\Skip.mmmacro does EXIST then the macro will GOTO MACRO LINE 5 but if the file does not exist then RUN the ACTION to GOTO MACRO LINE 2.
ELSE can further be used to evaluate subsequent conditions. For example:
IF | FILE | C:\MMM\Skip.mmmacro | EXIST | GOTO MACRO LINE | 5 | ELSE | 1 | IF | FILE | C:\MMM\Skip2.mmmacro | EXIST | GOTO MACRO LINE | 10
Here if the first condition evaluates to false, the file does not exist, then the second condition will be evaluated.
Note: To add ELSE to a condition select the 'ELSE' checkbox option within the 'Add Condition' window. It is best to do this after you set your first condition. For example:
- Create your initial IF or IF NOT condition - do not click ok.
- Check the 'ELSE' checkbox.
- Now select either IF, IF NOT, or RUN ACTION condition - This will add the condition after the ELSE.
- [LINE #] | [FIRST CONDITION] | ELSE | [LINE #] | [CONDITION]
- or for a RUN ACTION condition: [LINE #] | [FIRST CONDITION] | ELSE | [LINE #] | [ACTION]
- Select your OBJECT - this will add an object condition after the condition.
- [LINE #] | [FIRST CONDITION] | ELSE | [LINE #] | [CONDITION] | [OBJECT]
- Now complete the ELSE line by selecting the OPERATOR and ACTION.
- [LINE #] | [FIRST CONDITION] | ELSE | [LINE #] | [CONDITION] | [OBJECT] | [OPERATOR] | [ACTION]
- It is best to follow this procedure for each ELSE condition added.
and
AND is used to add further actions and conditions to macro lines once they evaluate to TRUE.
To add AND to a macro line:
Consider the following example:
1 | IF | FILE | D:\Macro\OUTPUT\output.txt | EXIST | MESSAGE PROMPT | File Exists - Starting Output Write::File Exists::0 | AND | 2 | RUN ACTION | OUTPUT TO FILE | D:\Macro\OUTPUT\output.txt::APPEND::%STRING%
This reads: If the file output.txt does EXIST then run the MESSAGE PROMPT, AND also run the action to OUTPUT TO FILE output.txt the variable %STRING%.
In this example if the file output.txt did not exist then the AND action would not run.
Consider the following example with ELSE added:
1 | IF | FILE | D:\Macro\OUTPUT\output.txt | EXIST | MESSAGE PROMPT | File Exists - Starting Output Write::File Exists::0 | AND | 2 | RUN ACTION | OUTPUT TO FILE | D:\Macro\OUTPUT\output.txt::APPEND::%STRING% | ELSE | 3 | RUN ACTION | MESSAGE PROMPT | File does NOT Exist::File not found::0
This example, the same as the first with ELSE added, will execute the last MESSAGE PROMPT if the file output.txt does not exist and will skip the AND statement.
ANDs can be added to key press and mouse movement macro lines also:
1 | 2098 | 363 | 1000 | Keypress Output 1 | AND | 4 | 1883 | 206 | 10 | Mouse Movement | AND | 4 | 1883 | 206 | 10 | Keypress Output 2
Note: That AND actions or conditions only run if the leading statement in the ELSE block evaluates to TRUE or is successful.
Note: That AND actions or conditions do not add aditional condition evaluation to a macro statement. For example in the typical use case below notice how AND is used to combine multiple macro line statements into one line.
Typical use case example:
1 | IF | PROCESS ID | 12888 | EXIST | KILL PROCESS ID | 12888 | AND | 2 | IF | PROCESS ID | 12888 | NOT EXIST | MESSAGE PROMPT | Process 12888 Killed::Process 12888 Status::0
2 | RUN ACTION | RUN VIA CMD /C | start d:\process_generate.bat | AND | 2 | RUN ACTION | WAIT MINUTES | 1 | AND | 2 | IF | PROCESS NAME | process_build | EXIST | MESSAGE PROMPT | process_generate successful::SUCCESS::0 | ELSE | 2 | RUN ACTION | MESSAGE PROMPT | process_generate unsuccessful::FAIL::0
3 | RUN ACTION | SELECT WINDOW BY NAME | process_2 | AND | 3 | RUN ACTION | WAIT SECONDS | 2 | AND | 3 | X | X | 10 | Keypress $END
4 | IF | WINDOW TITLE | process_2 | EXIST | KILL PROCESS NAME | process_build | AND | 4 | RUN ACTION | MESSAGE PROMPT | process_build KILLED::process_build status::5 | AND | 4 | RUN ACTION | MESSAGE PROMPT | END::EOF::0 | ELSE | 4 | IF | PROCESS NAME | LMS | NOT EXIST | RUN VIA CMD /C | start d:\process_generate.bat | AND | 4 | RUN ACTION | WAIT MINUTES | 1 | AND | 4 | RUN ACTION | GOTO MACRO LINE | 3
To add AND to a macro line:
- Left click to select the macro line
- Right click and bring up the 'Edit Menu' and select 'Edit Entry'
- Select 'Action' then 'Add AND Action'
Consider the following example:
1 | IF | FILE | D:\Macro\OUTPUT\output.txt | EXIST | MESSAGE PROMPT | File Exists - Starting Output Write::File Exists::0 | AND | 2 | RUN ACTION | OUTPUT TO FILE | D:\Macro\OUTPUT\output.txt::APPEND::%STRING%
This reads: If the file output.txt does EXIST then run the MESSAGE PROMPT, AND also run the action to OUTPUT TO FILE output.txt the variable %STRING%.
In this example if the file output.txt did not exist then the AND action would not run.
Consider the following example with ELSE added:
1 | IF | FILE | D:\Macro\OUTPUT\output.txt | EXIST | MESSAGE PROMPT | File Exists - Starting Output Write::File Exists::0 | AND | 2 | RUN ACTION | OUTPUT TO FILE | D:\Macro\OUTPUT\output.txt::APPEND::%STRING% | ELSE | 3 | RUN ACTION | MESSAGE PROMPT | File does NOT Exist::File not found::0
This example, the same as the first with ELSE added, will execute the last MESSAGE PROMPT if the file output.txt does not exist and will skip the AND statement.
ANDs can be added to key press and mouse movement macro lines also:
1 | 2098 | 363 | 1000 | Keypress Output 1 | AND | 4 | 1883 | 206 | 10 | Mouse Movement | AND | 4 | 1883 | 206 | 10 | Keypress Output 2
Note: That AND actions or conditions only run if the leading statement in the ELSE block evaluates to TRUE or is successful.
Note: That AND actions or conditions do not add aditional condition evaluation to a macro statement. For example in the typical use case below notice how AND is used to combine multiple macro line statements into one line.
Typical use case example:
1 | IF | PROCESS ID | 12888 | EXIST | KILL PROCESS ID | 12888 | AND | 2 | IF | PROCESS ID | 12888 | NOT EXIST | MESSAGE PROMPT | Process 12888 Killed::Process 12888 Status::0
2 | RUN ACTION | RUN VIA CMD /C | start d:\process_generate.bat | AND | 2 | RUN ACTION | WAIT MINUTES | 1 | AND | 2 | IF | PROCESS NAME | process_build | EXIST | MESSAGE PROMPT | process_generate successful::SUCCESS::0 | ELSE | 2 | RUN ACTION | MESSAGE PROMPT | process_generate unsuccessful::FAIL::0
3 | RUN ACTION | SELECT WINDOW BY NAME | process_2 | AND | 3 | RUN ACTION | WAIT SECONDS | 2 | AND | 3 | X | X | 10 | Keypress $END
4 | IF | WINDOW TITLE | process_2 | EXIST | KILL PROCESS NAME | process_build | AND | 4 | RUN ACTION | MESSAGE PROMPT | process_build KILLED::process_build status::5 | AND | 4 | RUN ACTION | MESSAGE PROMPT | END::EOF::0 | ELSE | 4 | IF | PROCESS NAME | LMS | NOT EXIST | RUN VIA CMD /C | start d:\process_generate.bat | AND | 4 | RUN ACTION | WAIT MINUTES | 1 | AND | 4 | RUN ACTION | GOTO MACRO LINE | 3

|
Objects
|
Objects are the focus of your condition. An object is an item that you would like to evaluate with an IF or IF NOT condition statement.
file & folder
FILE and FOLDER objects evaluate conditions based on the state of file and folders on the system.
Consider the FILE example statement below taken from a macro condition:
1 | IF | FILE | C:\tasklog.log | EXIST | DELETE FILE | C:\tasklog.log
This reads - IF the FILE c:\tasklog.log does EXIST then DELETE the file c:\tasklog.log. So the file c:\tasklog.log will be deleted if it does exist on the system at that location. Files are deleted permanently and not sent to the recycle bin.
Consider the FOLDER example statement below taken from a macro condition:
1 | IF | FOLDER | C:\MMM | NOT EXIST | GOTO MACRO LINE | 5
This reads - IF the FOLDER does NOT EXIST then GOTO MACRO LINE 5 and run . So if the folder does not exist then the macro will start running at macro line 5.
- File objects have the following Operator conditions for evaluation:
- Exist
- Not Exist
- File Contains String
- Folder objects have the following Operator conditions for evaluation:
- Exist
- Not Exist
- Files Contains String
- Files Contains String -R
file size & folder size
FILE SIZE and FOLDER SIZE objects evaluate conditions based on the size in bytes of files and folders on the system.
Consider the FILE SIZE example statement below taken from a macro condition:
1 | IF | FILE SIZE | C:\rescuepe.log | GREATER THAN | 96 | CONTINUE
This reads - IF the FILE SIZE of c:\tasklog.log is GREATER THAN 96 bytes then CONTINUE with the macro. So the file is larger than 96 bytes then continue running the macro. NOTE that with CONTINUE actions the macro will wait until the condition evaluates to true or matches before continuing. So in the case of the example if the file is not greater than 96 bytes then wait until it is.
Consider the FOLDER example statement below taken from a macro condition:
1 | IF | FOLDER SIZE | C:\MMM | IS | 17574 | LOAD MACRO | C:\MMM\Skip.mmmacro
This reads - IF the FOLDER SIZE of folder c:\MMM is 17574 bytes then load the macro from c:\MMM\Skip.mmmacro. So run the macro Skip.mmmacro if c:\MMM is exactly 17575 bytes in size. NOTE that a root folder that is very large in size may take time to evaluate the size condition.
- File size and Folder size objects have the following Operator conditions for evaluation:
- Is
- Is Not
- Greater than
- Less than
- Greater than equal to
- Less than equal to
file hash
FILE HASH objects evaluate condition based on the resulting cryptographic hash outcome of a file.
A hash is a one way mathematical algorithm that produces a fixed size output from a value, in this case the output from reading in a file. Hash values are used to check the integrity of files. If the file has been changed then the hash value is also changed.
Consider the FILE HASH example statement below taken from a macro condition:
1 | IF | FILE HASH | C:\rescue.log | MD5 IS | bfe75d55a12df081a06e463eefc7f0c5 | WAIT SECONDS | 30
This reads - IF the FILE HASH (MD5) of c:\rescue.log is bfe75d55a12df081a06e463eefc7f0c5 then WAIT SECONDS 30. So the file hash matches then wait 30 seconds before continuing running the macro if the MD5 does not match then the continue without running the action.
- File Hash objects have the following Operator conditions for evaluation:
- MD5 IS
- SHA1 IS
- SHA256 IS
- SHA384 IS
- SHA512 IS
folder file count
FOLDER FILE COUNT objects evaluate condition based on how many files are in the folder. NOTE that this is recursive. Meaning all files within all folders within the folder.
Consider the FILE FOLDER COUNT example statement below taken from a macro condition:
1 | IF | FOLDER FILE COUNT | C:\MMM | IS | 6 | RUN PROGRAM | C:\Windows\notepad.exe
This reads - IF the FOLDER FILE COUNT within the root folder c:\MMM is 6 then RUN PROGRAM c:\Windows\notepad.exe. So if there are 6 files within the folder tree of c:\MMM then run the program c:\windows\notepad.exe.
- Folder file count objects have the following Operator conditions for evaluation:
- Is
- Is Not
- Greater than
- Less than
- Greater than equal to
- Less than equal to
process name & process id
PROCESS NAME and PROCESS ID objects evaluate conditions based on the current status of the system process ID or process name at the time of execution.
Consider the FILE FOLDER COUNT example statement below taken from a macro condition:
1 | IF | PROCESS NAME | notepad | EXIST | SELECT WINDOW BY NAME | Untitled - Notepad
This reads - IF the PROCESS with the NAME of notepad does EXIST then SELECT WINDOWS BY NAME the windows name Untitled - Notepad. So if currently there is a system process called notepad that does exist then select the windows entitled Untitled - Notepad, the default name of a new notepad document.
After either Process name or Process ID are selected as an Object a combo box will appear with all the current system process names or ID's to select from.
- Folder file count objects have the following Operator conditions for evaluation:
- Exist
- Not Exist
time
TIME objects evaluate condition based on the current system time.
Consider the TIME example statement below taken from a macro condition:
1 | IF | TIME | 2:00:56 PM | IS | CONTINUE
NOTE that TIME values are in 12 hour time format.
This reads - IF the TIME of 2:00:56 PM is the current time then CONTINUE. So if the time when the condition is evaluated is 2:00:56 PM then continue running the macro, otherwise wait until that time and then continue.
Consider this example of IS BEFORE CURRENT TIME:
1 | IF | TIME | 2:04:09 PM | IS BEFORE CURRENT TIME | GOTO MACRO LINE | 1
This reads - IF the TIME of 2:04:09 PM IS BEFORE the CURRENT TIME then GOTO the MACRO LINE 1. So if the current system time is before 2:04:09 PM then the macro will be redirected using the GOTO action, to macro line number 1. If the time is not before, then this condition is skipped and the macro continues the next line.
Consider this example of IS AFTER CURRENT TIME:
1 | IF | TIME | 2:07:10 PM | IS AFTER CURRENT TIME | RESTART COMPUTER
This reads - IF the TIME of 2:07:10 PM IS AFTER the CURRENT TIME then RESTART the COMPUTER. So if the current system time when this macro condition is evaluated by Mini Mouse Macro is after 2:07:10 PM (for example it is 2:10:00 PM) then the computer will be restarted. If the time is before this time then this condition is skipped and the macro continues to the next line.
- Time objects have the following Operator conditions for evaluation:
- Is
- Is Not
- Is Before Current Time
- Is After Current Time
date
DATE objects evaluate condition based on the current system date.
Consider the DATE example statement below taken from a macro condition:
1 | IF | DATE | 6/25/2016 | IS | STOP
This reads - IF the DATE of 6/25/2016 is the current system date then STOP. So if the date when the condition is evaluated is the same then STOP the macro, otherwise continue that macro.
Consider the IS BEFORE CURRENT DATE example:
1 | IF | DATE | 6/25/2016 | IS BEFORE CURRENT DATE | DEFINE INTEGER VARIABLE | +1
This reads - IF the DATE of 6/25/2016 IS BEFORE the CURRENT DATE then DEFINE INTEGER VARIABLE to be the current value + 1 (Integer variables are covered below). So the date value of 6/25/2016 is before the current system date, for example 6/28/2016, then the define integer variable action will be run. If the current system date is not before 6/25/2016 then the condition will be skipped and the next macro line entry will be evaluated.
Consider the IS AFTER CURRENT DATE example:
1 | IF | DATE | 6/25/2016 | IS AFTER CURRENT DATE | CONTINUE
This reads - IF the DATE of 6/25/2016 IS BEFORE the CURRENT DATE then CONTINUE. So if the date value of 6/25/2016 is after the current system date, for example 6/20/2016, then continue to run the macro. If the current system date is not before 6/25/2016 then the condition will wait until the date is after the current system date and then it will continue.
- Date objects have the following Operator conditions for evaluation:
- Is
- Is Not
- Is Before Current Date
- Is After Current Date
time and date
TIME AND DATE objects evaluate condition based on the current system time and date.
Consider the TIME AND DATE example statement below taken from a macro condition:
1 | IF | TIME AND DATE | 14:25:30 25Jun2021 | IS | CONTINUE
This reads - IF the TIME AND DATE of 14:25:30 25Jun2021 is the current time and date then CONTINUE. So if the time and date when the condition is evaluated is the same then the macro will continue. If the current system time and date is not 14:25:30 25 June 2021 then the macro will wait until it is before continuing.
Consider the IS BEFORE CURRENT DATE & TIME example:
1 | IF | TIME AND DATE | 14:25:30 25Jun2021 | IS BEFORE CURRENT DATE & TIME | WAIT HOURS | 12
This reads - IF the TIME AND DATE of 14:25:30 25Jun2021 is BEFORE the current time and date then WAIT 12 hours and continue. So if the time and date value of 14:25:30 25Jun2021 is before the current system clock time then the macro condition will be true and the action to wait 12 hours before continuing will commence. If the current system time and date is after 14:25:30 25 June 2021 then the macro condition will be false and the action will be skipped allowing the macro to evaluate the next macro item.
Consider the IS AFTER CURRENT DATE & TIME example:
1 | IF | TIME AND DATE | 14:30:00 25Jun2016 | IS AFTER CURRENT DATE & TIME | DEFINE STRING VARIABLE | 14:30_25 JUNE 2016
This reads - IF the TIME AND DATE of 14:30:00 25Jun2016 is AFTER the current time and date then DEFINE the STRING VARIABLE to 14:30_25 JUNE 2016 (String Variables are covered in the section below). So if the time and date value of 14:30:00 25Jun2016 is after the current system clock time then the macro condition will be true and the action to define the %string% variable to the text 14:30_25 JUNE 2016 will execute. If the current system time and date is before 14:30:00 25 June 2016 then the macro condition will be false and the action will be skipped allowing the macro to evaluate the next macro item.
- Date objects have the following Operator conditions for evaluation:
- Is
- Is Not
- Is Before Current Date & Time
- Is After Current Date & Time
keyboard keypress
KEYBOARD KEYPRESS objects evaluate condition based on a keypress at the time of evaluation.
Consider the KEYBOARD KEYPRESS example statement below taken from a macro condition:
1 | IF | KEYBOARD KEYPRESS | Keypress \ | IS | CONTINUE
This reads - IF the KEYBOARD KEYPRESS is \ then CONTINUE. So during the time of condition evaluation when the key '\' is pressed then continue the macro. The macro will wait until the key is pressed before continuing. Only single key presses are evaluated at this stage.
Keyboard Keypress is best implemented with the CONTINUE action. With the continue action the macro will wait for the key to be pressed to continue. Without the continue action the evaluation of the keypress is done at runtime only one time and can be missed.
- Keyboard keypress objects have the following Operator conditions for evaluation:
- Is
- Is Not
last condition
This condition is used to evaluate if the last processed condition evaluated to true (successful) or false (unsuccessful). It's useful for macro flow control, as an alternative to ELSE conditions, or for macro debugging.
IF | LAST CONDITION | EVALUATION | SUCCESSFUL | MESSAGE PROMPT | Last condition was successful
IF | LAST CONDITION | EVALUATION | UNSUCCESSFUL | MESSAGE PROMPT | Last condition was unsuccessful
Example 1:
1 | IF | WINDOW TITLE | Start Here | EXIST | SELECT WINDOW BY NAME | Start Here
2 | IF | LAST CONDITION | EVALUATION | SUCCESSFUL | MESSAGE PROMPT | The Window Title was found successfully
In the example above at line 1 we run a WINDOW TITLE check for 'Start Here'. If start here exists we select that window. Lets assume for this example that the window title does exist and the action to SELECT WINDOW BY NAME runs. At line 2 we evaluate the last condition being the WINDOW TITLE check above at line 1. This condition was successful (evaluated true - SUCCESSFUL) so we then process the MESSAGE PROMPT action.
Example 2:
* | File_Delete_Start
1 | RUN ACTION | WAIT SECONDS | 1
2 | IF | FILE | D:\Macro\File\props.txt | EXIST | FILE DELETE | D:\Macro\File\props.txt
3 | IF | LAST CONDITION | EVALUATION | UNSUCCESSFUL | GOTO MACRO LINE | File_Delete_Start
In example 2 first we start with a line remark 'File_Delete_start'. This line remark is used later for the GOTO MARCO LINE position at line 3.
At line 2 we are checking if the file 'props.txt' exists and if it does we then run a FILE DELETE action to delete it.
At line 3 we evaluate if this condition was UNSECCESSFUL. Unseccessful for line 2 means that the file props.txt does not exist and that the IF FILE condition evaluated to false. If it was unseccessful we then run the GOTO MACRO LINE action to loop back to the 'File_Delete_Start' heading.
- Last Condition objects have the following Operator conditions for evaluation:
- SUCCESSFUL
- UNSECCESSFUL
- TRUE
- FALSE
mouse position equals
MOUSE POSITION EQUALS object evaluate condition based on current position of the mouse during evaluation.
Consider the MOUSE POSITION EQUALS example statement below taken from a macro condition:
1 | IF | MOUSE POSITION EQUALS | {X=940,Y=517} | LESS THAN | CONTINUE
This reads - IF MOUSE POSITION EQUALS X=940 Y=517 LESS THAN the current mouse position then CONTINUE. So if the current mouse X position or Y position is LESS than X 940 OR less than Y 517 then continue playing the macro, otherwise wait until the mouse is less than X 940 and Y 517.
The CONTINUE action allows an object to only evaluate once a match has been made. Any other actions will evaluate the condition at the time of condition execution. This suites both Mouse Equals and Mouse Near objects.
- Mouse position equals objects have the following Operator conditions for evaluation:
- Is
- Is Not
- Greater than
- Less than
- Greater than equal to
- Less than equal to
mouse position near
MOUSE POSITION NEAR object evaluate condition based on if the current mouse position is near (within +50 or -50) of the mouse position during evaluation. The value of +50 or -50 can be changed by specifying the values.
Consider the MOUSE POSITION NEAR example statement below taken from a macro condition:
1 | IF | MOUSE POSITION NEAR | {X=996,Y=523} | IS | CONTINUE
This reads - IF MOUSE POSITION NEAR X=996 Y=523 is the current mouse position then CONTINUE. So if the current mouse X position or Y position is within +50 or -50 X or Y of X 996 or Y 523 then continue playing the macro, otherwise wait until the mouse is within the range.
Consider the MOUSE POSITION NEAR example statement below taken from a macro condition:
1 | IF | MOUSE POSITION NEAR | {X=996,Y=523} | IS NOT | CONTINUE
This reads - IF MOUSE POSITION NEAR X=996 Y=523 is not within the current mouse position then CONTINUE. So if the current mouse X position or Y position is NOT within +50 or -50 X or Y of X 996 or Y 523 then continue playing the macro, otherwise wait until the mouse is out of the range.
Consider the MOUSE POSITION NEAR example with CUSTOM VALUES statement below taken from a macro condition. The custom values allow for a range other than -50 and +50. This range allows for +100 & -100 of X and +300 & -300 of Y:
1 | IF | MOUSE POSITION NEAR | {X=996,Y=523}::100::300 | IS | CONTINUE
Consider the MOUSE POSITION NEAR example statement below taken from a macro condition:
1 | IF | MOUSE POSITION NEAR | {X=996,Y=523} | IS | CONTINUE
This reads - IF MOUSE POSITION NEAR X=996 Y=523 is the current mouse position then CONTINUE. So if the current mouse X position or Y position is within +50 or -50 X or Y of X 996 or Y 523 then continue playing the macro, otherwise wait until the mouse is within the range.
Consider the MOUSE POSITION NEAR example statement below taken from a macro condition:
1 | IF | MOUSE POSITION NEAR | {X=996,Y=523} | IS NOT | CONTINUE
This reads - IF MOUSE POSITION NEAR X=996 Y=523 is not within the current mouse position then CONTINUE. So if the current mouse X position or Y position is NOT within +50 or -50 X or Y of X 996 or Y 523 then continue playing the macro, otherwise wait until the mouse is out of the range.
Consider the MOUSE POSITION NEAR example with CUSTOM VALUES statement below taken from a macro condition. The custom values allow for a range other than -50 and +50. This range allows for +100 & -100 of X and +300 & -300 of Y:
1 | IF | MOUSE POSITION NEAR | {X=996,Y=523}::100::300 | IS | CONTINUE
- Mouse position near objects have the following Operator conditions for evaluation:
- Is
- Is Not
network host ping reply
NETWORK HOST PING REPLY objects evaluate conditions based on ICMP reply status; if they can be reached on the network.
Consider the NETWORK HOST PING REPLY example statement below taken from a macro condition:
1 | IF | NETWORK HOST PING REPLY | 192.168.0.2 | SUCCESSFUL | RUN VIA CMD /K | net use X: \\192.168.0.2\share
This reads - IF NETWORK HOST PING REPLY to ip address 192.168.0.2 is SUCCESSFUL then RUN VIA CMD /K the command NET USE X: \\192.168.0.2\share. So if the network host 192.168.0.2 is reachable on the network by PING (ICMP packets) then run a command from a command line window to map a network drive and keep the command window open.
- Network host Ping reply objects have the following Operator conditions for evaluation:
- Successful
- Unsuccessful
network packet detected
NETWORK PACKET DETECTED objects evaluate conditions based on network packets read from a local interface during the time of evaluation.
NOTE that to evaluate network packets Mini Mouse Macro creates a raw IP socket for the duration of evaluation. This requires administrator level permission on the system at the time of evaluation and may require Mini Mouse Macro to be run as admin otherwise the evaluation will be skipped. Mini Mouse Macro creates a socket under the .NET framework using the command: socket = New Socket(AddressFamily.InterNetwork, SocketType.Raw, ProtocolType.IP) and binds the socket with: sockets.Bind(New IPEndPoint(myip, 0))
After the Network packet detected object is selected a combo box is presented with the current names of all system network adapters. Select the network adapter to read packets from then select the operator value.
Consider the NETWORK PACKET DETECTED example statement below taken from a macro condition:
1 | IF | NETWORK PACKET DETECTED | Wi-Fi | SOURCE ADDRESS | 192.168.0.2::10000 | LOAD MACRO | C:\MMM\NetworkFind.mmmacro
This reads - IF NETWORK PACKET DETECTED from WIFI adapter of the SOURCE ADDRESS 192.168.0.2 (during 10 seconds) is detected then LOAD MACRO c:\MMM\NetworkFind.mmmacro. So if any network packet during evaluation read from the adapter named WIFI is from the source 192.168.0.2 then load the macro, otherwise wait until a packet is received and then load the macro.
Consider the following example:
1 | IF | NETWORK PACKET DETECTED | Ethernet | PACKET CONTAINS STRING | LoadMacro::30000 | LOAD MACRO | B:\MMM\Connect.mmmacro | ELSE | 1 | RUN ACTION | LOAD MACRO | B:\MMM\startprocess.mmmacro
This reads - If NETWORK PACKET DETECTED from the Ethernet adapter does CONTAIN the STRING "LoadMacro" (within 30 seconds) then run the action to LOAD MACRO b:\mmm\Connect.mmmacro. If this condition does not detect the packet string then ELSE run the action to load the macro startprocess.mmmacro.
- Network packet detected objects have the following Operator conditions for evaluation:
- Source address
- Destination address
- Packet contains string
- Packet type TCP
- Packet type UDP
- Packet type ICMP
- Packet count TCP
- Packet count UDP
- Packet count ICMP
- Packet count total
- Packet source port number
- Packet destination port number
receive udp packet string
RECEIVE UDP PACKET STRING objects evaluate conditions based on the string contents of UDP packets read during the time of evaluation.
Sending and receiving UDP strings is a way of controlling Mini Mouse Macro over the network. The MMM Controller tool can be used to send commands to Mini Mouse Macro and to receive feedback from Mini Mouse Macro over a network. The MMM Controller can be downloaded here.
Consider the RECEIVE UDP PACKET STRING example statement below taken from a macro condition:
1 | IF | RECEIVE UDP PACKET STRING | ANY::41414::StartMacro4::20000 | STRING FOUND | SEARCH FOR STRING | SEND UDP PACKET STRING | 192.168.0.2::41414::LoadMacro5
This reads - IF RECEIVE UDP PACKET STRING from ANY IP address on UDP port 41414 that contains the string 'StartMacro4" (within 20 seconds) then SEND UDP PACKET STRING containing string "LoadMacro5" to IP address 192.168.0.2 on UDP port 41414. So if a UDP packet is detected on port 41414 with contains the word "StartMacro4" then send a UDP packet to IP address 192.168.0.2 on port 41414 that contains the word 'LoadMacro5".
Note that RECEIVE UDP PACKET STRING conditions only continue once they evaluate to true. Conditions can be skipped by clicking on the ...Condition link at the bottom of the macro list.
- Receive UDP packet string objects have the following Operator conditions for evaluation:
- STRING FOUND
TCP Port open
TCP PORT OPEN objects evaluate conditions based on the state value (open port or closed port) of a selected remote (or local) TCP port number.
To determine the state of a port, MMM initiates a connection to the host on the chosen port. If the connection is successful within the timeout value the port is considered to be open. If the connection is unsuccessful (no reply is received) within the timeout value the connection is considered to be closed.
Consider the TCP PORT OPEN example statement below taken from a macro condition:
1 | IF | TCP PORT OPEN | 192.168.0.2::41414::200 | IS OPEN | SEND UDP PACKET STRING | 192.168.0.2::41414::LoadMacro5
This reads - IF the TCP PORT number 41414 IS OPEN on the host of 192.168.0.2 (wait 200 ms for a reply) then perform the action to SEND a UDP PACKET to 192.168.0.2 on port 41414 containing the STRING of LoadMacro5.
Consider the TCP PORT OPEN example statement below taken from a macro condition:
1 | IF | TCP PORT OPEN | 127.0.0.1::80::100 | IS CLOSED | MESSAGE PROMPT | The local web server on port 80 is CLOSED::Port Closed
This reads - IF the local host on 127.0.0.1 TCP PORT of 80 IS CLOSED (wait 100 ms for a reply) then do a MESSAGE PROMPT with the text of 'The local web server on port 80 is CLOSED' and the title of 'Port Closed'.
- TCP Port Open objects have the following Operator condition for evaluation:
- IS OPEN
- IS CLOSED
string variable
STRING VARIABLE objects evaluate conditions based on the value of the local %STRING% variable in use with Mini Mouse Macro.
Strings can be defined with the internal %STRING% name or any other custom name.
Using a string variable is a way to contain, evaluate, and work with static text strings within MMM. First, a string variable must be defined. This is done with:
1 | RUN ACTION | DEFINE STRING VARIABLE | %STRING%::StartMacro1
Here the string variable is defined as StartMacro1. More information on define a string variable is available under the ACTION section and the heading DEFINE STRING VARIABLE.
Consider the following STRING VARIABLE example statement below taken from a macro condition:
1 | IF | STRING VARIABLE | %STRING% | IS | StartMacro1 | DEFINE STRING VARIABLE | %STRING%::Macro1Process
This reads - IF the STRING VARIABLE %STRING% IS StartMacro1 then DEFINE STRING VARIABLE, %STRING%, to be the text Macro1Process. So if the current string variable (hard coded as %STRING%) matches exactly (evaluations are case sensitive) then change and define the variable to be Macro1Process.
Consider another example of the STRING VARIABLE condition:
1 | IF NOT | STRING VARIABLE | %STRING4% | CONTAINS | Macro1 | DEFINE INTEGER VARIABLE | %INTEGER1%::+5
This reads - IF NOT the STRING VARIABLE, %STRING4%, does CONTAIN the text Macro1 then DEFINE INTEGER VARIABLE, %integer1%, +5. So if the current string value of %STRING4% does not contain the text of Macro1 in succession anywhere in the string then add 5 to the integer variable %integer1% value (integer variables are covered in the section below).
Strings can also be defined with custom names. Here are some examples of custom string name declaration:
1 | RUN ACTION | DEFINE STRING VARIABLE | %NAME%::Kirstin
2 | RUN ACTION | DEFINE STRING VARIABLE | %GENDER%::Female
3 | RUN ACTION | DEFINE STRING VARIABLE | %AGE%::31
4 | RUN ACTION | DEFINE STRING VARIABLE | %CITY%::Townsville
5 | RUN ACTION | DEFINE STRING VARIABLE | %COUNTRY%::Australia
FOR loops add several internal Mini Mouse Macro string variables that can be used for evaluation. Examples for FOR loop variables can be found here under FOR. These are:
- %I%: The count for the current iteration of the FOR loop
- %LINE%: Used in FOR EACH LINE loops, this variable holds the current text line in a file
- %FILE%: The full file path and name of the current FOR EACH FILE loop file
- %FILE.NAME%: The file name of the current FOR EACH FILE loop file
- %FILE.EXT%: The file extension of the current FOR EACH FILE loop file. For example this may be .txt or .rtf
- %FILE.PATHROOT%: The root of the file path for the current FOR EACH FILE loop file
- %FILE.PATH%: The file path without the file name of the current FOR EACH FILE loop file
- %FILE.ACCESSTIME%: The last file access time of the current FOR EACH FILE loop file
- %FILE.WRITETIME%: The last file write time of the current FOR EACH FILE loop file
- %FILE.CREATIONTIME%: the file creation time of the current FOR EACH FILE loop file
COMPLEX STRING CONSTRUCTS
Variables can be used for each elements of the macro entry. This provides a greater level of control of macro entries during macro playback.
The following macro shows example of multi-element macro variable usage:
* | This simple macro moves the mouse X and Y pos incrementally 100 times.
1 | RUN ACTION | %STRING% | %INTEGER1%::0
2 | %INTEGER1% | %INTEGER1% | %INTEGER2% | %STRING1%
%STRING2%
%STRING3%
The variables have the following values defined in settings:
- %STRING%: DEFINE INTEGER VARIABLE
- %STRING1%: Mouse Movement
- %STRING2%: 3 | RUN ACTION | DEFINE INTEGER VARIABLE | %INTEGER1%::+1
- %STRING3%: 4 | IF | INTEGER VARIABLE | %INTEGER1% | < | 100 | GOTO MACRO LINE | 3 | ELSE | 4 | RUN ACTION | MESSAGE PROMPT | Mouse Moved 100 times::END
- %INTEGER1%: 0
- %INTEGER2%: 50
STRING OUTPUT
STRING VARIABLE contents can be further used in macro's with the %STRING% word. Consider the following example:
1 | 2409 | 790 | 200 | Keypress My string variable is equal to %string%
This reads - At X mouse position 2409 and Y mouse position 790 wait 200 milliseconds and they output words "My string variable is equal to %STRING%". So at that X and Y mouse position the value of the %STRING% variable will be typed with the text My string variable is equal to %string%.
Consider the following example of the %string3% variable used as output within ACTION statements:
1 | IF | FILE | D:\Macro\MMM_10.txt | EXIST | RUN VIA CMD /C | rename "D:\Macro\MMM_10.txt" "MMM_%string3%_%random_5-15%
This reads - IF the FILE D:\Macro\MMM_10.txt does EXIST then RUN VIA CMD /C the command: rename "D:\Macro\MMM_10.txt" "MMM_%string3%_%random_5-15%.txt". So if the file exists then rename the file to the value of the %STRING3% variable and also a random value between 5 and 15 using the %RANDOM_5-15% variable (Random variables are covered below in the next section).
1 | 2739 | 701 | 200 | Keypress My integer is %INTEGER%. A random is: %random_1-100000% and here is my string:%string%
This reads - At X mouse position 2739 and Y mouse position 701 wait 200 milliseconds and then output words "My integer is %INTEGER%. A random is: %random_1-100000% and here is my string:%string%. So at that X and Y mouse position the value of the %INTEGER%, a %RANDOM_1-100000% value, and the value of the %STRING% variable will be typed with the text A random is: %random_1-100000% and here is my string:%string%. (Random and integer variables are covered below in the next section).
- STRING VARIABLE objects have the following Operator conditions for evaluation:
- IS
- IS NOT
- CONTAINS
integer and decimal variable
INTEGER VARIABLE objects evaluate conditions based on the value of the local %INTEGER% variable in use with Mini Mouse Macro. Integers can be defined with the internal %INTEGER% name or any other custom name.
DECIMAL VARIABLE objects evaluate conditions based on the value of the local %DECIMAL% variable in use with Mini Mouse Macro. Decimals can be defined with the internal %DECIMAL% name or any other custom name.
Using a integer and decimal variables is a way to contain, evaluate, and work with static numbers within MMM. The default value of an undeclared integer and decimal variable here is 0, or it can be statically defined. This is done with:
1 | RUN ACTION | DEFINE INTEGER VARIABLE | %INTEGER%::100
2 | RUN ACTION | DEFINE DECIMAL VARIABLE | %DECIMAL%::1.1
Here the integer variable is defined as 100 and the decimal variable is defined as 1.1. More information on defining integer variables is available under the ACTION section and the heading DEFINE INTEGER VARIABLE and DEFINE DECIMAL VARIABLE.
Math evaluations are available for both INTEGER and DECIMAL variables. Consider the following INTEGER VARIABLE example statements below that show all the available OPERATOR evaluation of:
1 | IF | INTEGER VARIABLE | %INTEGER% | + | 2::=::%INTEGER1% | DELETE FILE | D:\Macro\%STRING%_%INTEGER1%.mmmacro
This reads - IF the INTEGER VARIABLE, %INTEGER%, + 2 does equal (=) the value of %INTEGER1% then DELETE the FILE located at D:\Marco\%STRING%_%INTEGER1%.mmmacro.
SUBTRACTION example (-)
1 | IF | INTEGER VARIABLE | %INTEGER% | - | %INTEGER1%::>=::%INTEGER1% | DEFINE INTEGER VARIABLE | %INTEGER%::*%INTEGER2%
This reads - IF the INTEGER VARIABLE, %INTEGER%, subtract (-) %INTEGER1% is greater or equal to (>=) the value of %INTEGER1% then DEFINE INTEGER VARIABLE, %INTEGER% to be the value of %INTEGER% multiple by (*) %INTEGER2%.
MULTIPLICATION example (*)
1 | IF | INTEGER VARIABLE | %INTEGER% | * | 2::<::100 | GOTO MACRO LINE | %RETURN%-5
This reads - IF the INTEGER VARIABLE, %INTEGER%, multiply by (*) 2 is less than (<) the value 100 then GOTO MACRO LINE number with the value of %RETURN%-5. More on the %RETURN% variable can found under the GOTO MACRO LINE section.
DIVISION example (/)
1 | IF | INTEGER VARIABLE | %INTEGER% | / | 5::!=::5 | DEFINE INTEGER VARIABLE | %INTEGER%::25
This reads - IF the INTEGER VARIABLE, %INTEGER%, divided by (/) 5 is not equal to (!=) the value 5 then DEFINE INTEGER VARIABLE, %INTEGER% to be the value of 25.
IS EVEN
1 | IF | INTEGER VARIABLE | %INTEGER% | IS EVEN | MOD 2 = 0 | DEFINE INTEGER VARIABLE | %INTEGER%::%INTEGER1%
This reads - IF the INTEGER VARIABLE %INTEGER% IS an EVEN number then DEFINE INTEGER VARIABLE to be the current value of the variable %INTEGER1%. So the current integer variable value is 2, this is a even number (MOD 2 = 0) and evaluates to true, so now define the value of %INTEGER% to be the value of the %INTEGER1% variable .
IS ODD
1 | IF | INTEGER VARIABLE | %INTEGER% | IS ODD | MOD 2 = 1 | DEFINE INTEGER VARIABLE | %INTEGER%::+1 | ELSE | 2 | IF | INTEGER VARIABLE | %INTEGER% | % | 2::=::0 | MESSAGE PROMPT | Value is EVEN::Even or Odd
This example is similar to the IS EVEN example above however it showcases an alternative via the ELSE statement using a MODULUS match function.
POWER OF example (^)
1 | IF | INTEGER VARIABLE | %INTEGER% | ^ | 3::<::100 | DEFINE INTEGER VARIABLE | %INTEGER%::+25
This reads - IF the INTEGER VARIABLE, %INTEGER%, to the power of (^) 3 is less than (<) the value 100 then DEFINE INTEGER VARIABLE, %INTEGER%to be the value of %INTEGER% + 25.
MODULUS example (%)
1 | IF | INTEGER VARIABLE | %INTEGER% | % | %INTEGER1%::=::%INTEGER2% | COPY TO CLIPBOARD | %INTEGER% | ELSE | 2 | RUN ACTION | DEFINE INTEGER VARIABLE | %INTEGER3%::%3
This reads - IF the INTEGER VARIABLE, %INTEGER%, mod (%) %INTEGER1% is equal to (=) the value %INTEGER2% then run the action to COPY TO CLIPBOARD the value of %INTEGER% or ELSE if the value is not equal to then DEFINE INTEGER VARIABLE, %INTEGER3% to be the value of %INTEGER3% % 3.
EQUAL example (=)
1 | IF | INTEGER VARIABLE | %INTEGER% | IS | 100 | DEFINE INTEGER VARIABLE | %INTEGER%::+150
-or-
1 | IF | INTEGER VARIABLE | %INTEGER% | = | 100 | DEFINE INTEGER VARIABLE | %INTEGER%::+150
This reads - IF the INTEGER VARIABLE %INTEGER4% IS 100 then DEFINE INTEGER VARIABLE, %INTEGER%, to be the current value + 150. So the current integer variable is 100, so this condition evaluates to true, so add 150, the value of %INTEGER% is now 350.
NOT EQUAL example (!=)
1 | IF | INTEGER VARIABLE | %INTEGER% | IS NOT | 100 | DEFINE INTEGER VARIABLE | %INTEGER%::-300
-or-
1 | IF | INTEGER VARIABLE | %INTEGER% | != | 100 | DEFINE INTEGER VARIABLE | %INTEGER%::-300
This reads - IF the INTEGER VARIABLE %INTEGER% IS NOT 100 then DEFINE INTEGER VARIABLE to be the current value - 300. So the current integer variable value is 350, and not 100 so this condition is true, now subtract that by 300. the value of %INTEGER% is now 50.
GREATER THAN example (>)
1 | IF | INTEGER VARIABLE | %INTEGER% | GREATER THAN | 10 | DEFINE INTEGER VARIABLE | %INTEGER%::*200
-or-
1 | IF | INTEGER VARIABLE | %INTEGER% | > | 10 | DEFINE INTEGER VARIABLE | %INTEGER%::*200
This reads - IF the INTEGER VARIABLE %INTEGER% IS GREATER THAN 10 then DEFINE INTEGER VARIABLE to be the current value * 200. So the current integer variable value is 50, this is greater than 10 - the condition is true, now multiply that by 200. the value of %INTEGER% is now 10000.
GREATER THAN EQUAL TO example (>=)
1 | IF | INTEGER VARIABLE | %INTEGER% | GREATER THAN EQUAL TO | 10000 | DEFINE INTEGER VARIABLE | %INTEGER%::/2
-or-
1 | IF | INTEGER VARIABLE | %INTEGER% | >= | 10000 | DEFINE INTEGER VARIABLE | %INTEGER%::/2
This reads - IF the INTEGER VARIABLE %INTEGER% IS GREATER THAN or EQUAL TO 10000 then DEFINE INTEGER VARIABLE to be the current value / 2. So the current integer variable value is 10000, this is equal to 10000 and evaluates to true, so now divide that by 2. the value of %INTEGER% is now 5000.
LESS THAN example (<)
1 | IF | INTEGER VARIABLE | %INTEGER% | LESS THAN | 10000 | DEFINE INTEGER VARIABLE | %INTEGER%::-99999
-or-
1 | IF | INTEGER VARIABLE | %INTEGER% | < | 10000 | DEFINE INTEGER VARIABLE | %INTEGER%::-99999
This reads - IF the INTEGER VARIABLE %INTEGER% IS LESS THAN 10000 then DEFINE INTEGER VARIABLE to be the current value - 99999. So the current integer variable value is 5000, this is less than to 10000 and evaluates to true, so now subtract that by 99999. the value of %INTEGER% is now -94999.
LESS THAN EQUAL TO example (<=)
1 | IF | INTEGER VARIABLE | %INTEGER% | LESS THAN EQUAL TO | 1 | RUN PROGRAM | c:\Batch\calculateresults.bat
-or-
1 | IF | INTEGER VARIABLE | %INTEGER% | <= | 1 | RUN PROGRAM | c:\Batch\calculateresults.bat
This reads - IF the INTEGER VARIABLE %INTEGER% IS LESS THAN or EQUAL TO 1 then RUN the PROGRAM located at C:\Batch\calcualteresults.bat. So the current integer variable value is -94999, this is less than to 1 and evaluates to true, so now run the program c:\Batch\calculateresults.bat
Note: That all mathematical statements are not separated by a space. So this is valid: +50 and this is not valid: + 50 (note the space after +)
DECIMAL VARIABLE objects evaluate conditions based on the value of the local %DECIMAL% variable in use with Mini Mouse Macro. Decimals can be defined with the internal %DECIMAL% name or any other custom name.
Using a integer and decimal variables is a way to contain, evaluate, and work with static numbers within MMM. The default value of an undeclared integer and decimal variable here is 0, or it can be statically defined. This is done with:
1 | RUN ACTION | DEFINE INTEGER VARIABLE | %INTEGER%::100
2 | RUN ACTION | DEFINE DECIMAL VARIABLE | %DECIMAL%::1.1
Here the integer variable is defined as 100 and the decimal variable is defined as 1.1. More information on defining integer variables is available under the ACTION section and the heading DEFINE INTEGER VARIABLE and DEFINE DECIMAL VARIABLE.
Math evaluations are available for both INTEGER and DECIMAL variables. Consider the following INTEGER VARIABLE example statements below that show all the available OPERATOR evaluation of:
- Addition (+)
- Subtraction (-)
- Multiplication (*)
- Division (/)
- Is even
- Is odd
- Power of (^)
- Modulus (%)
- Equal to (=)
- Not equal to (!=)
- Greater than (>)
- Greater than equal to (>=)
- Less than (<)
- Less than equal to (<=)
1 | IF | INTEGER VARIABLE | %INTEGER% | + | 2::=::%INTEGER1% | DELETE FILE | D:\Macro\%STRING%_%INTEGER1%.mmmacro
This reads - IF the INTEGER VARIABLE, %INTEGER%, + 2 does equal (=) the value of %INTEGER1% then DELETE the FILE located at D:\Marco\%STRING%_%INTEGER1%.mmmacro.
SUBTRACTION example (-)
1 | IF | INTEGER VARIABLE | %INTEGER% | - | %INTEGER1%::>=::%INTEGER1% | DEFINE INTEGER VARIABLE | %INTEGER%::*%INTEGER2%
This reads - IF the INTEGER VARIABLE, %INTEGER%, subtract (-) %INTEGER1% is greater or equal to (>=) the value of %INTEGER1% then DEFINE INTEGER VARIABLE, %INTEGER% to be the value of %INTEGER% multiple by (*) %INTEGER2%.
MULTIPLICATION example (*)
1 | IF | INTEGER VARIABLE | %INTEGER% | * | 2::<::100 | GOTO MACRO LINE | %RETURN%-5
This reads - IF the INTEGER VARIABLE, %INTEGER%, multiply by (*) 2 is less than (<) the value 100 then GOTO MACRO LINE number with the value of %RETURN%-5. More on the %RETURN% variable can found under the GOTO MACRO LINE section.
DIVISION example (/)
1 | IF | INTEGER VARIABLE | %INTEGER% | / | 5::!=::5 | DEFINE INTEGER VARIABLE | %INTEGER%::25
This reads - IF the INTEGER VARIABLE, %INTEGER%, divided by (/) 5 is not equal to (!=) the value 5 then DEFINE INTEGER VARIABLE, %INTEGER% to be the value of 25.
IS EVEN
1 | IF | INTEGER VARIABLE | %INTEGER% | IS EVEN | MOD 2 = 0 | DEFINE INTEGER VARIABLE | %INTEGER%::%INTEGER1%
This reads - IF the INTEGER VARIABLE %INTEGER% IS an EVEN number then DEFINE INTEGER VARIABLE to be the current value of the variable %INTEGER1%. So the current integer variable value is 2, this is a even number (MOD 2 = 0) and evaluates to true, so now define the value of %INTEGER% to be the value of the %INTEGER1% variable .
IS ODD
1 | IF | INTEGER VARIABLE | %INTEGER% | IS ODD | MOD 2 = 1 | DEFINE INTEGER VARIABLE | %INTEGER%::+1 | ELSE | 2 | IF | INTEGER VARIABLE | %INTEGER% | % | 2::=::0 | MESSAGE PROMPT | Value is EVEN::Even or Odd
This example is similar to the IS EVEN example above however it showcases an alternative via the ELSE statement using a MODULUS match function.
POWER OF example (^)
1 | IF | INTEGER VARIABLE | %INTEGER% | ^ | 3::<::100 | DEFINE INTEGER VARIABLE | %INTEGER%::+25
This reads - IF the INTEGER VARIABLE, %INTEGER%, to the power of (^) 3 is less than (<) the value 100 then DEFINE INTEGER VARIABLE, %INTEGER%to be the value of %INTEGER% + 25.
MODULUS example (%)
1 | IF | INTEGER VARIABLE | %INTEGER% | % | %INTEGER1%::=::%INTEGER2% | COPY TO CLIPBOARD | %INTEGER% | ELSE | 2 | RUN ACTION | DEFINE INTEGER VARIABLE | %INTEGER3%::%3
This reads - IF the INTEGER VARIABLE, %INTEGER%, mod (%) %INTEGER1% is equal to (=) the value %INTEGER2% then run the action to COPY TO CLIPBOARD the value of %INTEGER% or ELSE if the value is not equal to then DEFINE INTEGER VARIABLE, %INTEGER3% to be the value of %INTEGER3% % 3.
EQUAL example (=)
1 | IF | INTEGER VARIABLE | %INTEGER% | IS | 100 | DEFINE INTEGER VARIABLE | %INTEGER%::+150
-or-
1 | IF | INTEGER VARIABLE | %INTEGER% | = | 100 | DEFINE INTEGER VARIABLE | %INTEGER%::+150
This reads - IF the INTEGER VARIABLE %INTEGER4% IS 100 then DEFINE INTEGER VARIABLE, %INTEGER%, to be the current value + 150. So the current integer variable is 100, so this condition evaluates to true, so add 150, the value of %INTEGER% is now 350.
NOT EQUAL example (!=)
1 | IF | INTEGER VARIABLE | %INTEGER% | IS NOT | 100 | DEFINE INTEGER VARIABLE | %INTEGER%::-300
-or-
1 | IF | INTEGER VARIABLE | %INTEGER% | != | 100 | DEFINE INTEGER VARIABLE | %INTEGER%::-300
This reads - IF the INTEGER VARIABLE %INTEGER% IS NOT 100 then DEFINE INTEGER VARIABLE to be the current value - 300. So the current integer variable value is 350, and not 100 so this condition is true, now subtract that by 300. the value of %INTEGER% is now 50.
GREATER THAN example (>)
1 | IF | INTEGER VARIABLE | %INTEGER% | GREATER THAN | 10 | DEFINE INTEGER VARIABLE | %INTEGER%::*200
-or-
1 | IF | INTEGER VARIABLE | %INTEGER% | > | 10 | DEFINE INTEGER VARIABLE | %INTEGER%::*200
This reads - IF the INTEGER VARIABLE %INTEGER% IS GREATER THAN 10 then DEFINE INTEGER VARIABLE to be the current value * 200. So the current integer variable value is 50, this is greater than 10 - the condition is true, now multiply that by 200. the value of %INTEGER% is now 10000.
GREATER THAN EQUAL TO example (>=)
1 | IF | INTEGER VARIABLE | %INTEGER% | GREATER THAN EQUAL TO | 10000 | DEFINE INTEGER VARIABLE | %INTEGER%::/2
-or-
1 | IF | INTEGER VARIABLE | %INTEGER% | >= | 10000 | DEFINE INTEGER VARIABLE | %INTEGER%::/2
This reads - IF the INTEGER VARIABLE %INTEGER% IS GREATER THAN or EQUAL TO 10000 then DEFINE INTEGER VARIABLE to be the current value / 2. So the current integer variable value is 10000, this is equal to 10000 and evaluates to true, so now divide that by 2. the value of %INTEGER% is now 5000.
LESS THAN example (<)
1 | IF | INTEGER VARIABLE | %INTEGER% | LESS THAN | 10000 | DEFINE INTEGER VARIABLE | %INTEGER%::-99999
-or-
1 | IF | INTEGER VARIABLE | %INTEGER% | < | 10000 | DEFINE INTEGER VARIABLE | %INTEGER%::-99999
This reads - IF the INTEGER VARIABLE %INTEGER% IS LESS THAN 10000 then DEFINE INTEGER VARIABLE to be the current value - 99999. So the current integer variable value is 5000, this is less than to 10000 and evaluates to true, so now subtract that by 99999. the value of %INTEGER% is now -94999.
LESS THAN EQUAL TO example (<=)
1 | IF | INTEGER VARIABLE | %INTEGER% | LESS THAN EQUAL TO | 1 | RUN PROGRAM | c:\Batch\calculateresults.bat
-or-
1 | IF | INTEGER VARIABLE | %INTEGER% | <= | 1 | RUN PROGRAM | c:\Batch\calculateresults.bat
This reads - IF the INTEGER VARIABLE %INTEGER% IS LESS THAN or EQUAL TO 1 then RUN the PROGRAM located at C:\Batch\calcualteresults.bat. So the current integer variable value is -94999, this is less than to 1 and evaluates to true, so now run the program c:\Batch\calculateresults.bat
Note: That all mathematical statements are not separated by a space. So this is valid: +50 and this is not valid: + 50 (note the space after +)
WORKING WITH RANDOM NUMBERS
INTEGER VARIABLES can also be used with random numbers. These are defined using the %RANDOM% variables. Random variables can be any one single random number with %RANDOM% or a custom random number with %RANDOM_1-25%.
Custom random numbers can be between any two numbers for example:
%RANDOM% - an unrestricted random number between 1 and 2147483647
%RANDOM_1-33% - a random number between 1 and 33
%RANDOM_50-55% - a random number between 50 and 55
%RANDOM_1111-1234% - a random number between 1111 and 1234
%RANDOM_50000-100000% - a random number between 50000 and 100000
This reads - RUN ACTION DEFINE the INTEGER VARIABLE of %INTEGER1% to be %RANDOM%. So this will define the current value of %INTEGER1% to be a random number.
This reads IF the INTEGER VARIABLE of %INTEGER1% is < (less than) 10 then DEFINE INTEGER VARIABLE of %INTEGER2% to be the current value + %RANDOM_1-10% (a random value of between 1 and 10). So if the current value of %INTEGER1% is less than to then 10, add a random number between 1 and 10 to the %INTEGER2% variable.
This reads - At X mouse position 2409 and Y mouse position 790 wait 200 milliseconds and they output the keypress %RANDOM_99-199%. So at that X and Y the value of the %RANDOM_99-199% variable will be typed. This will be a random number value between 99 and 199.
This reads - RUN the ACTION being to WAIT SECONDS %random_30-60%. So this will wait a random amount of seconds between 30 and 60 before continuing the macro.
This reads - RUN the ACTION to DEFINE STRING VARIABLE to %random_1-10000%. So the value of %STRING% will now be defined to a random value between 1 and 10000.
This reads - IF the FOLDER D:\Macro does EXIST then RUN VIA CMD /K the command rename D:\macro Folder-%random_1-50%. So if that folder does exist then rename it to Folder-(random number between 1 and 50). For example it may be renamed to 'Folder-32'.
INTEGER VARIABLES can also be used with random numbers. These are defined using the %RANDOM% variables. Random variables can be any one single random number with %RANDOM% or a custom random number with %RANDOM_1-25%.
Custom random numbers can be between any two numbers for example:
%RANDOM% - an unrestricted random number between 1 and 2147483647
%RANDOM_1-33% - a random number between 1 and 33
%RANDOM_50-55% - a random number between 50 and 55
%RANDOM_1111-1234% - a random number between 1111 and 1234
%RANDOM_50000-100000% - a random number between 50000 and 100000
- %RANDOM%
This reads - RUN ACTION DEFINE the INTEGER VARIABLE of %INTEGER1% to be %RANDOM%. So this will define the current value of %INTEGER1% to be a random number.
- %RANDOM_1-10%
This reads IF the INTEGER VARIABLE of %INTEGER1% is < (less than) 10 then DEFINE INTEGER VARIABLE of %INTEGER2% to be the current value + %RANDOM_1-10% (a random value of between 1 and 10). So if the current value of %INTEGER1% is less than to then 10, add a random number between 1 and 10 to the %INTEGER2% variable.
- %RANDOM_99-199%
This reads - At X mouse position 2409 and Y mouse position 790 wait 200 milliseconds and they output the keypress %RANDOM_99-199%. So at that X and Y the value of the %RANDOM_99-199% variable will be typed. This will be a random number value between 99 and 199.
- %RANDOM_30-60%
This reads - RUN the ACTION being to WAIT SECONDS %random_30-60%. So this will wait a random amount of seconds between 30 and 60 before continuing the macro.
- %RANDOM_1-10000%
This reads - RUN the ACTION to DEFINE STRING VARIABLE to %random_1-10000%. So the value of %STRING% will now be defined to a random value between 1 and 10000.
- %RANDOM_1-50%
This reads - IF the FOLDER D:\Macro does EXIST then RUN VIA CMD /K the command rename D:\macro Folder-%random_1-50%. So if that folder does exist then rename it to Folder-(random number between 1 and 50). For example it may be renamed to 'Folder-32'.
INTEGER OUTPUT
INTEGER VARIABLE contents can be further used in macro's with the %INTEGER% word. Consider the following example:
1 | 2409 | 790 | 200 | Keypress %integer%
This reads - At X mouse position 2409 and Y mouse position 790 wait 200 milliseconds and they output the keypress %INTEGER%. So at that X and Y the value of the %INTEGER% variable will be typed.
1 | 2739 | 701 | 200 | Keypress My integer is %INTEGER1%. A random is: %random_1-100000% and here is my string:%string%
This reads - At X mouse position 2739 and Y mouse position 701 wait 200 milliseconds and they output words "My integer is %INTEGER1%. A random is: %random_1-100000% and here is my string:%string%. So at that X and Y mouse position the value of the %INTEGER%, a %RANDOM_1-100000% value, and the value of the %STRING% variable will be typed with the text A random is: %random_1-100000% and here is my string:%string%
- INTEGER VARIABLE objects have the following Operator conditions for evaluation:
- IS
- IS NOT
- GREATER THAN
- GREATER THAN EQUAL TO
- LESS THAN
- LESS THAN EQUAL TO
boolean variable
BOOLEAN VARIABLE objects evaluate conditions based on the value of the local %BOOLEAN% variable in use with Mini Mouse Macro. A Boolean can be defined using the internal %BOOLEAN% name or any other custom name.
Boolean's can be one of two states:
10 | IF | BOOLEAN VARIABLE | %BOOLEAN% | IS TRUE | GOTO MACRO LINE | Down | ELSE | 10 | RUN ACTION | GOTO MACRO LINE | Up 5
This reads IF the BOOLEAN VARIABLE %BOOLEAN% is TRUE then GOTO MACRO LINE Down 1 line ELSE if %BOOLEAN% is not true then GOTO MACRO LINE Up 5 from this line.
1 | RUN ACTION | INPUT BOX | Would you like to start (Y/N)::Start::PROMPT_YES_NO::BOOLEAN
2 | IF | BOOLEAN VARIABLE | %BOOLEAN% | IS FALSE | MESSAGE PROMPT | Ok - Macro is cancelled ::Macro Stopped::1
3 | IF | BOOLEAN VARIABLE | %BOOLEAN% | IS FALSE | STOP
The macro above makes use of INPUT BOX to declare %BOOLEAN% to YES (evaluating to TRUE) or NO (evaluating to FALSE). Line 2 if is FALSE run the MESSAGE PROMPT. At Line 3 if %BOOLEAN% is FALSE then STOP the macro.
Boolean's can be one of two states:
- True or False
- On of Off (On = True)
- 1 or 0 (1 = True)
- Yes of No (Yes = True)
10 | IF | BOOLEAN VARIABLE | %BOOLEAN% | IS TRUE | GOTO MACRO LINE | Down | ELSE | 10 | RUN ACTION | GOTO MACRO LINE | Up 5
This reads IF the BOOLEAN VARIABLE %BOOLEAN% is TRUE then GOTO MACRO LINE Down 1 line ELSE if %BOOLEAN% is not true then GOTO MACRO LINE Up 5 from this line.
1 | RUN ACTION | INPUT BOX | Would you like to start (Y/N)::Start::PROMPT_YES_NO::BOOLEAN
2 | IF | BOOLEAN VARIABLE | %BOOLEAN% | IS FALSE | MESSAGE PROMPT | Ok - Macro is cancelled ::Macro Stopped::1
3 | IF | BOOLEAN VARIABLE | %BOOLEAN% | IS FALSE | STOP
The macro above makes use of INPUT BOX to declare %BOOLEAN% to YES (evaluating to TRUE) or NO (evaluating to FALSE). Line 2 if is FALSE run the MESSAGE PROMPT. At Line 3 if %BOOLEAN% is FALSE then STOP the macro.
- BOOLEAN VARIABLE objects have the following Operator conditions for evaluation:
- IS TRUE
- IS FALSE
PIXEL VARIABLE
The Pixel Variable condition evaluates the difference between two defined PIXEL RANGE VARIABLES.
This is useful to detect pixel range changes on screen.
A pixel range variable is defined using the DEFINE PIXEL RANGE VARIABLE action:
1 | RUN ACTION | DEFINE PIXEL RANGE VARIABLE | %PIXEL_RANGE%::At Location [X:22 Y:122 W:34 H:43]
When a pixel range is declared it holds the current bitmap image within an internal pixel range bitmap array. As well as the bitmap image, a Pixel Range variable has the following variable properties which can be used within the macro:
%PIXEL_RANGE%: 0 The internal pixel range array index number of the variable
%PIXEL_RANGE.XPOS%: 22 The starting mouse X pos
%PIXEL_RANGE.YPOS%: 122 The starting mouse Y pos
%PIXEL_RANGE.WIDTH%: 34 The width of the pixel range bitmap
%PIXEL_RANGE.HEIGHT%: 43 The height of the pixel range bitmap
%PIXEL_RANGE.TIME%: 6:49:02 AM The time that the pixel range was declared
%PIXEL_RANGE.DATE%: 7/17/2021 The date that the pixel range was declared
Consider the following example:
1 | IF | PIXEL VARIABLE | %BANNER_ORIGINAL% | MATCHES | %BANNER_NEW% | CONTINUE
In the example abovewe have two declared pixel range bitmaps previously declared with DEFINE PIXEL RANGE VARIABLE action. It reads, if the pixel range bitmap image within %BANNER_ORIGINAL% matches with the pixel range bitmap within the %BANNER_NEW% pixel variable then continue the macro. If they don't match then the macro will wait until they do before continuing.
- PIXEL VARIABLES have the following Operator conditions for evaluation:
- MATCHES
DETECT IMAGE
DETECT IMAGE evaluates if an image bitmap from file is detected on the screen and optionally move the mouse to the location.
DETECT IMAGE optionally can store the result of the capture location to variables for later use.
Detect Image is best declared as an Action from the 'Add Condition' tool.
The Detect Image action operates the same as the MOUSE TO IMAGE action. The DETECT IMAGE condition can offer a follow on action and better suited over MOUSE TO IMAGE when it is unknown if the image will be found on the screen.
The example below will will try to detect the image header.bmp on the screen. When the image is not found on the screen the CONTINUE action will run.
1 | IF | DETECT IMAGE | image path C:\images\header.bmp::match quick::move mouse no | IMAGE NOT FOUND | CONTINUE
The example below will try to detect the image banner.bmp on the screen. If it is found it will not move the mouse to that location and it will save the mouse X and Y pos values to variables %X% and %Y% and then carry out the MOUSE CLICK action. The MOUSE CLICK action will perform a 'Left Click' at the declared image X and Y value.
1 | IF | DETECT IMAGE | image path C:\File\banner.bmp::match quick::move mouse no::save to vars X Y | IMAGE FOUND | MOUSE CLICK | Left click at %X% %Y%
DETECT IMAGE accepts multiple options:
- Match Quick - Match quick performs a partiall pixel match
- Match Full - Match full matches 100% of the pixels within the range
- Full Screen - Find the image anywhere on the display
- At Location - Find the image from a region within the display
- Mouse Mouse Yes - Move the mouse to the center of the image when detected
- Mouse Move No - Do not move the mouse, instead save the value of the found image to X and Y variable coords for later use
- Offset - When moving the mouse to the image, off set the X and Y coords by a + or - pixel variation
- Comment - An optional line comment
clipboard
The CLIPBOARD object evaluates a condition based on the current value of the system clipboard during evaluation. This value, when referenced, is stored within the %CLIPBOARD% variable. When a file (or files) are within the system CLIPBOARD then the file path, or file paths, are stored within the %CLIPBOARD_LISTFILES% variable.
If a file (or files) are copied to system CLIPBOARD then the %CLIPBOARD% variable will contain a text representation of the copied file or files. For example, if a text file is copied to the system CLIPBOARD then the contents of that text file are stored dynamically within the variable.
Similarly, if a file (or files) are copied to the system CLIPBOARD then the %CLIPBOARD_LISTFILES% variable will contain a list of the file paths that are copied.
Consider the CLIPBOARD TEXT IS example statement below taken from a macro condition:
1 | IF | CLIPBOARD | VALUE | TEXT IS | %INTEGER% | DEFINE INTEGER VARIABLE | %INTEGER%::+1 | ELSE | 2 | RUN ACTION | COPY TO CLIPBOARD | %INTEGER%
This reads - IF the current CLIPBOARD value TEXT IS the value of the %INTEGER% variable then run the action to DEFINE INTEGER VARIABLE, being %INTEGER%, +1. ELSE if the clipboard text value is not the same as the value of %INTEGER% then RUN ACTION to COPY TO CLIPBOARD the value of the %INTEGER% variable.
Note: TEXT IS and TEXT CONTAINS values are case sensitive (Text is not the same as TEXT).
Consider the CLIPBOARD TEXT CONTAINS example statement below taken from a macro condition:
1 | IF | CLIPBOARD | VALUE | TEXT CONTAINS | MZ | DEFINE STRING VARIABLE | %STRING%::%CLIPBOARD_LISTFILES%
This reads - IF the current CLIPBOARD value TEXT CONTAINS the text MZ then run the action to DEFINE STRING VARIABLE, being %STRING%, the current value of the %CLIPBOARD_LISTFILES% variable. The current value of the %CLIPBOARD_LISTFILES% variable would be the currently selected file path. If the value is not MZ then skip this condition.
Consider the CLIPBOARD FILE PATH IS example statement below taken from a macro condition:
1 | IF | CLIPBOARD | VALUE | FILE PATH IS | d:\macro\fish.txt | DELETE FILE | D:\Macro\fish.txt
This reads - IF the current CLIPBOARD value FILE PATH IS the value of D:\Marco\fish.txt then run the action to DELETE the FILE, being D:\Macro\fish.txt. If the current CLIPBOARD file path value is not D:\Marco\fish.txt then skip this condition.
Consider the CLIPBOARD CONTAINS A SINGE FILE example statement below taken from a macro condition:
1 | IF | CLIPBOARD | VALUE | CONTAINS A SINGLE FILE | 1 | CONTINUE
This reads - IF the current CLIPBOARD value CONTAINS A SINGLE FILE then CONTINUE. If the current CLIPBOARD value does not contains a single file, then keep looping this condition and only continue when it does contain a single file.
- CLIPBOARD objects have the following Operator conditions for evaluation:
- TEXT IS
- TEXT CONTAINS
- FILE PATH IS
- FILE PATH CONTAINS
- CONTAINS A SINGLE FILE
pixel color
The PIXEL COLOR object evaluates a condition based on the color of a single pixel at a specific mouse position during evaluation.
Consider the PIXEL example statement below taken from a macro condition:
1 | IF | PIXEL COLOR | Color [R=145, G=228, B=247]::At Location [X:942 Y:536] | IS THE SAME | WAIT MINUTES | 5
This reads - IF the PIXEL COLOR, Color [R=145, G=228, B=247], at the mouse location of X:942 Y:536 matches the color (IS THE SAME R, G, B value) then run the action to WAIT 5 MINUTES.
Consider the PIXEL example statement below taken from a macro condition:
1 | IF | PIXEL COLOR | Color [R=145, G=228, B=247]::At Location [X:942 Y:536] | IS NOT THE SAME | CONTINUE
This reads - IF the PIXEL COLOR, Color [R=145, G=228, B=247], at the mouse location of X:942 Y:536 does not match the color (IS NOT THE SAME R, G, B value) then run the action CONTINUE. The macro will only continue to the next line when the pixel color does change.
Pixel Color can also evaluate is a RGB value is less (<) or greater than (>) the RGB pixel its comparing against. Consider this example below where we do just that:
1 | IF | PIXEL COLOR | Color [R<255, G<255, B<255]::At Location [X:400 Y:300] | IS THE SAME | MESSAGE PROMPT | The pixel is less than 255 at the location::Pixel Check::0::Information
2 | IF | PIXEL COLOR | Color [R>100, G=50, B<200]::At Location [X:500 Y:400] | IS NOT THE SAME | MESSAGE PROMPT | R LESS 100, G EQL 50, B GTR 200::Pixel Check::0::Information
Consider the PIXEL example statement below taken from a macro condition:
1 | IF | PIXEL COLOR | At Location [X:784 Y:602] | CHANGES::2::30::200 | MESSAGE PROMPT | Pixel changed 2 times in 30 seconds::Pixel Change::0
This reads - IF the PIXEL COLOR at mouse location X:784 and Y:602 CHANGES 2 times within 30 seconds, with a 200 milliseconds delay between changes, then run a MESSAGE PROMPT.
CHANGES can take three values (CHANGES::1::2::3):
Consider the PIXEL example statement below taken from a macro condition:
1 | IF | PIXEL COLOR | Color [R=145, G=228, B=247]::At Location [X:942 Y:536] | IS THE SAME | WAIT MINUTES | 5
This reads - IF the PIXEL COLOR, Color [R=145, G=228, B=247], at the mouse location of X:942 Y:536 matches the color (IS THE SAME R, G, B value) then run the action to WAIT 5 MINUTES.
Consider the PIXEL example statement below taken from a macro condition:
1 | IF | PIXEL COLOR | Color [R=145, G=228, B=247]::At Location [X:942 Y:536] | IS NOT THE SAME | CONTINUE
This reads - IF the PIXEL COLOR, Color [R=145, G=228, B=247], at the mouse location of X:942 Y:536 does not match the color (IS NOT THE SAME R, G, B value) then run the action CONTINUE. The macro will only continue to the next line when the pixel color does change.
Pixel Color can also evaluate is a RGB value is less (<) or greater than (>) the RGB pixel its comparing against. Consider this example below where we do just that:
1 | IF | PIXEL COLOR | Color [R<255, G<255, B<255]::At Location [X:400 Y:300] | IS THE SAME | MESSAGE PROMPT | The pixel is less than 255 at the location::Pixel Check::0::Information
2 | IF | PIXEL COLOR | Color [R>100, G=50, B<200]::At Location [X:500 Y:400] | IS NOT THE SAME | MESSAGE PROMPT | R LESS 100, G EQL 50, B GTR 200::Pixel Check::0::Information
Consider the PIXEL example statement below taken from a macro condition:
1 | IF | PIXEL COLOR | At Location [X:784 Y:602] | CHANGES::2::30::200 | MESSAGE PROMPT | Pixel changed 2 times in 30 seconds::Pixel Change::0
This reads - IF the PIXEL COLOR at mouse location X:784 and Y:602 CHANGES 2 times within 30 seconds, with a 200 milliseconds delay between changes, then run a MESSAGE PROMPT.
CHANGES can take three values (CHANGES::1::2::3):
- The amount of changes to detect.
- A timeout value in seconds - The total time to wait for the changes. If the time expires the statement will evaluate to FALSE and continue. A value of 0 will wait until all changes have occurred.
- A change delay value in milliseconds - The delay value forces a delay between detecting pixel changes. This is useful to control sensitivity of pixel changes. A value of 0 will skip a delay.
- Pixel Color objects have the following Operator conditions for evaluation:
- IS THE SAME
- IS NOT THE SAME
- CHANGES
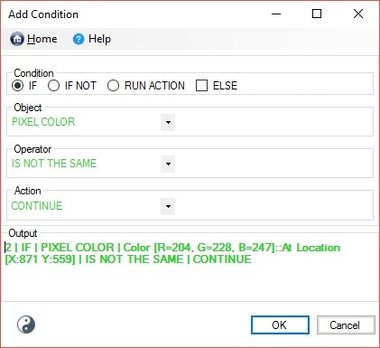
|
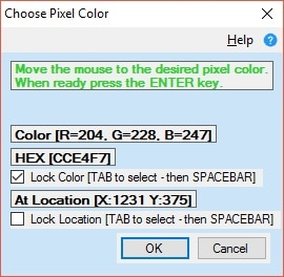
Choose the Pixel Color after selecting the PIXEL COLOR object. Move the mouse to the desired color or manually enter the color by clicking the text.
|
pixel range
The PIXEL RANGE object evaluates a condition based on changes in a range of pixels during evaluation.
Consider this CHANGES example statement below taken from a PIXEL RANGE condition:
1 | IF | PIXEL RANGE | At Location [X:2768 Y:602]::Size [W:68 H:62] | CHANGES::1::0::0 | GOTO MACRO LINE | 10
This reads - IF the PIXEL RANGE at mouse location X 2768 and Y 602, of size width 68 pixels and height 62 pixels, changes 1 times, with 0 timeout value, and with a 0 milliseconds delay time, then GOTO MACRO LINE 10.
Consider this CHANGES example statement below taken from a PIXEL RANGE condition:
1 | IF | PIXEL RANGE | At Location [X:2768 Y:602]::Size [W:100 H:50] | CHANGES::5::0::200 | CONTINUE
This reads - IF the PIXEL RANGE at mouse location X 2768 and Y 602, of size width 100 pixels and height 50 pixels, changes 5 times, with 0 timeout value, and with a 200 milliseconds delay time between the changes, then CONTINUE to macro. The macro will only continue until the condition successfully detects 5 changes.
CHANGES can take three values (CHANGES::1::2::3):
Consider this CHANGES example statement below taken from a PIXEL RANGE condition:
1 | IF | PIXEL RANGE | At Location [X:2768 Y:602]::Size [W:68 H:62] | CHANGES::1::0::0 | GOTO MACRO LINE | 10
This reads - IF the PIXEL RANGE at mouse location X 2768 and Y 602, of size width 68 pixels and height 62 pixels, changes 1 times, with 0 timeout value, and with a 0 milliseconds delay time, then GOTO MACRO LINE 10.
Consider this CHANGES example statement below taken from a PIXEL RANGE condition:
1 | IF | PIXEL RANGE | At Location [X:2768 Y:602]::Size [W:100 H:50] | CHANGES::5::0::200 | CONTINUE
This reads - IF the PIXEL RANGE at mouse location X 2768 and Y 602, of size width 100 pixels and height 50 pixels, changes 5 times, with 0 timeout value, and with a 200 milliseconds delay time between the changes, then CONTINUE to macro. The macro will only continue until the condition successfully detects 5 changes.
CHANGES can take three values (CHANGES::1::2::3):
- The amount of changes to detect.
- A timeout value in seconds - The total time to wait for the changes. If the time expires the statement will evaluate to FALSE and continue. A value of 0 will wait until all changes have occurred.
- A change delay value in milliseconds - The delay value forces a delay between detecting pixel changes. This is useful to control sensitivity of pixel changes. A value of 0 will skip a delay.
- Pixel Range objects have the following Operator conditions for evaluation:
|
|
|
Pixel Range Selection
- Move the mouse to the location of the start of the pixel range selection. The mouse position indicates the top left most pixel.
- Use TAB controls to enter the Width and Height text boxes manually or use the UP/DOWN keyboard arrows to adjust the Width and Height.
- Mouse over or click the 'Size Grow +' label to change the increment direction or use the Left/Right keyboard arrows.
- Use TAB controls to enter the 'Lock Range' checkbox and press SPACEBAR to lock in the pixel range.
- When the pixel range selection is captured press ENTER or select the OK button.
window title
The WINDOW TITLE object evaluates a condition based on the presence of a window title name. The Window Title condition is useful to check if a program window is open.
Consider the WINDOW TITLE example statement below taken from a macro condition:
1 | IF | WINDOW TITLE | index.txt - Notepad | EXIST | SELECT WINDOW BY NAME | index.txt - Notepad | ELSE | 1 | RUN ACTION | RUN PROGRAM | D:\Macro\index.txt
This reads - IF a WINDOW with the TITLE named index.txt - Notepad does EXIST (meaning that a window is open that does have that title name) then SELECT the WINDOW BY its NAME. index.txt - Notepad. If the window title named index.txt does not exist, ELSE, then RUN the ACTION to RUN the PROGRAM at D:\Macro\index.txt opening the file.
- WINDOW TITLE objects have the following Operator conditions for evaluation:
- EXIST - A program window is open that has the chosen window title
- NOT EXIST - A program window is not open with the chosen window title
idle
The IDLE object evaluates a condition based on the computer idle status.
Mini Mouse Macro measures the IDLE state by detecting human interation with the computer during a selected time value; human interaction being mouse movements and clicks, and keyboard entries.
The IDLE value can take several parameters:
1 | IF | IDLE | 10 | IS TRUE | MESSAGE PROMPT | IDLE detected (10 sec)::idle::0
2 | IF | IDLE | 20::NOMOUSE | IS TRUE | MESSAGE PROMPT | IDLE Detected (20 sec) (mouse ignored)::idle::0
3 | IF | IDLE | %INTEGER% | IS FALSE | MESSAGE PROMPT | IDLE NOT Detected::idle::0
Mini Mouse Macro measures the IDLE state by detecting human interation with the computer during a selected time value; human interaction being mouse movements and clicks, and keyboard entries.
The IDLE value can take several parameters:
- TIME: X second time period to monitor for the idle status
- NOMOUSE: Optional - Removes mouse movement as a state check
- NOKEYS: Optional - Removes keyboard and mouse clicks as a state check
- PROCESSES: Optional - Adds the process count check. If the count of process changes during the TIME value IDLE returns false. Note that process count can be a volitile measurement and change frequently.
1 | IF | IDLE | 10 | IS TRUE | MESSAGE PROMPT | IDLE detected (10 sec)::idle::0
2 | IF | IDLE | 20::NOMOUSE | IS TRUE | MESSAGE PROMPT | IDLE Detected (20 sec) (mouse ignored)::idle::0
3 | IF | IDLE | %INTEGER% | IS FALSE | MESSAGE PROMPT | IDLE NOT Detected::idle::0
- IDLE objects have the following Operator conditions for evaluation:
- IS TRUE - The computer is IDLE. All state checks selected have passed.
- IS FALSE - The computer is NOT IDLE. One or more state checks have failed.
OCR
The OCR (Optical Character Recognition) condition allows evaluation and detection of text within saved images and/or areas of the desktop screen.
OCR features within Mini Mouse Macro must be enabled through the 'Plugin' tool. The plugin will download the require OCR companion files from https://minimousemacro.com.
OCR features within Mini Mouse Macro must be enabled through the 'Plugin' tool. The plugin will download the require OCR companion files from https://minimousemacro.com.
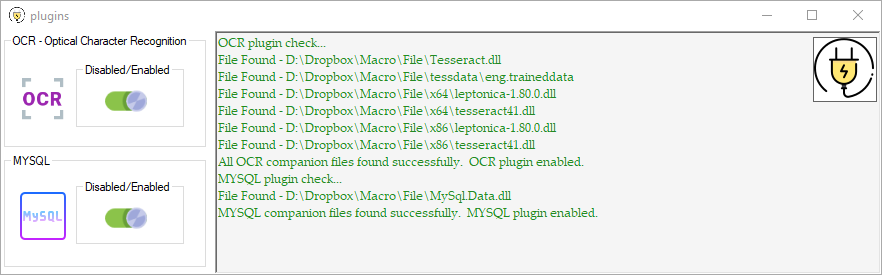
The OCR condition can evaluate text from a single image, a folder of images, of from an image path.
- From Image : The path to the image to process
- From Folder of Images : The path to the folder of images to process
- At Location : A location of the desktop screen to capture text from
- Language : The language dictionary used to reference detected charactors. Additional language dictionaries must be downloaded and added to the tessdata directory. See 'plugins' for more information.
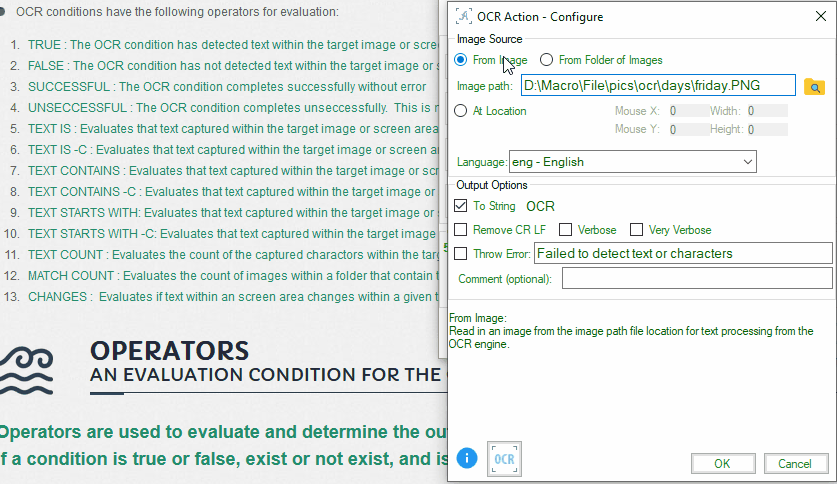
The OCR condition can take optional output parameters.
1 | IF | OCR | from image D:\File\pics\ocr\days\monday.png::to string OCR | TEXT IS | Monday | MESSAGE PROMPT | The text is Monday
The example above reads the text from a monday.png image file and if the text is "Monday" then throws a MESSAGE PROMPT "The text is Monday".
1 | IF | OCR | At location [X:701 Y:291 W:100 H:100]::to string OCR | CHANGES::amount 2::timeout 5::delay 1 | MESSAGE PROMPT | CHANGE DETECTED: %OCR%
The example above we scan a location of the screen, capture the text, and detect if any changes occur to the text in that region. IF we have 2 changes over 5 seconds with a 1 second delay in between are condition evaluates to true and we throw up a MESSAGE PROMPT "CHANGE DETECTED: %OCR%". %OCR% is the variable name we have chosen to capture the text.
1 | IF | OCR | from image D:\File\pics\ocr\sample1.png::to string OCR::very verbose | IS TRUE | MESSAGE PROMPT | Text is found
2 | IF | OCR | from image D:\File\pics\ocr\sample1.png::to string OCR::very verbose | SUCCESSFUL | MESSAGE PROMPT | OCR is successful
The two examples above are examples of verification activities. IS TRUE and IS FALSE evaluate the detection of text. It text is found then TRUE and not found then FALSE. SUCCESSFUL and UNSUCCESSFUL evaluate if the OCR condition ran successfully.
1 | IF | OCR | From image D:\File\pics\ocr\phrase\here comes the sun.PNG::Lang eng - English::To string OCR | TRUE | OUTPUT TO FILE | D:\File\ocr_text.txt::APPEND_NEWLINE::%OCR%
The example above reads the text from a image, stores the value in a variable named OCR, and outputs the value of the variable to a file.
- To String : Capture any text from the target image of screen location to a variable. The default variable is %OCR%.
- Remove CR LF : When selected will remove any carriage return/line feed sequence (new line detection's) from the captured text. This will result in the captured text being a single line of text without multiple lines.
- Verbose and Very Verbose : When selected will output a greater amount of internal MMM event log output. This is useful only when debugging.
- Throw Error : The condition will return the error text and a false/failed state if no text is found.
- Comment : Append an optional comment to the macro line.
1 | IF | OCR | from image D:\File\pics\ocr\days\monday.png::to string OCR | TEXT IS | Monday | MESSAGE PROMPT | The text is Monday
The example above reads the text from a monday.png image file and if the text is "Monday" then throws a MESSAGE PROMPT "The text is Monday".
1 | IF | OCR | At location [X:701 Y:291 W:100 H:100]::to string OCR | CHANGES::amount 2::timeout 5::delay 1 | MESSAGE PROMPT | CHANGE DETECTED: %OCR%
The example above we scan a location of the screen, capture the text, and detect if any changes occur to the text in that region. IF we have 2 changes over 5 seconds with a 1 second delay in between are condition evaluates to true and we throw up a MESSAGE PROMPT "CHANGE DETECTED: %OCR%". %OCR% is the variable name we have chosen to capture the text.
1 | IF | OCR | from image D:\File\pics\ocr\sample1.png::to string OCR::very verbose | IS TRUE | MESSAGE PROMPT | Text is found
2 | IF | OCR | from image D:\File\pics\ocr\sample1.png::to string OCR::very verbose | SUCCESSFUL | MESSAGE PROMPT | OCR is successful
The two examples above are examples of verification activities. IS TRUE and IS FALSE evaluate the detection of text. It text is found then TRUE and not found then FALSE. SUCCESSFUL and UNSUCCESSFUL evaluate if the OCR condition ran successfully.
1 | IF | OCR | From image D:\File\pics\ocr\phrase\here comes the sun.PNG::Lang eng - English::To string OCR | TRUE | OUTPUT TO FILE | D:\File\ocr_text.txt::APPEND_NEWLINE::%OCR%
The example above reads the text from a image, stores the value in a variable named OCR, and outputs the value of the variable to a file.
- OCR conditions have the following operators for evaluation:
- TRUE : The OCR condition has detected text within the target image or screen area
- FALSE : The OCR condition has not detected text within the target image or screen area
- SUCCESSFUL : The OCR condition completes successfully without error
- UNSUCCESSFUL : The OCR condition completes unsuccessfully. This is most likely due to a syntax error or the OCR plugin not being enabled
- TEXT IS : Evaluates that text captured within the target image or screen area matches a text value
- TEXT IS -C : Evaluates that text captured within the target image or screen area matches a text value (case insensitive)
- TEXT CONTAINS : Evaluates that text captured within the target image or screen area contains a text value
- TEXT CONTAINS -C : Evaluates that text captured within the target image or screen area contains a text value (case insensitive)
- TEXT STARTS WITH: Evaluates that text captured within the target image or screen area starts with a text value
- TEXT STARTS WITH -C: Evaluates that text captured within the target image or screen area starts with a text value (case insensitive)
- TEXT COUNT : Evaluates the count of the captured charactors within the target image or screen area
- MATCH COUNT : Evaluates the count of images within a folder that contain text
- CHANGES : Evaluates if text within an screen area changes within a given time period
OCR can also be capured directly from an ACTION condition to store in a variable for later use.
1 | RUN ACTION | OCR | From image D:\File\pics\ocr\phrase\daysoftheweek.PNG::Lang eng - English::To string OCR
2 | RUN ACTION | MESSAGE PROMPT | %OCR%::::1::OK
In the example above we capture the text from a file and output the value in a message box.
1 | RUN ACTION | OCR | From image D:\File\pics\ocr\phrase\daysoftheweek.PNG::Lang eng - English::To string OCR
2 | RUN ACTION | MESSAGE PROMPT | %OCR%::::1::OK
In the example above we capture the text from a file and output the value in a message box.

|
operators
|
Operators are used to evaluate and determine the outcome of an object item for a condition. They determine if a condition is true or false, exist or not exist, and is successful or not successful.
exist
EXIST operators are to evaluate if file, folder, and process objects are present or running at the time of evaluation.
Consider the EXIST example statement below taken from a macro condition:
1 | IF | FILE | C:\MMM\Process.mmmacro | EXIST | CONTINUE
This reads - IF the FILE c:\MMM\Process.mmmacro does EXIST then CONTINUE the macro. So if the file EXISTS meaning if it is present on the system at the time of evaluation, then continue otherwise wait until the file does exist.
- Exist operators are available to evaluate the following objects:
- File
- Folder
- Process name
- Process ID
not exist
NOT EXIST operators are to evaluate if file, folder, and process objects are not present or not running at the time of evaluation.
Consider the NOT EXIST example statement below taken from a macro condition:
1 | IF | FILE | C:\log.log | NOT EXIST | RUN VIA CMD /C | echo > c:\log.log
This reads - IF the FILE c:\log.log does NOT EXIST then RUN VIA CMD /C echo > c:\log.log. So if the file c:\log.log does not exist then run the command 'echo > c:\log.log' via a command window and then close the command window.
- Not Exist operators are available to evaluate the following objects:
- File
- Folder
- Process name
- Process ID
is
IS operators are to evaluate objects that contain a value for comparison.
Consider the IS example statement below taken from a macro condition:
1 | IF | DATE | 10/13/2015 | IS | CONTINUE
This reads - IF the DATE IS 10/13/2015 then CONTINUE. So if the date matches and IS 10/13/2015 then continue running the macro, otherwise wait until the date IS 10/13/2015.
Consider the IS example statement below taken from a macro condition:
1 | IF | DATE | 10/13/2015 | IS | CONTINUE
This reads - IF the DATE IS 10/13/2015 then CONTINUE. So if the date matches and IS 10/13/2015 then continue running the macro, otherwise wait until the date IS 10/13/2015.
- Is operators are available to evaluate the following objects:
- File size
- Folder size
- File MD5 hash
- Folder file count
- Time
- Date
- Time and date
- Keyboard keypress
- Mouse position equals
- Mouse position near
is not
IS NOT operators are to evaluate objects that contain a value for comparison.
Consider the IS NOT example statement below taken from a macro condition:
1 | IF | FOLDER FILE COUNT | C:\MMM | IS NOT | 7 | GOTO MACRO LINE | 39
This reads - IF the FOLDER FILE COUNT in folder c:\MMM IS NOT 7 then GOTO MACRO LINE 39. So if there is not 7 files in c:\MMM then the macro will jump to line number 39 and continue.
- Is not operators are available to evaluate the following objects:
- File size
- Folder size
- File MD5 hash
- Folder file count
- Time
- Date
- Time and date
- Keyboard keypress
- Mouse position equals
- Mouse position near
changes
CHANGES operator is used to evaluate a change in pixel for the PIXEL COLOR and PIXEL RANGE object condition.
Consider this CHANGES example statement below taken from a PIXEL COLOR macro condition:
1 | IF | PIXEL COLOR | At Location [X:2768 Y:602] | CHANGES::2::0::200 | CONTINUE
This reads - IF the PIXEL COLOR at mouse location X 2768 and Y 602 does change 2 times, with 0 timeout value, and with a 200 milliseconds delay between changes, then CONTINUE the macro.
Consider this CHANGES example statement below taken from a PIXEL RANGE condition:
1 | IF | PIXEL RANGE | At Location [X:2768 Y:602]::Size [W:68 H:62] | CHANGES::1::0::0 | GOTO MACRO LINE | 10
This reads - IF the PIXEL RANGE at mouse location X 2768 and Y 602, of size width 68 pixels and height 62 pixels, changes 1 times, with 0 timeout value, and with a 0 milliseconds delay time, then GOTO MACRO LINE 10.
Consider this CHANGES example statement below taken from a macro condition:
1 | IF | PIXEL COLOR | At Location [X:2784 Y:602] | CHANGES | MESSAGE PROMPT | Pixel has changed
The example above CHANGES will default to detect 1 pixel change, with no timout value.
CHANGES can take three values (CHANGES::1::2::3):
See the PIXEL COLOR or PIXEL RANGE object for more examples and uses for working with pixels.
Consider this CHANGES example statement below taken from a PIXEL COLOR macro condition:
1 | IF | PIXEL COLOR | At Location [X:2768 Y:602] | CHANGES::2::0::200 | CONTINUE
This reads - IF the PIXEL COLOR at mouse location X 2768 and Y 602 does change 2 times, with 0 timeout value, and with a 200 milliseconds delay between changes, then CONTINUE the macro.
Consider this CHANGES example statement below taken from a PIXEL RANGE condition:
1 | IF | PIXEL RANGE | At Location [X:2768 Y:602]::Size [W:68 H:62] | CHANGES::1::0::0 | GOTO MACRO LINE | 10
This reads - IF the PIXEL RANGE at mouse location X 2768 and Y 602, of size width 68 pixels and height 62 pixels, changes 1 times, with 0 timeout value, and with a 0 milliseconds delay time, then GOTO MACRO LINE 10.
Consider this CHANGES example statement below taken from a macro condition:
1 | IF | PIXEL COLOR | At Location [X:2784 Y:602] | CHANGES | MESSAGE PROMPT | Pixel has changed
The example above CHANGES will default to detect 1 pixel change, with no timout value.
CHANGES can take three values (CHANGES::1::2::3):
- The amount of changes to detect.
- A timeout value in seconds - The total time to wait for the changes. If the time expires the statement will evaluate to FALSE and continue. A value of 0 will wait until all changes have occured.
- A change delay value in milliseconds - The delay value forces a delay between detecting pixel changes. This is useful to control sensitivity of pixel changes. A value of 0 will skip a delay.
See the PIXEL COLOR or PIXEL RANGE object for more examples and uses for working with pixels.
- CHANGES operator available to evaluate the following objects:
- PIXEL COLOR
- PIXEL RANGE
file contains string
FILE CONTAINS STRING operators are to evaluate if a file object contains a string of text within the file. Strings are case sensitive.
Consider the FILE CONTAINS STRING example statement below taken from a macro condition:
1 | IF | FILE | C:\rescue.log | FILE CONTAINS STRING | error | KILL PROCESS ID | 8732
This reads - IF the FILE c:\rescue.log FILE CONTAINS STRING 'error' then KILL PROCESS ID 8732. So if the file c:\rescue.log contains the text string 'error' anywhere in the file then kill the current running process with the process ID of 8732.
- FILE CONTAINS STRING operators are available to evaluate the following object:
- File
files contains string
FILES CONTAINS STRING operators are to evaluate if a file object within a folder contains a string of text within the file. Strings are case sensitive.
Consider the FILES CONTAINS STRING example statement below taken from a macro condition:
1 | IF | FOLDER | C:\LOGS | FILES CONTAINS STRING | error | KILL PROCESS ID | 8732
This reads - IF the FOLDER c:\LOGS FILES CONTAINS STRING 'error' then KILL PROCESS ID 8732. So if any file in the directory of c:\LOGS contains the text string 'error' anywhere in the file then kill the current running process with the process ID of 8732.
- FILES CONTAINS STRING operators are available to evaluate the following object:
- Folder
files contains string -R
FILES CONTAINS STRING -R operators are to evaluate if a file object within a folder tree contains a string of text within the file. The -R is 'Recursive'. Strings are case sensitive.
Consider the FILES CONTAINS STRING -R example statement below taken from a macro condition:
1 | IF | FOLDER | C:\LOGS | FILES CONTAINS STRING -R | error | KILL PROCESS ID | 8732
This reads - IF the FOLDER c:\LOGS FILES CONTAINS STRING -R 'error' then KILL PROCESS ID 8732. So if any file in the entire directory tree starting from the root of c:\LOGS contains the text string 'error' anywhere in the file then kill the current running process with the process ID of 8732.
- FILES CONTAINS STRING -R operators are available to evaluate the following object:
- Folder
contains
CONTAINS operators evaluate the text within a variable. This operator is typically used with %STRING% variables, however is compatible with all variable types. CONTAINS is case sensitive.
1 | IF | STRING VARIABLE | %STRING% | CONTAINS | _%integer%_%string1%_ | COPY TO CLIPBOARD | %string%
The macro line above is a classic example of the CONTAINS operator. Here we evaluate the contents of the string variable %STRING%. If it does contain the text '_%integer%_%string1%_' then copy the value of %string% to the system clipboard.
- CONTAINS operators are available to evaluate the following object:
- STRING VARIABLE
contains -c
CONTAINS operators evaluate the text within a variable. This operator is typically used with %STRING% variables, however is compatible with all variable types. CONTAINS -C is NOT case sensitive.
1 | FOR | EACH | LINE IN | D:\Macro\RX\rx.txt | DO
2 | IF | STRING VARIABLE | %LINE% | CONTAINS -C | _%integer%_%string1%_ | NEXT FOR | ELSE | 5 | RUN ACTION | DEFINE INTEGER VARIABLE | %INTEGER1%::+1
3 | IF | INTEGER VARIABLE | %INTEGER1% | >= | 50 | OUTPUT TO FILE | D:\Macro\TX\fileedits.txt::APPEND::%file%_%line%
4 | FOR | NEXT
The macro above has a FOR LOOP that iterates through each line in rx.txt. If the line (%line%) contains '_%integer%_%string1%_' then skip this line with NEXT FOR. ELSE if the line does contain the text then increment integer1 variable by 1. The macro at line 3 of the FOR LOOP evaluates the value of %integer1%. If the value if greater or equal to 50 then append to fileedits.txt with the current FOR LOOP file (rx.txt) and the value of the current line (%line%). More on FOR LOOPS here.
- CONTAINS -C operators are available to evaluate the following object:
- STRING VARIABLE
greater than & greater than equal to
GREATER THAN and GREATER THAN AND EQUAL TO operators are to evaluate objects that contain a value for comparison.
Consider the GREATER THAN example statement below taken from a macro condition:
1 | IF | FILE SIZE | C:\rescue.log | GREATER THAN | 96 | CONTINUE
This reads - IF the FILE SIZE of the file c:\rescue.log is GREATER THAN 96 bytes then CONTINUE. So continue if the file is larger than 96 bytes, otherwise wait until it is.
Consider the GREATER THAN AND EQUAL TO example statement below taken from a macro condition:
1 | IF | FOLDER FILE COUNT | C:\MMM | GREATER THAN EQUAL TO | 7 | PAUSE
This reads - IF the FOLDER FILE COUNT of folder c:\MMM is GRATER THAN EQUAL TO 7 then PAUSE. So there are 7 or more than 7 files in the folder c:\MMM then pause the current macro or else continue the macro.
- GREATER THAN and GREATER THAN EQUAL TO operators are available to evaluate the following objects:
- File size
- Folder size
- File MD5 hash
- Folder file count
- Time
- Date
- Time and date
- Keyboard keypress
- Mouse position equals
less than & less than equal to
LESS THAN and LESS THAN OR EQUAL TO operators are to evaluate objects that contain a value for comparison.
Consider the LESS THAN example statement below taken from a macro condition:
1 | IF | FILE SIZE | C:\rescue.log | LESS THAN | 96 | CONTINUE
This reads - IF the FILE SIZE of the file c:\rescue.log is LESS THAN 96 bytes then CONTINUE. So continue if the file is less than 96 bytes, otherwise wait until it is.
Consider the LESS THAN AND EQUAL TO example statement below taken from a macro condition:
1 | IF | MOUSE POSITION EQUALS | {X=996,Y=513} | LESS THAN EQUAL TO | CONTINUE
This reads - IF the MOUSE POSITION EQUALS X 996 or Y 513 is LESS THAN or EQUAL TO the current mouse X or Y then CONTINUE. So if the current mouse X is 996 or less than 996 or is the current mouse Y is 513 or less than 513 then continue, otherwise wait until it is then continue.
- LESS THAN and LESS THAN EQUAL TO operators are available to evaluate the following objects:
- File size
- Folder size
- File MD5 hash
- Folder file count
- Date
- Time
- Time and date
- Keyboard keypress
- Mouse position equals
source address
SOURCE ADDRESS operators are to evaluate Network Packet objects source address field.
Consider the SOURCE ADDRESS example statement below taken from a macro condition:
1 | IF | NETWORK PACKET DETECTED | Wi-Fi | SOURCE ADDRESS | 192.168.0.2 | DOWNLOAD FROM URI | C:\downloads::http://mywebsite.com/download.exe
This reads - IF a NETWORK PACKET DETECTED from the WIFI named adapter with the packet SOURCE ADDRESS of 192.168.0.2 then DOWNLOAD FROM URI to the folder c:\downloads the file from http://mywebsite.com/download.exe. So if a packet from source address 192.168.0.2 is read from the WIFI adapter then download a file from http://mywebsite.com/download.exe.
- Source address operators are available to evaluate the following object:
- Network packet detected
destination address
DESTINATION ADDRESS operators are to evaluate Network Packet objects destination address field.
Consider the DESTINATION ADDRESS example statement below taken from a macro condition:
1 | IF | NETWORK PACKET DETECTED | Wi-Fi | DESTINATION ADDRESS | 192.168.0.1 | CONTINUE
This reads - IF a NETWORK PACKET DETECTED from the WIFI named adapter with the packet DESTINATION ADDRESS of 192.168.0.1 then CONTINUE the macro. So if a packet is detected on the adapter named WIFI with the DESTINATION address of 192.168.0.1 then continue the macro, otherwise wait until a packet with the destination is read and then continue.
- Destination address operators are available to evaluate the following object:
- Network packet detected
packet contains string
PACKET CONTAINS STRING operators are to evaluate Network Packet objects packet contents for matching string comparison.
Consider the PACKET CONTAINS STRING example statement below taken from a macro condition:
1 | IF | NETWORK PACKET DETECTED | Wi-Fi | PACKET CONTAINS STRING | run_batchfile4 | RUN VIA CMD /C | start c:\batchfile4.bat
This reads - IF a NETWORK PACKET DETECTED from the WIFI named adapter and the PACKET CONTAINS STRING 'run_batchfile4' then RUN VIA CMD /C the command start c:\batchfile4.bat and then close the command window. So if a packet is detected from the named WIFI adapter that contains the string 'run_batchfile4' anywhere in the packet then run a command via a batch window to start c:\batchfile4.bat closing the command window after completion.
- Packet contains string operators are available to evaluate the following object:
- Network packet detected
packet type tcp & packet type udp & packet type icmp
PACKET TYPE TCP and PACKET TYPE UDP and PACKET TYPE ICMP operators are to evaluate Network Packet objects that match packets to a particular IP protocol.
Consider the PACKET TYPE ICMP example statement below taken from a macro condition:
1 | IF | NETWORK PACKET DETECTED | Wi-Fi | PACKET TYPE ICMP | | CONTINUE
This reads - IF a NETWORK PACKET DETECTED from the WIFI named adapter and PACKET TYPE is ICMP then CONTINUE. So if a packet is detected from the named WIFI adapter that is an ICMP protocol packet then continue, otherwise wait until an ICMP packet is detected and then continue.
- Packet type operators are available to evaluate the following object:
- Network packet detected
packet count tcp & packet count udp & packet count icmp & packet count total
PACKET COUNT TCP and PACKET COUNT UDP and PACKET COUNT ICMP and PACKET COUNT TOTAL operators are to evaluate Network Packet objects that match the numerical count of packets of a particular IP protocol or all packets received as the case for the PACKET COUNT TOTAL operator.
Consider the PACKET COUNT ICMP example statement below taken from a macro condition:
1 | IF | NETWORK PACKET DETECTED | Wi-Fi | PACKET COUNT ICMP | 10 | CONTINUE
This reads - IF a NETWORK PACKET DETECTED from the WIFI named adapter and PACKET COUNT ICMP is 10 then CONTINUE. So when 10 ICMP packets are detected from the named WIFI adapter then continue, otherwise keep counting ICMP packets until the count 10 is reached and then continue.
- Packet count operators are available to evaluate the following object:
- Network packet detected
packet source port number & packet dest port number
PACKET SOURCE PORT NUMBER and PACKET DEST PORT NUMBER operators are to evaluate Network Packet objects that match the either a source port or destination port value.
Consider the PACKET DESTINATION PORT example statement below taken from a macro condition:
1 | IF | NETWORK PACKET DETECTED | Wi-Fi | PACKET DEST PORT NUMBER | 21 | LOAD MACRO | C:\ftpbeginfiletx.mmmacro
This reads - IF a NETWORK PACKET DETECTED from the WIFI named adapter and the PACKET DEST PORT NUMBER is 21 then LOAD MACRO c:\ftpbeginfiletx.mmmacro. So when a network packet is detected from the named WIFI adaptor with the destination port of 21 then load the macro file c:\ftpbeginfiletx.mmmacro.
- Packet count operators are available to evaluate the following object:
- Network packet detected
string found
STRING FOUND operators are to evaluate Receive UDP packet string objects string comparison.
Consider the STRING FOUND example statement below taken from a macro condition:
1 | IF | RECEIVE UDP PACKET STRING | 192.168.0.2::41414::GOTO30 | STRING FOUND | SEARCH FOR STRING | GOTO MACRO LINE | 30
This reads - IF RECEIVE UDP PACKET STRING from IP address 192.168.0.2 on UDP port 41414 with the string text of 'GOTO30' within the packet then GOTO MACRO LINE number 30. So if a UDP packet from IP 192.168.0.2 on port 41414 contains the text 'GOTO30' anywhere in the packet the the macro will jump to the macro line number 30, otherwise continue to listen and read UDP packets on that port until the string is found.
- Packet count operators are available to evaluate the following object:
- Receive UDP packet string

|
actions
|
Actions are what happens on the result of a matching condition. Actions are used to control macro flow or perform external tasks from outside of Mini Mouse Macro.
continue
CONTINUE action is used for macro flow control.
Consider the CONTINUE example statement below taken from a macro condition:
1 | IF | FILE | C:\rescue.log | EXIST | CONTINUE
This reads - IF the FILE c:\rescue.log does EXIST then CONTINUE the macro. So if the file is present on the system at the time of the condition evaluation then continue running the macro. The macro will only continue if the file exists.
Note: Continue is a useful action to apply if you want to wait until an object is evaluated as true. Take the example above, this will only evaluate and continue to the next macro line once the file c:\rescue.log does exist.
Consider this CONTINUE example statement below taken from a macro PIXEL condition:
1 | IF | PIXEL COLOR | At Location [X:2768 Y:602] | CHANGES::2::0::200 | CONTINUE
This reads - IF the PIXEL COLOR at mouse location X 2768 and Y 602 does change 2 times, with 0 timeout value, and with a 200 milliseconds delay between changes, then CONTINUE the macro.
Consider this CONTINUE statement as a further example:
1 | IF | FILE | C:\rescue.log | FILE CONTAINS STRING | Hello | CONTINUE
This reads - IF the FILE c:\rescue.log does CONTAIN the STRING 'Hello' then CONTINUE. Only if the word 'Hello' is within the file will the macro continue. The macro will continue to read the file on a loop until the word Hello is found. Only then will the macro continue.
debug
DEBUG is a simple action to enable, disable, or set macro settings during a running macro or prior to recording a macro.
Debug can configure the following during a running macro:
Consider this DEBUG example statement below where the MMM Event Log is turned ON and OFF to capture a section of the running macro:
1 | RUN ACTION | DEBUG | EVENT LOG ON
2 | RUN ACTION | ENCRYPT FOLDER (AES) | D:\Macro::[PROMPT_AT_RUNTIME]::SINGLE_DIR::KEEP_ORIGINAL
3 | RUN ACTION | DEBUG | EVENT LOG OFF
In this example the MMM Event Log is turned on to capture the ENCRYPT FOLDER (AES) action and then at line 3 Event Logging is turned off.
GLOBAL LOOP ON/OFF
1 | RUN ACTION | DEBUG | GLOBAL LOOP START
2 | IF | INTEGER VARIABLE | %INTEGER% | > | 5 | DEFINE INTEGER VARIABLE | %INTEGER%::0
3 | IF | INTEGER VARIABLE | %INTEGER% | = | 5 | DEBUG | GLOBAL LOOP STOP
4 | RUN ACTION | MESSAGE PROMPT | Loop %INTEGER% of 5::(%integer%/5)::1
5 | RUN ACTION | DEFINE INTEGER VARIABLE | %INTEGER%::+1
Line 1 - Set the macro LOOP to be enabled for the macro.
Line 3 - If the %INTEGER% variable is equal to 5 then set the macro LOOP to stop.
PLAYBACK OPTIONS
1 | RUN ACTION | DEBUG | PLAYBACK KEYPRESS ON
2 | RUN ACTION | DEBUG | PLAYBACK KEYPRESS OFF
3 | RUN ACTION | DEBUG | PLAYBACK LEFT CLICK ON
4 | RUN ACTION | DEBUG | PLAYBACK LEFT CLICK OFF
5 | RUN ACTION | DEBUG | PLAYBACK RIGHT CLICK ON
6 | RUN ACTION | DEBUG | PLAYBACK RIGHT CLICK OFF
7 | RUN ACTION | DEBUG | PLAYBACK MIDDLE CLICK ON
8 | RUN ACTION | DEBUG | PLAYBACK MIDDLE CLICK OFF
9 | RUN ACTION | DEBUG | PLAYBACK MOUSE MOVEMENT ON
10 | RUN ACTION | DEBUG | PLAYBACK MOUSE MOEVEMENT OFF
11 | RUN ACTION | DEBUG | PLAYBACK ACTION ON
12 | RUN ACTION | DEBUG | PLAYBACK ACTION OFF
13 | RUN ACTION | DEBUG | PLAYBACK IF ON
14 | RUN ACTION | DEBUG | PLAYBACK IF OFF
15 | RUN ACTION | DEBUG | PLAYBACK IF NOT ON
16 | RUN ACTION | DEBUG | PLAYBACK IF NOT OFF
17 | RUN ACTION | DEBUG | PLAYBACK FOR ON
18 | RUN ACTION | DEBUG | PLAYBACK FOR OFF
19 | RUN ACTION | DEBUG | PLAYBACK SPEED X
Keypress, clicks, mouse movement ON/OFF enable or disable there ability to be played back during a running macro.
Action ON/OFF turns off all actions except debug actions.
IF/IF NOT/FOR ON/OFF turns off all IF/IF NOT condition execution and disables FOR looping. If actions are within a FOR block they still do execute.
SPEED X changes the current playback running speed to the value of X. X can be a negitive value or positive value. For example, -5 will slow the macro time values down 5 times. A value of 10 will speed up the time value 10x there current speed.
ALL Playback settings are retained for the current MMM instance. Turning a playback setting OFF will require it to be turned ON to become functional again.
PAINT PATH OPTIONS
PAINT PATH OPTIONS set the paint path paramaters for the MMM running instance.
1 | RUN ACTION | DEBUG | PAINT PATH::COLOR [BLACK 3]
2 | RUN ACTION | DEBUG | PAINT PATH::FILL [YES]
3 | RUN ACTION | DEBUG | PAINT PATH::TIME [1 50]
4 | RUN ACTION | DEBUG | PAINT PATH::CIRCLE
Line 1 - Set the COLOR to black with a size of 3. Standard color values are accepts and line size of 1 to 10 (10 being largest).
Line 2 - Set to FILL the color area. FILL [NO] will produce an outline around the color area.
Line 3 - Set the TIME value. The example [1 50] sets a TIME value to retain the paint area for 1 seconds with a refresh value of 50 milliseconds.
Line 4 - Set the shape value. CIRCLE or RECTANGLE are accepted.
LOGGER
DEBUG LOGGER will send information directly to the MMM event log.
LOGGER accepts the following paramaters:
2 | RUN ACTION | DEBUG | logger::INFO::An informational event
3 | RUN ACTION | DEBUG | logger::WARNING::verbose::A verbose warning event
4 | RUN ACTION | DEBUG | logger::ERROR::A error event
BACKGROUND/FOREGROUND COLOR
DEBUG BACKGROUND COLOR changes the back color of the macro window for the session
See www.turnssoft.com/mmm_colors.html for color names
1 | RUN ACTION | DEBUG | BACKGROUND COLOR::Black
2 | RUN ACTION | DEBUG | FOREGROUND COLOR::LightSeaGreen
VARIABLES
Show Custom Variables. Show custom variables outputs all custom vars defined to the MMM internal event log.
1 | RUN ACTION | DEBUG | SHOW CUSTOM VARIABLES
Clear Custom Variables. Clear custom variables removes the values from all custom variables.
1 | RUN ACTION | DEBUG | CLEAR CUSTOM VARIABLES
Clear All Arrays. Clears all internal array variables.
Internal arrays include, custom vars, arrays vars, and MMM internal event log events.
1 | RUN ACTION | DEBUG | CLEAR ALL ARRAYS
SET::STRICT TIME VALUE
Strict Time Value locks in a set recording time value in milliseconds. Run this debug action prior to recording a macro. The setting will remain in effect until Mini Mouse Macro is closed or the value is changed through another debug run.
STRING TIME VALUE sets the global recording time for mouse movement, mouse clicks, and keyboard presses.
1 | RUN ACTION | DEBUG | SET::STRICT TIME VALUE::250
STRING TIME VALUE MOUSE sets the global recording time for mouse movement.
1 | RUN ACTION | DEBUG | SET::STRICT TIME VALUE MOUSE::50
STRING TIME VALUE CLICK sets the global recording time for all mouse clicks.
1 | RUN ACTION | DEBUG | SET::STRICT TIME VALUE CLICKS::1000
STRING TIME VALUE KEYS sets the global recording keyboard presses.
1 | RUN ACTION | DEBUG | SET::STRICT TIME VALUE KEYS::150
STEP PLAYBACK
This debug feature can be toggled on and off during playback and will step through the macro one line at a time.
After each line is executed the macro will 'pause'. This operates as though the macro pause button is pressed every line.
1 | RUN ACTION | DEBUG | STEP PLAYBACK
RECORD NUMBERPAD
This debug action is useful for record debugging and will enable/disable interpretive numpad recording. Interpretive numpad recording replaces a recording of 'numpad1' with '1' and so on up to number 9. When recording with numlock on the numpad functions (end, pgup, etc) are recorded as usual.
The default for MMM is to interpretive numpad recording disabled. Run this debug command prior to recording, as a one off, to enable/disable interpretive numpad recording.
1 | RUN ACTION | DEBUG | RECORD NUMBERPAD
Debug can configure the following during a running macro:
- EVENT LOG ON/OFF
- GLOBAL LOOP START/STOP
- PLAYBACK KEYPRESS/CLICKS/MOUSE ON/OFF
- PAINT PATH OPTIONS
- LOGGER
- BACKGROUD/FOREGROUND COLOR
- VARIABLES
- STRICT TIME VALUES
- PLAYBACK STEP
- RECORD NUMBERPAD
Consider this DEBUG example statement below where the MMM Event Log is turned ON and OFF to capture a section of the running macro:
1 | RUN ACTION | DEBUG | EVENT LOG ON
2 | RUN ACTION | ENCRYPT FOLDER (AES) | D:\Macro::[PROMPT_AT_RUNTIME]::SINGLE_DIR::KEEP_ORIGINAL
3 | RUN ACTION | DEBUG | EVENT LOG OFF
In this example the MMM Event Log is turned on to capture the ENCRYPT FOLDER (AES) action and then at line 3 Event Logging is turned off.
GLOBAL LOOP ON/OFF
1 | RUN ACTION | DEBUG | GLOBAL LOOP START
2 | IF | INTEGER VARIABLE | %INTEGER% | > | 5 | DEFINE INTEGER VARIABLE | %INTEGER%::0
3 | IF | INTEGER VARIABLE | %INTEGER% | = | 5 | DEBUG | GLOBAL LOOP STOP
4 | RUN ACTION | MESSAGE PROMPT | Loop %INTEGER% of 5::(%integer%/5)::1
5 | RUN ACTION | DEFINE INTEGER VARIABLE | %INTEGER%::+1
Line 1 - Set the macro LOOP to be enabled for the macro.
Line 3 - If the %INTEGER% variable is equal to 5 then set the macro LOOP to stop.
PLAYBACK OPTIONS
1 | RUN ACTION | DEBUG | PLAYBACK KEYPRESS ON
2 | RUN ACTION | DEBUG | PLAYBACK KEYPRESS OFF
3 | RUN ACTION | DEBUG | PLAYBACK LEFT CLICK ON
4 | RUN ACTION | DEBUG | PLAYBACK LEFT CLICK OFF
5 | RUN ACTION | DEBUG | PLAYBACK RIGHT CLICK ON
6 | RUN ACTION | DEBUG | PLAYBACK RIGHT CLICK OFF
7 | RUN ACTION | DEBUG | PLAYBACK MIDDLE CLICK ON
8 | RUN ACTION | DEBUG | PLAYBACK MIDDLE CLICK OFF
9 | RUN ACTION | DEBUG | PLAYBACK MOUSE MOVEMENT ON
10 | RUN ACTION | DEBUG | PLAYBACK MOUSE MOEVEMENT OFF
11 | RUN ACTION | DEBUG | PLAYBACK ACTION ON
12 | RUN ACTION | DEBUG | PLAYBACK ACTION OFF
13 | RUN ACTION | DEBUG | PLAYBACK IF ON
14 | RUN ACTION | DEBUG | PLAYBACK IF OFF
15 | RUN ACTION | DEBUG | PLAYBACK IF NOT ON
16 | RUN ACTION | DEBUG | PLAYBACK IF NOT OFF
17 | RUN ACTION | DEBUG | PLAYBACK FOR ON
18 | RUN ACTION | DEBUG | PLAYBACK FOR OFF
19 | RUN ACTION | DEBUG | PLAYBACK SPEED X
Keypress, clicks, mouse movement ON/OFF enable or disable there ability to be played back during a running macro.
Action ON/OFF turns off all actions except debug actions.
IF/IF NOT/FOR ON/OFF turns off all IF/IF NOT condition execution and disables FOR looping. If actions are within a FOR block they still do execute.
SPEED X changes the current playback running speed to the value of X. X can be a negitive value or positive value. For example, -5 will slow the macro time values down 5 times. A value of 10 will speed up the time value 10x there current speed.
ALL Playback settings are retained for the current MMM instance. Turning a playback setting OFF will require it to be turned ON to become functional again.
PAINT PATH OPTIONS
PAINT PATH OPTIONS set the paint path paramaters for the MMM running instance.
1 | RUN ACTION | DEBUG | PAINT PATH::COLOR [BLACK 3]
2 | RUN ACTION | DEBUG | PAINT PATH::FILL [YES]
3 | RUN ACTION | DEBUG | PAINT PATH::TIME [1 50]
4 | RUN ACTION | DEBUG | PAINT PATH::CIRCLE
Line 1 - Set the COLOR to black with a size of 3. Standard color values are accepts and line size of 1 to 10 (10 being largest).
Line 2 - Set to FILL the color area. FILL [NO] will produce an outline around the color area.
Line 3 - Set the TIME value. The example [1 50] sets a TIME value to retain the paint area for 1 seconds with a refresh value of 50 milliseconds.
Line 4 - Set the shape value. CIRCLE or RECTANGLE are accepted.
LOGGER
DEBUG LOGGER will send information directly to the MMM event log.
LOGGER accepts the following paramaters:
- TYPE: INFO/WARNING/ERROR - The type of event to pass
- VERBOSE: The event is considered 'verbose'
- COMMENT: The text to output to the log
2 | RUN ACTION | DEBUG | logger::INFO::An informational event
3 | RUN ACTION | DEBUG | logger::WARNING::verbose::A verbose warning event
4 | RUN ACTION | DEBUG | logger::ERROR::A error event
BACKGROUND/FOREGROUND COLOR
DEBUG BACKGROUND COLOR changes the back color of the macro window for the session
See www.turnssoft.com/mmm_colors.html for color names
1 | RUN ACTION | DEBUG | BACKGROUND COLOR::Black
2 | RUN ACTION | DEBUG | FOREGROUND COLOR::LightSeaGreen
VARIABLES
Show Custom Variables. Show custom variables outputs all custom vars defined to the MMM internal event log.
1 | RUN ACTION | DEBUG | SHOW CUSTOM VARIABLES
Clear Custom Variables. Clear custom variables removes the values from all custom variables.
1 | RUN ACTION | DEBUG | CLEAR CUSTOM VARIABLES
Clear All Arrays. Clears all internal array variables.
Internal arrays include, custom vars, arrays vars, and MMM internal event log events.
1 | RUN ACTION | DEBUG | CLEAR ALL ARRAYS
SET::STRICT TIME VALUE
Strict Time Value locks in a set recording time value in milliseconds. Run this debug action prior to recording a macro. The setting will remain in effect until Mini Mouse Macro is closed or the value is changed through another debug run.
STRING TIME VALUE sets the global recording time for mouse movement, mouse clicks, and keyboard presses.
1 | RUN ACTION | DEBUG | SET::STRICT TIME VALUE::250
STRING TIME VALUE MOUSE sets the global recording time for mouse movement.
1 | RUN ACTION | DEBUG | SET::STRICT TIME VALUE MOUSE::50
STRING TIME VALUE CLICK sets the global recording time for all mouse clicks.
1 | RUN ACTION | DEBUG | SET::STRICT TIME VALUE CLICKS::1000
STRING TIME VALUE KEYS sets the global recording keyboard presses.
1 | RUN ACTION | DEBUG | SET::STRICT TIME VALUE KEYS::150
STEP PLAYBACK
This debug feature can be toggled on and off during playback and will step through the macro one line at a time.
After each line is executed the macro will 'pause'. This operates as though the macro pause button is pressed every line.
1 | RUN ACTION | DEBUG | STEP PLAYBACK
RECORD NUMBERPAD
This debug action is useful for record debugging and will enable/disable interpretive numpad recording. Interpretive numpad recording replaces a recording of 'numpad1' with '1' and so on up to number 9. When recording with numlock on the numpad functions (end, pgup, etc) are recorded as usual.
The default for MMM is to interpretive numpad recording disabled. Run this debug command prior to recording, as a one off, to enable/disable interpretive numpad recording.
1 | RUN ACTION | DEBUG | RECORD NUMBERPAD
stop
STOP action is used for macro flow control, to stop a running macro.
Consider the STOP example statement below taken from a macro condition:
1 | IF | PROCESS ID | 2352 | NOT EXIST | STOP
This reads - IF the PROCESS ID of 2352 does NOT EXIST then STOP the macro. So if this process is not currently running during condition evaluation then the macro will stop and end, otherwise the macro will continue on.
pause
PAUSE action is used for macro flow control, to pause a running macro.
Consider the PAUSE example statement below taken from a macro condition:
1 | IF | FILE | C:\runerrors.log | FILE CONTAINS STRING | error | PAUSE
This reads - IF the FILE c:\runerrors.log FILE CONTAINS STRING 'error' then pause. So if the file c:\runerrors.log contains the word 'error' anywhere in the file then the macro will pause execution, otherwise the macro will continue.
clear
CLEAR action is used for macro flow control, to clear a running macro.
Consider the CLEAR example statement below taken from a macro condition:
1 | IF | FILE | C:\MMM\End.mmmacro | EXIST | CLEAR
This reads - IF the FILE c:\MMM\End.mmmarco does EXIST then CLEAR and stop the macro. So if the file exist the macro will be cleared and stopped.
Consider the CLEAR example statement below taken from a macro condition:
1 | IF | FILE | C:\MMM\End.mmmacro | EXIST | CLEAR
This reads - IF the FILE c:\MMM\End.mmmarco does EXIST then CLEAR and stop the macro. So if the file exist the macro will be cleared and stopped.
exit
EXIT action is used to immediately exit and close Mini Mouse Macro.
Consider the EXIT example statement below taken from a macro condition:
1 | IF | TIME | 3:09:18 PM | LESS THAN | EXIT
This reads - IF the TIME of 3:09:18 PM is LESS THAN then the current time EXIT. So if the current time is past 3:09:18 PM then Mini Mouse Macro will immediately close and exit, otherwise the macro will continue.
EXIT FOR
EXIT FOR action is used break the current running FOR LOOP. When a EXIT FOR condition evaluates successfully the FOR LOOP will end at the next FOR NEXT statement.
Consider the EXIT FOR example statement below taken from a macro condition:
1 | IF | INTEGER VARIABLE | %INTEGER% | >= | 9 | EXIT FOR
This reads - IF the variable %INTEGER% is GREATER THAN or EQUAL TO 9 then EXIT FOR. So if the value is greater or equal to 9 then the current running FOR LOOP iteration will end and macro flow will continue after.
Consider the EXIT FOR example statement below taken from a macro condition:
1 | FOR | EACH | FILE IN -R | E:\docs | DO
2 | IF NOT | STRING VARIABLE | %FILE.EXT% | IS | .txt | EXIT FOR | ELSE | 2 | RUN ACTION | DELETE FILE | %FILE%
3 | FOR | NEXT
The example FOR LOOP above recursively iterates through each file in all folders within the e:\docs directory (FINE IN -R). Each file in the for loop evaluates line 2 Line 2 performs an IF NOT condition comparing the current file extension (%FILE.EXT%) to .txt. IF NOT the %FILE.EXT% IS .txt then EXIT FOR else RUN the ACTION to DELETE %file%.
Consider the EXIT FOR example below:
1 | FOR | I | = | 1 TO 10 | NEXT
2 | RUN ACTION | RUN VIA CMD /K | echo value of %i%
3 | IF | INTEGER VARIABLE | %I% | >= | 5 | EXIT FOR
4 | FOR | NEXT
5 | RUN ACTION | WAIT SECONDS | 3
6 | RUN ACTION | KILL PROCESS NAME | cmd
The example above breaks the FOR I loop at line 3 if the value of %i% (the current FOR counter internal variable) is greater than of equal to 5. Lines 5 and 6 clean up the cmd windows with a hard process kill (line 6).
For more information on FOR loops and %FILE% variables click here.
Consider the EXIT FOR example statement below taken from a macro condition:
1 | IF | INTEGER VARIABLE | %INTEGER% | >= | 9 | EXIT FOR
This reads - IF the variable %INTEGER% is GREATER THAN or EQUAL TO 9 then EXIT FOR. So if the value is greater or equal to 9 then the current running FOR LOOP iteration will end and macro flow will continue after.
Consider the EXIT FOR example statement below taken from a macro condition:
1 | FOR | EACH | FILE IN -R | E:\docs | DO
2 | IF NOT | STRING VARIABLE | %FILE.EXT% | IS | .txt | EXIT FOR | ELSE | 2 | RUN ACTION | DELETE FILE | %FILE%
3 | FOR | NEXT
The example FOR LOOP above recursively iterates through each file in all folders within the e:\docs directory (FINE IN -R). Each file in the for loop evaluates line 2 Line 2 performs an IF NOT condition comparing the current file extension (%FILE.EXT%) to .txt. IF NOT the %FILE.EXT% IS .txt then EXIT FOR else RUN the ACTION to DELETE %file%.
Consider the EXIT FOR example below:
1 | FOR | I | = | 1 TO 10 | NEXT
2 | RUN ACTION | RUN VIA CMD /K | echo value of %i%
3 | IF | INTEGER VARIABLE | %I% | >= | 5 | EXIT FOR
4 | FOR | NEXT
5 | RUN ACTION | WAIT SECONDS | 3
6 | RUN ACTION | KILL PROCESS NAME | cmd
The example above breaks the FOR I loop at line 3 if the value of %i% (the current FOR counter internal variable) is greater than of equal to 5. Lines 5 and 6 clean up the cmd windows with a hard process kill (line 6).
For more information on FOR loops and %FILE% variables click here.
NEXT FOR
NEXT FOR action is used to skip the current FOR LOOP iteration. When NEXT FOR is run the macro immediately ends the current loop and begins the next iteration, taking the macro to the start of the next FOR LOOP.
Consider the NEXT FOR example below:
1 | FOR | EACH | FILE IN -R | D:\Macro\TX | DO
2 | IF | STRING VARIABLE | %FILE.NAME% | CONTAINS | 441 | NEXT FOR
3 | FOR | EACH | LINE IN | %file% | DO
4 | RUN ACTION | RUN VIA CMD /C | %line%
5 | FOR | NEXT
6 | FOR | NEXT
The example above has a nested FOR EACH LINE IN loop at line 3. This macro loops recursively through the folder d:\macro\tx. At line 2 the condition evaluates if the file name of the current file (%file.name%) contains the text '441'. If it does the NEXT FOR action runs and the macro skips this FOR loop taking the macro back to the start of the FOR LOOP at line 1. If the text '441' is not found in the current file name then the next FOR EACH loop runs and evaluates each line in the current %file%.
1 | FOR | I | = | 1 TO 5 | NEXT
2 | IF | INTEGER VARIABLE | %I% | = | 3 | NEXT FOR
3 | RUN ACTION | MESSAGE PROMPT | Value of counter:%i%::%i%
4 | FOR | NEXT
The simple example above skips the FOR I loop if the internal loop counter (%i%) is equal to 3. If the counter is not 3 then a message prompt displays the value of the counter variable.
mysql
MYSQL can connect to remote MYSQL databases and send mysql structured statements.
The MYSQL action requires the MYSQL plugin download (see plugins) or manual downloading of the mysql connector version 8.0.23 from downloads.mysql.com/archives/get/p/6/file/mysql-connector-net-8.0.23.msi.
The MYSQL action is broken down into three command options:
The MYSQL action requires the MYSQL plugin download (see plugins) or manual downloading of the mysql connector version 8.0.23 from downloads.mysql.com/archives/get/p/6/file/mysql-connector-net-8.0.23.msi.
The MYSQL action is broken down into three command options:
- Connect - The options required to connect to the remote MYSQL database.
- Query - MYSQL query syntax is best represented and returned using the QUERY option. Use QUERY to capture the result of a MYSQL query back to the internal %MYSQL_RESULT% variable.
- SQL - Send and execute MYSQL statements.
MYSQL Setup - Configure Server Connection Details
MYSQL setup is required to define the MYSQL connection settings necessary to connect to and send queries to a MYSQL server. It is required prior to sending any queries to a MYSQL server from Mini Mouse Macro.
Required Settings:
MYSQL Server - This is the MYSQL server IP address or hostname.
Database - The database to use upon connection. This value is optional at connection and can be declared later.
Username - The username required for the remote MYSQL server connection.
Password - The password required for the username.
There are three ways to get these settings into Mini Mouse Macro when running a macro:
1. Provide Macro Line Options
Providing macro line options adds these options directly into a macro line. The 'MYSQL - Setup' dialog from the 'Add Condition' page is a good way to get these values in the correct format. The order of the MYSQL settings on the macro line must be SERVER::DATABASE::USERNAME::PASSWORD
1 | RUN ACTION | MYSQL | CONNECT::192.168.1.201::orders::myremoteuser::SecretPassword
Notice that the password is displayed on the macro line. For those who don't want to display the password on the screen consider the 'Read in from a file' option instead.
2. Read in From a File
The macro line options can be saved in a file and read in during the macro. The 'MYSQL - Setup' dialog from the 'Add Condition' page is a good way to get these values in the correct format. From the MYSQL - Setup dialog enter the values, click the 'Save' button to save them to file, and then select 'Read in from a file'.
1 | RUN ACTION | MYSQL | CONNECT::C:\Users\steph\Dropbox\Macro\File\mysql_setup.mmmacro
The file must be a text based file and contain the following values and format:
mysql_setup.mmmacro
Notice that the password is saved within the setup file. When saving the password to file consider securing the file or applying Windows file encryption or Mini Mouse Macro file encrpytion. For those who don't want to save the password to file consider the 'Prompt setup during macro' option instead.
3. Prompt Setup During Macro
The third option is to prompt for the setup information during the running of the macro.
1 | RUN ACTION | MYSQL | CONNECT::PROMPT
When run the 'MYSQL - Setup' dialog will appear. The values entered will be used to send the email. This option is preferred for those who don't wish to display credentials in the clear or save them to file.
MYSQL Send - Configure Send Options
MYSQL send defines SQL statement syntax to send to the MYSQL server. With the 'MYSQL - Send' dialog we can build MYSQL the statements.
There are two ways to get these commands into Mini Mouse Macro when running a macro:
1. Provide Macro Line Options
Providing macro line options adds these options directly into a macro line. The 'MYSQL - Send' dialog from the 'Add Condition' page is a good way to get these values in the correct format.
1 | RUN ACTION | MYSQL | SQL::INSERT into CUSTOMERS (id, order_date, order_name, order_email) values ( null, '2021-03-20', 'Johnathan Thurston', '[email protected]' );
2. Read in From a File
The MYSQL statement can be saved in a file and read in during the macro. The 'Email - Send' dialog from the 'Add Condition' page is a good way to get these values in the correct format. From the Email - Send dialog enter the values, click the 'Save' button to save them to file, and then select 'Read in from a file'.
1 | RUN ACTION | MYSQL | C:\Users\steph\Dropbox\Macro\mysql\mysql_send.mmmacro
The file must be a text based file and contain the following values and format:
mysql_send.mmmacro
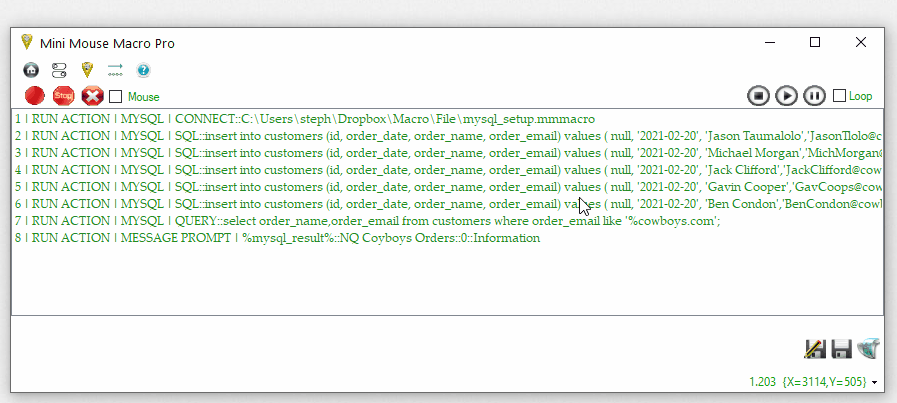
draw
DRAW creates temporary graphics on the screen. DRAW can create TEXT, PICTURES, CIRCLES, RECTANGLES, and LINES as graphics drawn temporally to the screen.
Consider the following DRAW example below:
1 | RUN ACTION | DRAW | TEXT::AT LOCATION [100 200]::COLOR [Black 1]::STRING [The time is %time%]::FONT [Arial, 20, Regular]::TIME [2 50]::WAIT YES
2 | RUN ACTION | DRAW | PICTURE::AT LOCATION [717 178]::FILE [D:\Macro\OUTPUT\Turnssoft Logo.jpg]::TIME [1 50]::WAIT NO
3 | RUN ACTION | DRAW | CIRCLE::AT LOCATION [776 103 25 25]::COLOR [Green 1]::FILL [YES]::TIME [1 50]::WAIT NO
4 | RUN ACTION | DRAW | RECTANGLE::AT LOCATION [736 103 25 25]::COLOR [RED 4]::FILL [NO]::TIME [1 50]::WAIT NO
5 | RUN ACTION | DRAW | LINE::AT LOCATION [95 243 752 243]::COLOR [RED 10]::TIME [1 50]::WAIT YES
In this example we create one of each of the graphic types. Notice that after the TIME value the graphics expires from the screen when the background changes behind them.
DRAW actions are best added through the 'Add Condition' page. By selecting the DRAW action the 'Add Action - DRAW' wizard is displayed.
|
|
send email
SEND EMAIL sends an email to one or many email addresses.
To send an email with Mini Mouse Macro you will most likely need to set your email account to allow 'Less Secure Apps'. Here is instructions for gmail. As of the end of 2022, for Gmail the account requires 2 factor authentication to be enabled in order to enable an app password for Mini Mouse Macro.
The Send Email action connects to a mail SMTP server, such as smtp.gmail.com (gmail) or smtp.live.com (outlook), using credentials (username and password) supplied, and with the options for secure SSL (SMARTTLS) to send an email message.
The Send Email action is broken down into three command options:
- Setup - The options required to send the email
- Send - The email body including the address information
- Setup or/and send from file - Create a file to read in the setup or/and send configuration during the macro
Email Setup - Configure Setup Options
Email setup is required to define the SMTP settings necessary to send an email with Mini Mouse Macro. For most people, the email sent from Mini Mouse Macro will be sent using your own personal email account, [email protected] for example, so the email setup settings will be based on your email account.
To send an email with Mini Mouse Macro you will most likely need to set your email account to allow 'Less Secure Apps'. Here is instructions for gmail.
Required Settings:
SMTP Server - This is the SMTP server address of your email provider. Gmail is smtp.gmail.com and outlook or hotmail are smtp.live.com. If you are unsure of your SMTP address or port for your email provider check out arclab for some popular examples as well as this site.
Port - The port is a number required by the SMTP server address to accept mail sending requests. The port number, in most cases, for secure SSL connections is 587. If you are unsure of your SMTP address or port for your email provider check out arclab for some popular examples as well as this site.
SSL - When SSL is enabled email messages sent from Mini Mouse Macro are sent securly (SMARTTLS). SSL is the default and is strongly recommended.
Username - The username value is the SMTP server login. In most cases this value is your own email address.
Password - The password value is the SMTP username password. In most cases this value is your email address password.
There are three ways to get these settings into Mini Mouse Macro when running a macro:
1. Provide Macro Line Options
Providing macro line options adds these options directly into a macro line. The 'Email - Setup' dialog from the 'Add Condition' page is a good way to get these values in the correct format. The order of the SMTP settings on the macro line must be SERVER::PORT::SSL::USERNAME::PASSWORD.
1 | RUN ACTION | SEND EMAIL | SETUP::smtp.gmail.com::587::SSL::[email protected]::SecretPassword
Notice that the password is displayed on the macro line. For those who don't want to display the password on the screen consider the 'Read in from a file' option instead.
2. Read in From a File
The macro line options can be saved in a file and read in during the macro. The 'Email - Setup' dialog from the 'Add Condition' page is a good way to get these values in the correct format. From the Email - Setup dialog enter the values, click the 'Save' button to save them to file, and then select 'Read in from a file'.
1 | RUN ACTION | SEND EMAIL | SETUP::C:\Users\steph\Dropbox\Macro\File\email_setup.mmmacro
The file must be a text based file and contain the following values and format:
email_setup.mmmacro
Notice that the password is saved within the setup file. When saving the password to file consider securing the file or applying Windows file encryption or Mini Mouse Macro file encrpytion. For those who don't want to save the password to file consider the 'Prompt setup during macro' option instead.
3. Prompt Setup During Macro
The third option is to prompt for the setup information during the running of the macro.
1 | RUN ACTION | SEND EMAIL | SETUP::PROMPT
When run the 'Email - Setup' dialog will appear. The values entered will be used to send the email. This option is preferred for those who don't wish to display credentials in the clear or save them to file.
Email Send - Configure Send Options
Email send defines the email body. With the 'Email - Send' dialog we can build email messages.
If you have the free version of Mini Mouse Macro you can send a total of 10 emails per macro run. The Pro Version of Mini Mouse Macro has no limit on the number of emails that can be sent.
Required Settings:
To - The recipicant email address. This can be one address or many email addresses seperated by a semicolon.
From - This is the email address sending the email. In most cases, this is your email address.
HTML - The email body can be sent with HTML syntax. In most cases, this value is False.
Subject - The subject line of the email.
Body - The body of the email. The body can be more than one line. A line break (a new line) is represented by a '\n' within the macro line.
There are two ways to get these settings into Mini Mouse Macro when running a macro:
1. Provide Macro Line Options
Providing macro line options adds these options directly into a macro line. The 'Email - Send' dialog from the 'Add Condition' page is a good way to get these values in the correct format.
1 | RUN ACTION | SEND EMAIL | SEND::[email protected]::[email protected]::SUBJECT=Email from Mini Mouse Macro at %time%::HTML=False::BODY=Hi,'\n'This is an email from MMM at %date% %time%.'\n'This is the third and last line of the email.
For those who don't want to display the email on the screen consider the 'Read in from a file' option instead.
2. Read in From a File
The email can be saved in a file and read in during the macro. The 'Email - Send' dialog from the 'Add Condition' page is a good way to get these values in the correct format. From the Email - Send dialog enter the values, click the 'Save' button to save them to file, and then select 'Read in from a file'.
1 | RUN ACTION | SEND EMAIL | C:\Users\steph\Dropbox\Macro\email\email_thelongandwindingroad.mmmacro
The file must be a text based file and contain the following values and format:
email_thelongandwindingroad.mmmacro
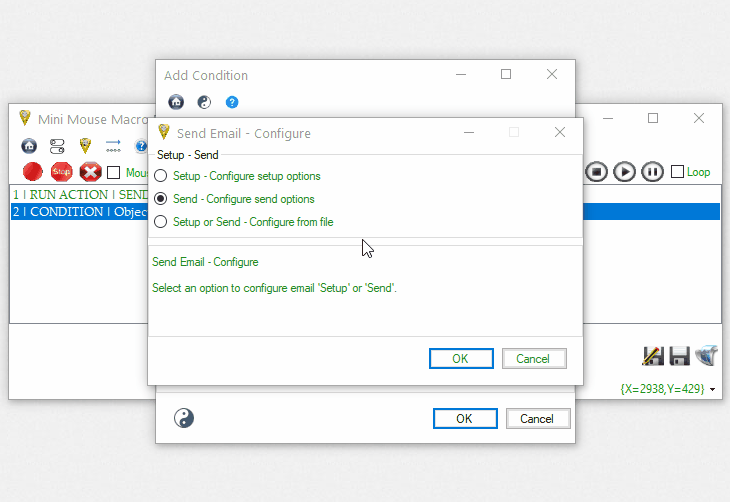
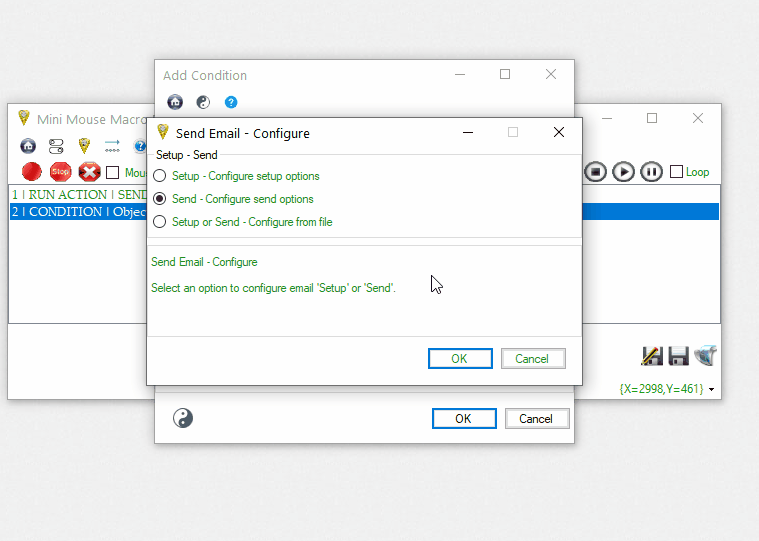
Setup or Send - Configure From File
The settings for both setup and send can be read in from the same file. The 'Setup/Send Email' dialog helps build that file.
Required file settings:
SMTP Server - This is the SMTP server address of your email provider. Gmail is smtp.gmail.com and outlook or hotmail are smtp.live.com. If you are unsure of your SMTP address or port for your email provider check out arclab for some popular examples as well as this site.
Port - The port is a number required by the SMTP server address to accept mail sending requests. The port number, in most cases, for secure SSL connections is 587. If you are unsure of your SMTP address or port for your email provider check out arclab for some popular examples as well as this site.
SSL - When SSL is enabled email messages sent from Mini Mouse Macro are sent securly (SMARTTLS). SSL is the default and is strongly recommended.
Username - The username value is the SMTP server login. In most cases this value is your email address.
Password - The password value is the SMTP username password. In most cases this value is your email address password.
To - The recipicant email address. This can be one address or many email addresses seperated by a semicolon.
From - This is the email address sending the email. In most cases, this is your email address.
HTML - The email body can be sent with HTML syntax. In most cases, this value is False.
Subject - The subject line of the email.
Body - The body of the email. The body can be more than one line. A line break (a new line) is represented by a '\n' within the macro line.
1 | RUN ACTION | SEND EMAIL | C:\Users\steph\Dropbox\Macro\email\email_full_whilemyguitargentlyweeps.mmmacro
The file must be a text based file and contain the following values and format:
email_full_whilemyguitargentlyweeps.mmmacro
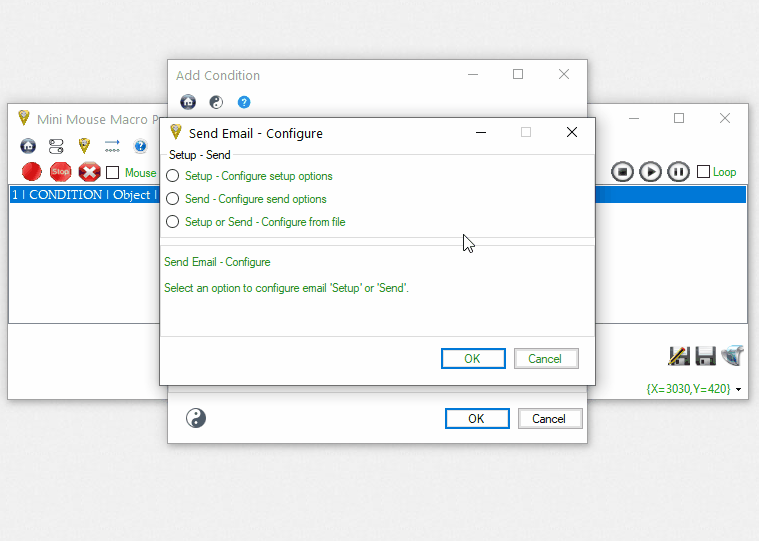
set title
SET TITLE defines the text for the macro title window. This is useful to display current values and aid in macro flow during the running macro.
Consider the SET TITLE example below:
1 | RUN ACTION | SET TITLE | %date% %time% Macro Start
In this example the macro window title set at run time to the current date, time, and the word Macro Start
Consider the SET TITLE example below:
1 | RUN ACTION | SET TITLE | %date% %time% Macro Start
In this example the macro window title set at run time to the current date, time, and the word Macro Start
GOTO MACRO LINE
GOTO MACRO LINE action is used to direct the flow of the macro by jumping the macro to a specific line number or heading. GOTO MACRO LINE can also be used with the %RETURN% internal variable to control macro direction.
Consider the GOTO MACRO LINE example statement below taken from a macro condition:
1 | IF | FILE | C:\running.log | FILE CONTAINS STRING | Started | GOTO MACRO LINE | 1019
This reads - IF the FILE, c:\running.log, FILE CONTAINS STRING 'Started' then GOTO MACRO LINE 1019. So if the file c:\running.log contains the text string 'Started' anywhere in the file then the macro will jump and continue from macro line 1019, otherwise continue the macro will continue.
Remarks can be used as reference headers for GOTO MACRO LINE.
Consider the GOTO MACRO LINE example statement below taken from a macro condition:
1 | IF | INTEGER VARIABLE | %INTEGER% | LESS THAN | 10 | GOTO MACRO LINE | Main | ELSE | 1 | RUN ACTION | GOTO MACRO LINE | End
This reads - IF %INTEGER% is less than the value 10 then GOTO MACRO LINE header Main or ELSE if the value of %INTEGER% is not less than 10 then GOTO MACRO LINE header End.
An example of GOTO MACRO LINE using remarks to define GOTO headers:
* | Head
1 | RUN ACTION | SET TITLE | %date% %time% (Goto Remark Demo)
2 | RUN ACTION | DEFINE STRING VARIABLE | %STRING%::%date% %time%
3 | RUN ACTION | DEFINE INTEGER VARIABLE | %INTEGER%::0
* | Main
4 | IF | RECEIVE UDP PACKET STRING | ANY::41414::ACK::10 | STRING FOUND | SEARCH FOR STRING | SEND UDP PACKET STRING | 192.168.1.50::41414::RST
5 | RUN ACTION | DEFINE INTEGER VARIABLE | %INTEGER%::+1
6 | IF | INTEGER VARIABLE | %INTEGER% | LESS THAN | 10 | GOTO MACRO LINE | Main | ELSE | 1 | RUN ACTION | GOTO MACRO LINE | End
* | End
7 | RUN ACTION | SET TITLE | Start=%string% End=%date% %time% (Goto Remark Demo)
UP and DOWN can be used as reference headers for GOTO MACRO LINE.
Consider the GOTO MACRO LINE example statement below taken from a macro condition:
5 | IF | BOOLEAN VARIABLE | %BOOLEAN% | IS TRUE | GOTO MACRO LINE | Up 5 | ELSE | 2 | RUN ACTION | GOTO MACRO LINE | Down 1
This reads - IF %BOOLEAN% is TRUE then GOTO MACRO LINE that is Up 5 from this line or ELSE if the value of %BOOLEAN% is not TRUE then GOTO MACRO LINE that is Down 1 .
An example of GOTO MACRO LINE using Up and Down to define GOTO headers:
* | Head
1 | RUN ACTION | DEFINE INTEGER VARIABLE | %INTEGER%::1
2 | RUN ACTION | MESSAGE PROMPT | After Head::%RETURN%::1
* | Main
3 | RUN ACTION | MESSAGE PROMPT | Hello World::%RETURN%::1
4 | RUN ACTION | MESSAGE PROMPT | After Main: %integer% of 5::%RETURN%::1
5 | RUN ACTION | DEFINE INTEGER VARIABLE | %INTEGER%::+1
6 | IF | INTEGER VARIABLE | %INTEGER% | = | 5 | GOTO MACRO LINE | Down 2
7 | RUN ACTION | GOTO MACRO LINE | UP 3
* | Next
8 | RUN ACTION | MESSAGE PROMPT | After Next: %integer% of 10::%RETURN%::1
9 | RUN ACTION | DEFINE INTEGER VARIABLE | %INTEGER%::+1
10 | IF | INTEGER VARIABLE | %INTEGER% | = | 10 | GOTO MACRO LINE | Down 2
11 | RUN ACTION | GOTO MACRO LINE | Up 3
* | End
12 | RUN ACTION | GOTO MACRO LINE | DOWN
13 | RUN ACTION | MESSAGE PROMPT | End of File: %integer%::%RETURN%::1
Consider the GOTO MACRO LINE example statement below taken from a macro condition:
5 | IF | BOOLEAN VARIABLE | %BOOLEAN% | IS TRUE | GOTO MACRO LINE | Up 5 | ELSE | 2 | RUN ACTION | GOTO MACRO LINE | Down 1
This reads - IF %BOOLEAN% is TRUE then GOTO MACRO LINE that is Up 5 from this line or ELSE if the value of %BOOLEAN% is not TRUE then GOTO MACRO LINE that is Down 1 .
- GOTO MACRO LINE | Up 5 Goto the macro line 5 up from the current line
- GOTO MACRO LINE | Up Goto the macro line 1 up from the current line
- GOTO MACRO LINE | Down 20 Goto the macro line 20 down from the current line
- GOTO MACRO LINE | Down Goto the macro line 1 down from the current line
An example of GOTO MACRO LINE using Up and Down to define GOTO headers:
* | Head
1 | RUN ACTION | DEFINE INTEGER VARIABLE | %INTEGER%::1
2 | RUN ACTION | MESSAGE PROMPT | After Head::%RETURN%::1
* | Main
3 | RUN ACTION | MESSAGE PROMPT | Hello World::%RETURN%::1
4 | RUN ACTION | MESSAGE PROMPT | After Main: %integer% of 5::%RETURN%::1
5 | RUN ACTION | DEFINE INTEGER VARIABLE | %INTEGER%::+1
6 | IF | INTEGER VARIABLE | %INTEGER% | = | 5 | GOTO MACRO LINE | Down 2
7 | RUN ACTION | GOTO MACRO LINE | UP 3
* | Next
8 | RUN ACTION | MESSAGE PROMPT | After Next: %integer% of 10::%RETURN%::1
9 | RUN ACTION | DEFINE INTEGER VARIABLE | %INTEGER%::+1
10 | IF | INTEGER VARIABLE | %INTEGER% | = | 10 | GOTO MACRO LINE | Down 2
11 | RUN ACTION | GOTO MACRO LINE | Up 3
* | End
12 | RUN ACTION | GOTO MACRO LINE | DOWN
13 | RUN ACTION | MESSAGE PROMPT | End of File: %integer%::%RETURN%::1
Variable values can also be used to set the GOTO value. %RETURN% variable holds the line number value of the last completed macro line. This variable is useful when used with GOTO to control macro flow.
Consider the following example macro detailing the usage of the %RETURN% variable with GOTO:
1 | RUN ACTION | DEFINE INTEGER VARIABLE | %INTEGER%::+1
2 | IF | INTEGER VARIABLE | %INTEGER% | < | 10 | GOTO MACRO LINE | %RETURN% | ELSE | 2 | RUN ACTION | GOTO MACRO LINE | %RETURN%+2
3 | RUN ACTION | MESSAGE PROMPT | INTEGER is GTR than 10::INT Value
This reads:
Line 1: Add a value of 1 to the %INTEGER% variable (%INTEGER%::+1)
Line 2: If the value of %INTEGER% is less than (<) 10 then GOTO MACRO LINE %RETURN% (here the value of %RETURN% is line1) or if the value is not less than 10 then GOTO MACRO LINE %RETURN%+2 (here the value of %RETURN% + 2 is line 3)
Line 3: Display a message prompt that says "INTEGER is GTR than 10"
%RETURN% accepts basic math expression during evaluation. This is limited to addition (+), multiplication (*), subtraction (*), and division (/).
%RETURN%+%INTEGER1%
%RETURN%-2
%RETURN%*2
%RETURN%/%INTEGER1%
Note: It is possible to get caught in a infinite loop if the value %RETURN%+1 is used. %RETURN%+1 is the current line, so using this value in a GOTO statement will return the flow back to the same line. If the loop is not caught through leading condition statement it will cycle infinity through the current line.
LOAD MACRO
LOAD MACRO action is used to control macro flow by loading and then starting a .mmmacro saved file into Mini Mouse Macro.
Consider the LOAD MACRO example statement below taken from a macro condition:
1 | IF | FILE | C:\MMM\Macro4.mmmacro | EXIST | LOAD MACRO | C:\MMM\Macro4.mmmacro
This reads - IF the FILE C:\MMM\Macro4.mmmacro EXIST then LOAD MACRO :\MMM\Macro4.mmmacro. So if the file Macro4.mmmacro does exist then stop the current macro, load the .mmmacro file Macro4.mmmacro and then start playing the macro, otherwise continue running the macro.
load marco from url
LOAD MACRO FROM URL action is used to control macro flow by loading and then starting a macro from a URL into Mini Mouse Macro.
Note that the URL must begin with http:// or https://
Consider the LOAD MACRO FROM URL example statement below taken from a macro condition where the file test_macro.mmmacro is loaded:
1 | RUN ACTION | LOAD MACRO FROM URL | https://minimousemacro.com/macro/test_macro.mmmacro
Consider the LOAD MACRO FROM URL example statement below taken from a macro condition where the text data is from the URL is loaded line by line:
1 | RUN ACTION | LOAD MACRO FROM URL | https://pastebin.com/raw/Qii5ZbVa
add macro from file
ADD MACRO FROM FILE action is used to add macro lines into the current running macro from a file. This appends all macro lines within the loaded file to the end of the macro, the macro is then stopped and started from the next line number after the ADD MACRO FROM FILE action.
NOTE that is it important when running this action to have correctly sorted line numbers. It is recommended to run the 'relist rows' feature from the macro right click menu prior to starting the macro.
Consider the ADD MACRO FROM FILE example statement below taken from a macro condition:
1 | IF | FILE | C:\MMM\Macro4.mmmacro | EXIST | ADD MACRO FROM FILE | C:\MMM\Macro4.mmmacro
This reads - IF the FILE C:\MMM\Macro4.mmmacro EXIST then ADD MACRO FROM FILE C:\MMM\Macro4.mmmacro. So if the file Macro4.mmmacro does exist then stop the current macro, add all macro lines from the file Macro4.mmmacro and then start playing the macro from where it left off, otherwise continue running the macro.
add macro from url
ADD MACRO FROM URL action is used to add macro lines into the current running macro from a URL. This appends all macro lines within the URL to the end of the macro, the macro then continues to the next line number after the ADD MACRO FROM FILE action.
Note that the URL must begin with http:// or https://
Consider the ADD MACRO FROM URL example statement below taken from a macro condition where the file test_macro.mmmacro is loaded:
1 | RUN ACTION | ADD MACRO FROM URL | https://minimousemacro.com/macro/test_macro.mmmacro
Consider the ADD MACRO FROM URL example statement below taken from a macro condition where the text data is from the URL is loaded line by line:
1 | RUN ACTION | ADD MACRO FROM URL | https://pastebin.com/raw/Qii5ZbVa

wait MILLISECONDS & seconds & wait minutes & wait hours
WAIT MILLISECONDS, WAIT SECONDS, WAIT MINUTES and WAIT HOURS action are used to control the flow of macro execution by offering a period of milliseconds, seconds, minutes, or hours to wait until continuing.
Consider the WAIT MINUTES example statement below taken from a macro condition:
1 | IF NOT | PROCESS ID | 12116 | EXIST | WAIT MINUTES | 5
This reads - IF NOT the PROCESS ID 12116 EXIST then WAIT MINUTES 5. So if the process with process ID of 12116 does not EXIST then the macro will wait 5 minutes before continuing, otherwise If the process does exist then the macro will continue.
1 | RUN ACTION | WAIT SECONDS | 20
This reads - RUN the ACTION to WAIT 20 SECONDS
select window by name
SELECT WINDOW BY NAME action selects the open window with the title value that matches the SELECT WINDOW BY NAME value. By selecting a window it is given active scope, for example when clicking into a window that program is given active scope.
Consider the SELECT WINDOW BY NAME example statement below taken from a macro condition:
1 | RUN ACTION | SELECT WINDOW BY NAME | New Tab - Mozilla Firefox
This reads - RUN the ACTION SELECT WINDOW BY NAME the window title 'New Tab - Mozilla Firefox'. So this action will run and select the window with the window title 'New Tab - Mozilla Firefox'. If there is no window with that title then the condition action is skipped.
Consider the WINDOW TITLE example statement below used to SELECT WINDOW:
1 | IF | WINDOW TITLE | index.txt - Notepad | EXIST | SELECT WINDOW BY NAME | index.txt - Notepad | ELSE | 1 | RUN ACTION | RUN PROGRAM | D:\Macro\index.txt
This reads - IF a WINDOW with the TITLE named index.txt - Notepad does EXIST (meaning that a window is open that does have that title) then SELECT the WINDOW BY its NAME. index.txt - Notepad. The the windows title named index.txt does not exist, ELSE then RUN the ACTION to RUN the PROGRAM at D:\Macro\index.txt
select window by process id
SELECT WINDOW BY PROCESS ID action selects the open program window with that matches the process ID value. By selecting a window it is given active scope, for example when clicking into a window that program is given active scope.
Consider the SELECT WINDOW BY PROCESS ID example statement below taken from a macro condition:
1 | IF | PROCESS ID | 10780 | EXIST | SELECT WINDOW BY PROCESS ID | 10780
This reads - IF the PROCESS ID 10780 EXIST then SELECT the WINDOW BY its PROCESS ID of 10780. So if the process with the process ID of 10780 is active the time the condition is evaluated then select the program with that process ID. If no process ID is running that matches that ID then the condition action is skipped.
delete file & delete folder
This Action is depreciated. It has been replaced by FILE DELETE.
DELETE FILE and DELETE FOLDER action deletes files and folders from the system. NOTE that files and folders that are deleted are permanently deleted and can not be recovered from the recycle bin. NOTE that when a folder is deleted ALL THE CONTENTS is deleted from the folder.
Consider the DELETE FOLDER example statement below taken from a macro condition:
1 | IF | FOLDER | C:\logerrors | EXIST | DELETE FOLDER | C:\logerrors
This reads - IF the FOLDER C:\logerrors does EXIST then DELETE FOLDER c:\logerrors. So all the contents of the folder c:\logerrors will be deleted. Including all child files and folders.
file copy
FILE COPY performs simple file copy operations. FILE COPY can copy single files from source to destination, a folder, or a folder tree recursively.
FILE COPY accepts the following parameters separated by two colons (::)
This example will copy all files in the D:\Macro\Source directory to D:\Macro\Dest directory.
1 | RUN ACTION | FILE COPY | D:\Macro\Source\::D:\Macro\Dest\
This example below uses the OVERWRITE paramater to overwrite files in the destination if they exsit:
1 | RUN ACTION | FILE COPY | D:\Macro\Source\::D:\Macro\Dest\::OVERWRITE
This example uses RECURSIVE to copy the directory tree:
1 | RUN ACTION | FILE COPY | D:\Macro\Source::D:\Macro\Dest::RECURSIVE::OVERWRITE
Files
This example copies the file D:\macro\source\file1.txt to the destination folder D:\Macro\Dest\. The operation also carries the OVERWRITE and UI paramaters.
1 | RUN ACTION | FILE COPY | D:\Macro\Source\file1.txt::D:\Macro\Dest\::OVERWRITE::UI
This example copies the source file D:\Macro\Source\file2.txt to the destination D:\Macro\Dest\%RANDOM%.txt:
1 | RUN ACTION | FILE COPY | D:\Macro\Source\file2.txt::D:\Macro\Dest\%random%.txt
FILE COPY accepts the following parameters separated by two colons (::)
- OVERWRITE: Overwrite the destination file with the source if it exists
- RECURSIVE: Copy all files and folders in a directory tree recursively.
- NOCREATE: If the destination folder does not exist then do not create the folder and abort the copy.
- UI: Use the typical Windows User Interface for copy operations. This provides the standard dialog for 'skipping' and 'overwriting' files.
This example will copy all files in the D:\Macro\Source directory to D:\Macro\Dest directory.
1 | RUN ACTION | FILE COPY | D:\Macro\Source\::D:\Macro\Dest\
This example below uses the OVERWRITE paramater to overwrite files in the destination if they exsit:
1 | RUN ACTION | FILE COPY | D:\Macro\Source\::D:\Macro\Dest\::OVERWRITE
This example uses RECURSIVE to copy the directory tree:
1 | RUN ACTION | FILE COPY | D:\Macro\Source::D:\Macro\Dest::RECURSIVE::OVERWRITE
Files
This example copies the file D:\macro\source\file1.txt to the destination folder D:\Macro\Dest\. The operation also carries the OVERWRITE and UI paramaters.
1 | RUN ACTION | FILE COPY | D:\Macro\Source\file1.txt::D:\Macro\Dest\::OVERWRITE::UI
This example copies the source file D:\Macro\Source\file2.txt to the destination D:\Macro\Dest\%RANDOM%.txt:
1 | RUN ACTION | FILE COPY | D:\Macro\Source\file2.txt::D:\Macro\Dest\%random%.txt
file create
FILE CREATE creates text files or empty files of a certain size
FILE CREATE accepts the following paramaters seperated by two colons (::)
This example will create an empty file called 'file1.out' of 100 Bytes in size:
1 | RUN ACTION | FILE CREATE | D:\Macro\Bytes\file1.out::B::100
This example will create an empty file called 'file2.out' of 500 Kilobytes in size:
1 | RUN ACTION | FILE CREATE | D:\Macro\Bytes\file2.out::K::500
This example will create an empty file called 'file3.out' of 10 Megabytes in size:
1 | RUN ACTION | FILE CREATE | D:\Macro\Bytes\file3.out::M::10
Text file
This example creates a text file with the text below:
FILE CREATE accepts the following paramaters seperated by two colons (::)
- B: Bytes. Creates an empty file of a declared size in bytes.
- K: Kilobytes. Creates an empty file of a declared size in kilobytes.
- M: Megabytes. Creates an empty file of a declared size in megabytes.
- NOOVERWRITE: If the file exists, do not overwrite the file.
- UI: Use the typical Windows User Interface for copy operations. This provides the standard dialog for 'skipping' and 'overwriting' files.
This example will create an empty file called 'file1.out' of 100 Bytes in size:
1 | RUN ACTION | FILE CREATE | D:\Macro\Bytes\file1.out::B::100
This example will create an empty file called 'file2.out' of 500 Kilobytes in size:
1 | RUN ACTION | FILE CREATE | D:\Macro\Bytes\file2.out::K::500
This example will create an empty file called 'file3.out' of 10 Megabytes in size:
1 | RUN ACTION | FILE CREATE | D:\Macro\Bytes\file3.out::M::10
Text file
This example creates a text file with the text below:
D:\Macro\Text\example.txt
1 | RUN ACTION | FILE CREATE | D:\Macro\Text\example.txt::The FILE CREATE action can create text files as well as empty files.\n Files can be created of a determined byte, kilobyte, and megabyte size.\n The following additional params are supported:\n NOOVERWRITE, and\n UI.
Note that the \n in the output adds a new line (a line feed).
Note that the \n in the output adds a new line (a line feed).
file delete
FILE DELETE performs simple file delete operations. FILE DELETE can delete single files or folders.
FILE DELETE accepts the following paramaters seperated by two colons (::)
This example will delete a directory and all files/folders within:
1 | RUN ACTION | FILE DELETE | D:\Macro\Source\
This example will delete a directory and all files/folders within and send them to the recycle bin:
1 | RUN ACTION | FILE DELETE | D:\Macro\Source\::RECYCLE
Files
This example will delete a single file:
1 | RUN ACTION | FILE DELETE | D:\Macro\Source\file1.txt
This example will delete a single file with the UI paramater:
1 | RUN ACTION | FILE DELETE | D:\Macro\Source\file1.txt::UI
FILE DELETE accepts the following paramaters seperated by two colons (::)
- RECYCLE: Sends the file to the recycle bin.
- UI: Use the typical Windows User Interface for delete operations. This provides the standard 'delete file' dialog.
This example will delete a directory and all files/folders within:
1 | RUN ACTION | FILE DELETE | D:\Macro\Source\
This example will delete a directory and all files/folders within and send them to the recycle bin:
1 | RUN ACTION | FILE DELETE | D:\Macro\Source\::RECYCLE
Files
This example will delete a single file:
1 | RUN ACTION | FILE DELETE | D:\Macro\Source\file1.txt
This example will delete a single file with the UI paramater:
1 | RUN ACTION | FILE DELETE | D:\Macro\Source\file1.txt::UI
file hash
FILE HASH returns the hash value of a file or many files recursively The hash value is return to the %HASH% internal variable, a designated variable, or output to a file with options.
FILE HASH supports the following file hashing algorithms:
FILE HASH supports the following file hashing algorithms:
- MD5
- SHA1
- SHA256
- SHA384
- SHA512
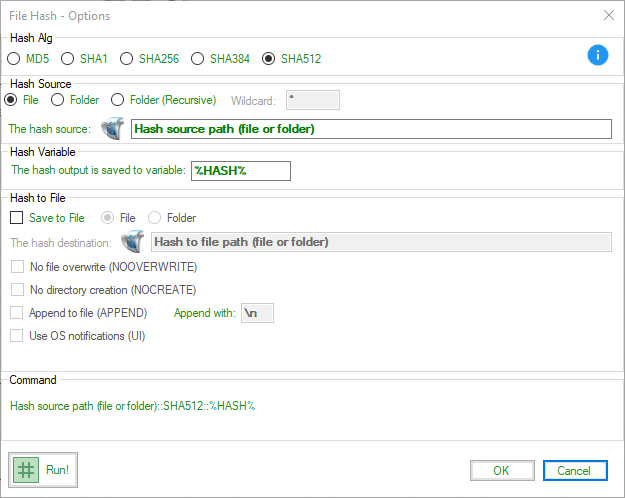
FILE HASH accepts the following paramaters seperated by two colons (::)
When hashing a file the hash value will be saved to the %HASH% variable by default and optionally can be saved to file.
This example is most basic implimentation of the FILE HASH action when hashing a file. The file test1.txt will use the MD5 hashing algorithm to hash the file and store the hash value to the %HASH% internal variable:
1 | RUN ACTION | FILE HASH | D:\Macro\File\test1.txt::md5
This example produces a sha512 hash of test1.txt and stores the value to the %STRING% variable:
1 | RUN ACTION | FILE HASH | D:\Macro\File\test1.txt::sha512::%STRING%
This example saves the hash value of test1.txt to the file D:\Hash\tests.sha512:
1 | RUN ACTION | FILE HASH | D:\Macro\File\test1.txt::sha512::D:\Hash\tests.sha512
This example saves the hash value of test2.txt as the file name to the folder D:\Hash:
1 | RUN ACTION | FILE HASH | D:\Macro\File\test1.txt::sha512::D:\Hash\::APPEND::\n
This example saves the hash value of test2.txt to the file D:\Hash\tests.sha512, appending the value with the filename (f) and a new line (\n):
1 | RUN ACTION | FILE HASH | D:\Macro\File\test2.txt::sha512::D:\Hash\tests.sha512::APPEND::f\n
- SOURCE: The source file or folder
- WILDCARD: Optional. If the hash source is a folder a wildcard can be used to filter files to be hashed.
- The wildcard can be any combination of vaild literal path and wildcard (* and ?) characters.
- The wildcard string does not support regulard expression.
- DESTINATION: Optional. The source file or folder path to write the hash value to.
- ALG: The hashing algorithm from the list above being MD5, SHA1, SHA256, SHA384, SHA512
- VARIABLE: Optional. The default being %HASH% however can be any other variable of STRING type
- NOOVERWRITE: Optional. When saving to file or folder there will be no file overwriting if the destination exists.
- NOCREATE: Optional. If the directory or sub directory does not exist in the destination then do not create it.
- UI: Optional. When performing file operations disaplay the Windows User Interface for file operations.
- APPEND: Optional. When saving to a file APPEND will append the hash value to the file. If not selected the file will be overwritten by the hash value.
- APPEND WITH: Optional. When saving to file APPEND the hash value WITH the a string. The following are some special characters acepted:
- \n This will append a new line
- f This will append the file name of the source
When hashing a file the hash value will be saved to the %HASH% variable by default and optionally can be saved to file.
This example is most basic implimentation of the FILE HASH action when hashing a file. The file test1.txt will use the MD5 hashing algorithm to hash the file and store the hash value to the %HASH% internal variable:
1 | RUN ACTION | FILE HASH | D:\Macro\File\test1.txt::md5
This example produces a sha512 hash of test1.txt and stores the value to the %STRING% variable:
1 | RUN ACTION | FILE HASH | D:\Macro\File\test1.txt::sha512::%STRING%
This example saves the hash value of test1.txt to the file D:\Hash\tests.sha512:
1 | RUN ACTION | FILE HASH | D:\Macro\File\test1.txt::sha512::D:\Hash\tests.sha512
This example saves the hash value of test2.txt as the file name to the folder D:\Hash:
1 | RUN ACTION | FILE HASH | D:\Macro\File\test1.txt::sha512::D:\Hash\::APPEND::\n
This example saves the hash value of test2.txt to the file D:\Hash\tests.sha512, appending the value with the filename (f) and a new line (\n):
1 | RUN ACTION | FILE HASH | D:\Macro\File\test2.txt::sha512::D:\Hash\tests.sha512::APPEND::f\n
File Source - Folder or Folder (Recursive)
When hashing a folder each file in the folder is hashed. The Recursive option hashes each file in each folder recursively.
This example hashes each file in he D:\Macro folder and saves them to D:\Hash\tests.sha512. The append option must be selected:
1 | RUN ACTION | FILE HASH | D:\Macro\::SHA512::D:\Hash\tests.sha512::APPEND::\n
This example uses a wildcard to filter for only files with a .txt extention within the folder D:\Macro\ and hash them to D:\Hash\tests.sha512:
1 | RUN ACTION | FILE HASH | D:\Macro\::SHA512::D:\Hash\tests.sha512::WILDCARD=*.txt::APPEND::\n
file move
FILE MOVE performs simple file move operations. FILE MOVE can move single files from source to destination, a folder, or a folder tree recursively.
FILE MOVE accepts the following parameters separated by two colons (::)
This example will move all files in the D:\Macro\Source directory to D:\Macro\Dest directory.
1 | RUN ACTION | FILE MOVE | D:\Macro\Source\::D:\Macro\Dest\
This example below uses the OVERWRITE paramater to overwrite files in the destination if they exsit:
1 | RUN ACTION | FILE MOVE | D:\Macro\Source\::D:\Macro\Dest\::OVERWRITE
This example uses RECURSIVE to move the directory tree:
1 | RUN ACTION | FILE MOVE | D:\Macro\Source::D:\Macro\Dest::RECURSIVE::OVERWRITE
Files
This example moves the file D:\macro\source\file1.txt to the destination folder D:\Macro\Dest\. The operation also carries the OVERWRITE and UI paramaters.
1 | RUN ACTION | FILE MOVE | D:\Macro\Source\file1.txt::D:\Macro\Dest\::OVERWRITE::UI
This example moves the source file D:\Macro\Source\file2.txt to the destination D:\Macro\Dest\%RANDOM%.txt:
1 | RUN ACTION | FILE MOVE | D:\Macro\Source\file2.txt::D:\Macro\Dest\%random%.txt
FILE MOVE accepts the following parameters separated by two colons (::)
- OVERWRITE: Overwrite the destination file with the source if it exists
- RECURSIVE: Moves all files and folders in a directory tree recursively.
- NOCREATE: If the destination folder does not exist then do not create the folder and abort the move.
- UI: Use the typical Windows User Interface for operations. This provides the standard dialog for 'skipping' and 'overwriting' files.
This example will move all files in the D:\Macro\Source directory to D:\Macro\Dest directory.
1 | RUN ACTION | FILE MOVE | D:\Macro\Source\::D:\Macro\Dest\
This example below uses the OVERWRITE paramater to overwrite files in the destination if they exsit:
1 | RUN ACTION | FILE MOVE | D:\Macro\Source\::D:\Macro\Dest\::OVERWRITE
This example uses RECURSIVE to move the directory tree:
1 | RUN ACTION | FILE MOVE | D:\Macro\Source::D:\Macro\Dest::RECURSIVE::OVERWRITE
Files
This example moves the file D:\macro\source\file1.txt to the destination folder D:\Macro\Dest\. The operation also carries the OVERWRITE and UI paramaters.
1 | RUN ACTION | FILE MOVE | D:\Macro\Source\file1.txt::D:\Macro\Dest\::OVERWRITE::UI
This example moves the source file D:\Macro\Source\file2.txt to the destination D:\Macro\Dest\%RANDOM%.txt:
1 | RUN ACTION | FILE MOVE | D:\Macro\Source\file2.txt::D:\Macro\Dest\%random%.txt
kill process id & kill process name
KILL PROCESS ID and KILL PROCESS NAME action kills current running system processes found either by the process ID value or the process name value.
Consider the KILL PROCESS NAME example statement below taken from a macro condition:
1 | IF | PROCESS NAME | notepad | EXIST | KILL PROCESS NAME | notepad
This reads - IF the PROCESS NAME of notepad does EXIST then KILL PROCESS with the NAME notepad. So if the notepad process exist then kill the notepad process.
run macro inline
The RUN MACRO INLINE action runs a saved macro file inline before progressing the macro.
Consider the RUN MACRO INLINE example statement below taken from a macro condition:
1 | RUN ACTION | MESSAGE PROMPT | Start
2 | RUN ACTION | RUN MACRO INLINE | D:\Macro\Calculate.mmmacro
3 | RUN ACTION | MESSAGE PROMPT | End
The example macro above first will run a MESSAGE PROMPT 'Start' then will proceed to execute all the macro lines within the 'Calculate.mmmacro' file.
NOTE that the macro file will run without any macro flow control. This means that FOR loops and GOTO statements within the selected file when run inline will not work.
run via cmd /c
RUN VIA CMD /C action runs a command with a command window and then closes the command window after the command is executed.
Consider the RUN VIA CMD /C example statement below taken from a macro condition:
1 | RUN ACTION | RUN VIA CMD /C | c:\batch\checklogs.bat
This reads - RUN ACTION RUN VIA CMD /C the command c:\batch\checklogs.bat. So the action will run and execute the command c:\batch\checklogs.bat in a command window and close the window after the command is executed.
run via cmd /k
RUN VIA CMD /K action runs a command with a command window and then keeps the command window after the command is executed giving the command window focus.
Consider the RUN VIA CMD /K example statement below taken from a macro condition:
1 | IF | NETWORK HOST PING REPLY | 192.168.0.2 | UNSUCCESSFUL | RUN VIA CMD /K | tracert -d 192.168.0.2
This reads - IF the NETWORK HOST PING REPLY to 192.168.0.2 is UNSUCCESSFUL then RUN VIA CMD /K command tracert -d 192.168.0.2. So if the host 192.168.0.2 does not reply to ICMP packets then run the tracert -d 192.168.0.2 command in a command window and keep the command window open after the command has executed.
run program
RUN PROGRAM action runs a selected program exe.
Consider the RUN PROGRAM example statement below taken from a macro condition:
1 | IF | PROCESS ID | 6180 | NOT EXIST | RUN PROGRAM | C:\logs\logaudit.exe
This reads - IF the PROCESS ID of 6180 does NOT EXIST then RUN PROGRAM c:\logs\logaudit.exe. So if the process does not exist then execute the c:\logs\logsaudit.exe program.
Consider this example where RUN PROGRAM is given program arguments. The program name and arguments are seperated by the '::" delimitering value:
1 | RUN ACTION | RUN PROGRAM | D:\Macro\MiniMouseMacro.exe::"D:\Macro\Launch.mmmacro" /e
This reads - RUN PROGRAM D:\Macro\MiniMouseMacro.exe with the arguments "D:\Marco\Launch.mmmacro" /e.
keypress/KEYPRESS FROM FILE
KEYPRESS and KEYPRESS FROM FILE output text to the screen.
Consider the KEYPRESS and KEYPRESS FROM FILE example statement below taken from a macro condition:
1 | RUN ACTION | INPUT FROM FILE | STRING::NO_REFRESH::D:\Macro\TX\output.txt
2 | RUN ACTION | MESSAGE PROMPT | %STRING%::Contents of output.txt::0
3 | RUN ACTION | RUN PROGRAM | Notepad.exe
4 | IF | WINDOW TITLE | Untitled - Notepad | EXIST | CONTINUE
5 | RUN ACTION | SELECT WINDOW BY NAME | Untitled - Notepad
6 | RUN ACTION | KEYPRESS FROM FILE | D:\Macro\TX\Output.txt
7 | RUN ACTION | KEYPRESS | The time is %time% and the date is %date%
Lines 1 and 2 display the contents of text file within a message prompt.
Lines 3, 4, and 5 open a new Notepad instance and then select the Notepad instance window.
Line 6 takes the contents of Output.txt and writes it out to the screen. The active window is the Notepad instace so all text is written into the notepad document.
Line 7 writes out the string 'The time is %time% and the date is %date%' to the notepad document.
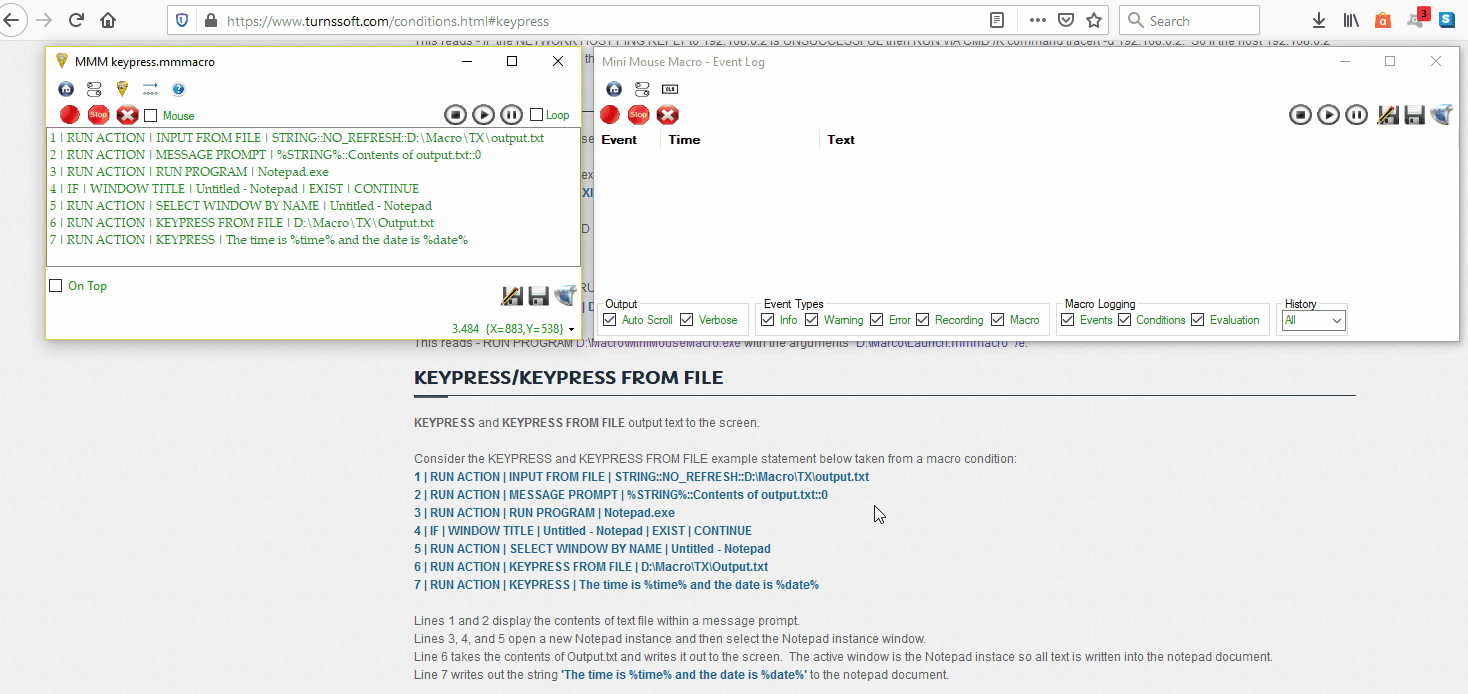
download from uri
DOWNLOAD FROM URI action downloads a program or file to a specific location from a URI location such as the internet.
Consider the DOWNLOAD FROM URI example statement below taken from a macro condition:
1 | RUN ACTION | DOWNLOAD FROM URI | C:\MMM::http://myuploadedmacros/macro4.mmmacro::WAIT
This reads - RUN ACTION DOWNLOAD FROM URI to folder c:\MMM from URI http://myuploadedmacros/macro4.mmmacro. So this action will run and download the file macro4.mmmacro to the folder c:\MMM. Because no save file name has been added the file will be saved to c:\MMM with the default file name of the file which is macro4.mmmacro in this case. The WAIT option will cause the macro to wait until the file has downloaded before continuing.
NOTE that formatting is important. Each statement must be separated by two colons ::
Consider the DOWNLOAD FROM URI example statement below taken from a macro condition:
1 | RUN ACTION | DOWNLOAD FROM URI | C:\MMM::https://minimousemacro.com/downloads/MiniMouseMacro.exe::MMM.exe::NO_WAIT
This reads - RUN ACTION DOWNLOAD FROM URI to folder c:\MMM from URI https://minimousemacro.com/downloads/MiniMouseMacro.exe and save the file as MMM.exe. The NO_WAIT option will not wait until the macro has downloaded before continuing the macro.
Consider the DOWNLOAD FROM URI example statement below taken from a macro condition:
1 | RUN ACTION | DOWNLOAD FROM URI | C:\MMM::http://myuploadedmacros/macro4.mmmacro::WAIT
This reads - RUN ACTION DOWNLOAD FROM URI to folder c:\MMM from URI http://myuploadedmacros/macro4.mmmacro. So this action will run and download the file macro4.mmmacro to the folder c:\MMM. Because no save file name has been added the file will be saved to c:\MMM with the default file name of the file which is macro4.mmmacro in this case. The WAIT option will cause the macro to wait until the file has downloaded before continuing.
NOTE that formatting is important. Each statement must be separated by two colons ::
Consider the DOWNLOAD FROM URI example statement below taken from a macro condition:
1 | RUN ACTION | DOWNLOAD FROM URI | C:\MMM::https://minimousemacro.com/downloads/MiniMouseMacro.exe::MMM.exe::NO_WAIT
This reads - RUN ACTION DOWNLOAD FROM URI to folder c:\MMM from URI https://minimousemacro.com/downloads/MiniMouseMacro.exe and save the file as MMM.exe. The NO_WAIT option will not wait until the macro has downloaded before continuing the macro.
remote
The REMOTE action send remote Mini Mouse Macro commands to other remote enabled Mini Mouse Macro instances across the network.
For detailed information on REMOTE, including usage demo's, please see the remote page.
A REMOTE action is best added to a macro from the 'Remote - Options' dialog launched from the Action menu within the 'Add Condition' tool.
For detailed information on REMOTE, including usage demo's, please see the remote page.
A REMOTE action is best added to a macro from the 'Remote - Options' dialog launched from the Action menu within the 'Add Condition' tool.
For sending and receiving any REMOTE actions from Mini Mouse Macro instances on the network 'Enable Remote Connections' must be enabled within settings.
To receive REMOTE commands from another instace of Mini Mouse Macro a listening IP : PORT socket must be enabled. An IP of 0.0.0.0 will enable listening on all interfaces. The port 41414 is the default for Mini Mouse Macro.
To send REMOTE commands to another instace of Mini Mouse Macro 'Enable sending from the MMM' must be enabled.
Commands
Remote SEND commands require a 'Remote Address' to be added. The 'Remote Address' is the destination address socket; an IP (or host name) and port socket pair.
- SEND: The SEND command is used to pass commands to remote listening MMM peers.
- SET: The SET command is used to configure local remote options.
- CLOSE: The CLOSE command is used to close the local listening IP:PORT socket preventing the host from receiving further commands. Once closed, the listening can only be started from the 'Settings - Remote' page.
Remote SEND commands require a 'Remote Address' to be added. The 'Remote Address' is the destination address socket; an IP (or host name) and port socket pair.
For detailed usage and examples of the SEND command see the remote page.
In the example below the SEND command is sending commands to the remote Mini Mouse Macro instance running at 192.168.1.53 on port 41414.
This will load a remote macro on the remote host, start the remote macro, and stop the remote macro.
At line 1 the remote host loads a local macro with 'Macro Load D:\mmm\MyMacro.mmmacro'.
At line 2 the macro is started with 'Macro play start'.
At line 3 the local macro flow waits for 60 seconds.
At line 4 the remote macro is stopped with 'Macro play stop'.
1 | RUN ACTION | REMOTE | Send 192.168.1.53:41414 Macro Load D:\mmm\MyMacro.mmmacro
2 | RUN ACTION | REMOTE | Send 192.168.1.53:41414 Macro play start
3 | RUN ACTION | WAIT SECONDS | 60
4 | RUN ACTION | REMOTE | Send 192.168.1.53:41414 Macro play stop
Set
Remote SET command configures local remote options.
For detailed usage and examples of the SET command see the remote page.
In the example below the SET command declares the remote address and port of a peer. Using the saved IP and Port the send command is then used to send the 'Macro Play Start' command to that host.
At line 1 the remote IP is set as the hostname 'WIN10_host2.local'.
At line 2 the remote port is set to 41414.
At line 3 the send command passes 'Macro play start' to the remote host.
1 | RUN ACTION | REMOTE | SET RemoteIP WIN10_host2.local
2 | RUN ACTION | REMOTE | SET RemortPort 41414
3 | RUN ACTION | REMOTE | SEND Macro play start
Close
Remote CLOSE closes the local listener.
When the listener is closed the local host stops lisening for Mini Mouse Macro commands.
1 | RUN ACTION | REMOTE | CLOSE
send udp packet string
SEND UDP PACKET STRING action sends a UDP packet containing a string value to a specified IP address on a specified UDP port. The SEND UDP PACKET STRING and RECEIVE UDP PACKET STRING can be used to control or monitor Mini Mouse Macro from over a network connection.
NOTE that Mini Mouse Macro will need to be allowed through your local firewall for UDP packets to be sent or received by the program.
Sending UDP strings can be targeted at other running Mini Mouse Macro macros on the network to trigger conditions. The MMM Controller tool can also be used to send commands to Mini Mouse Macro and to receive feedback from Mini Mouse Macro over a network. The MMM Controller can be downloaded here.
Consider the SEND UPD PACKET STRING example statement below taken from a macro condition:
1 | IF | NETWORK HOST PING REPLY | 192.168.0.2 | SUCCESSFUL | SEND UDP PACKET STRING | 192.168.0.2::41414::load_macro3
This reads - IF the NETWORK HOST PING REPLY to host 192.168.0.2 is SUCCESSFUL then SEND UDP PACKET STRING to IP address 192.168.0.2 on port 41414 with string load_macro3. So is the network host 192.168.0.2 is available then send a UDP packet to that host on port 41414 containing the string text load_macro3.
log off computer & restart computer & shutdown computer
LOG OFF and RESTART and SHUT DOWN COMPUTER actions are used to either log off, restart or shutdown the local computer.
Consider the RESTART example statement below taken from a macro condition:
1 | IF | RECEIVE UDP PACKET STRING | ANY::41414::RESTART | STRING FOUND | SEARCH FOR STRING | RESTART COMPUTER
This reads - IF RECEIVE UDP PACKET STRING from ANY IP address on port 41414 with the string RESTART then RESTART the COMPUTER. So if a UDP packet is received on port 41414 with the string RESTART then the computer will immediately restart.
Define string variable
STRING VARIABLE objects evaluate conditions based on the value of the %STRING% (%STRING% through to %STRING9999%) internal variables in use with Mini Mouse Macro. The DEFINE STRING VARIABLE action sets and defines the %STRING% variables for use within Mini Mouse Macro. Strings can be defined with the internal %STRING% variable names or any other custom name.
Using a string variable is a way to contain, evaluate, and work with static text strings within MMM. First, a string variable must be defined. This is done with:
1 | RUN ACTION | DEFINE STRING VARIABLE | %STRING%::StartMacro1
Here the string variable %STRING% is defined as StartMacro1. More information and detailed examples on working with the %string% variables within Mini Mouse Macro is located under the STRING VARIABLE heading in the object heading..
Consider the following STRING VARIABLE example statement below taken from a macro condition:
1 | IF | STRING VARIABLE | %STRING1% | IS | StartMacro1 | DEFINE STRING VARIABLE | %STRING2%::Macro1Process
This reads - IF the STRING VARIABLE %STRING1% IS StartMacro1 then DEFINE STRING VARIABLE, %STRING2% to be the text Macro1Process. So if the string variable %STRING1% matches exactly (evaluations are case sensitive) then change and define the variable %STRING2% to be Macro1Process.
This syntax is also valid for defining STRING variables:
1 | RUN ACTION | STRING::New Value
define integer variable
INTEGER VARIABLE objects evaluate conditions based on the value of the %INTEGER% (%INTEGER% through to %INTEGER9999%) variables in use with Mini Mouse Macro. Integer variables can be declared with the internal %INTEGER% variable names or any other custom name.
Defining variables can also be done manually from the 'Variable' settings page.
Using a integer variable is a way to contain, evaluate, and work with static numbers within MMM. The default value of an undeclared integer variable here is 0, or it can be statically defined. This is done with:
1 | RUN ACTION | DEFINE INTEGER VARIABLE | %INTEGER%::100
Here the integer variable is defined as 100. More information and detailed examples on working with %integer% variables within Mini Mouse Macro is located under the INTEGER VARIABLE heading in the object heading section.
When defining INTEGER variables it is possible to stack the value assignment. Consider the following:
1 | RUN ACTION | DEFINE INTEGER VARIABLE | %INTEGER%::0::+%STRING%::+%RANDOM_1-50%::*5
Here the integer variable is defined first as 0, the value of %STRING% is added to the value, the value of %RANDOM_1-50% is then added, and lastly the whole value is multiplied by 5.
Some other basic examples are:
1 | RUN ACTION | INTEGER::100
Defining variables can also be done manually from the 'Variable' settings page.
Using a integer variable is a way to contain, evaluate, and work with static numbers within MMM. The default value of an undeclared integer variable here is 0, or it can be statically defined. This is done with:
1 | RUN ACTION | DEFINE INTEGER VARIABLE | %INTEGER%::100
Here the integer variable is defined as 100. More information and detailed examples on working with %integer% variables within Mini Mouse Macro is located under the INTEGER VARIABLE heading in the object heading section.
When defining INTEGER variables it is possible to stack the value assignment. Consider the following:
1 | RUN ACTION | DEFINE INTEGER VARIABLE | %INTEGER%::0::+%STRING%::+%RANDOM_1-50%::*5
Here the integer variable is defined first as 0, the value of %STRING% is added to the value, the value of %RANDOM_1-50% is then added, and lastly the whole value is multiplied by 5.
Some other basic examples are:
- RUN ACTION | DEFINE INTEGER VARIABLE | %INTEGER%::=100 Declaration - %INTEGER% = 100
- RUN ACTION | DEFINE INTEGER VARIABLE | %INTEGER%::+100 Addition - %INTEGER% + 100
- RUN ACTION | DEFINE INTEGER VARIABLE | %INTEGER%::-100 Subtraction - %INTEGER% - 100
- RUN ACTION | DEFINE INTEGER VARIABLE | %INTEGER%::/100 Division - %INTEGER% / 100
- RUN ACTION | DEFINE INTEGER VARIABLE | %INTEGER%::*100 Multiplication - %INTEGER% * 100
- RUN ACTION | DEFINE INTEGER VARIABLE | %INTEGER%::%2 Modulus - %INTEGER% MOD 2
- RUN ACTION | DEFINE INTEGER VARIABLE | %INTEGER%::^5 Power of - %INTEGER% to the power of 5
- RUN ACTION | DEFINE INTEGER VARIABLE | %INTEGER%::%INTEGER1% %INTEGER% equals the value of %INTEGER1%
- RUN ACTION | DEFINE INTEGER VARIABLE | %INTEGER%::%RANDOM_200-250% %INTEGER% equals a random between 200 and 250
- RUN ACTION | DEFINE INTEGER VARIABLE | %INTEGER%::%STRING% %INTEGER% equals the value of %STRING% (must be a number)
- RUN ACTION | DEFINE INTEGER VARIABLE | %INTEGER%::%CLIPBOARD% %INTEGER% equals the value of %CLIPBOARD% (must be a number)
- RUN ACTION | DEFINE INTEGER VARIABLE | %INTEGER%::XOR10 XOR - %INTEGER% XOR 10
- RUN ACTION | DEFINE INTEGER VARIABLE | %INTEGER%::MAX%INTEGER1% MAX - %INTEGER% equals the highest value of itself compare %INTEGER1%
- RUN ACTION | DEFINE INTEGER VARIABLE | %INTEGER%::MIN50 MIN - %INTEGER% equals the lowest value of itself compare 50
- RUN ACTION | DEFINE INTEGER VARIABLE | %INTEGER%::SIGN SIGN - %INTEGER% equals math SIGN value of itself
- RUN ACTION | DEFINE INTEGER VARIABLE | %INTEGER%::SQRT SQRT- %INTEGER% equals the value squared
- RUN ACTION | DEFINE INTEGER VARIABLE | %INTEGER%::SQRT%INTEGER1% SQRT- %INTEGER% equals the value squared by %INTEGER1%
- RUN ACTION | DEFINE INTEGER VARIABLE | %INTEGER%::POW7 POW- %INTEGER% equals the %INTEGER% to the power of 7
1 | RUN ACTION | INTEGER::100
define decimal variable
DECIMAL VARIABLE objects evaluate conditions based on the value of the %DECIMAL% (%DECIMAL% through to %DECIMAL9999%) variables in use with Mini Mouse Macro. Decimal variables can be defined with the internal %DECIMAL% variable names or any other custom name.
Defining variables can also be done manually from the 'Variable' settings page.
Using a decimal variable is a way to contain, evaluate, and work with decimal numbers within MMM. The default value of an undeclared decimal variable here is 0, or it can be statically defined. This is done with:
1 | RUN ACTION | DEFINE DECIMAL VARIABLE | %DECIMAL%::10.55
Here the decimal variable is defined as 10.55. More information and detailed examples on working with %DECIMAL% variables within Mini Mouse Macro is located under the DECIMAL VARIABLE heading in the object heading section.
Like DEFINE INTEGER VARIABLE (above) decimals can take math operaters.
Some examples are (for more see above):
1 | RUN ACTION | DEFINE DECIMAL VARIABLE | %DECIMAL%::+1.55
2 | RUN ACTION | DEFINE DECIMAL VARIABLE | %DECIMAL%::-.50
3 | RUN ACTION | DEFINE DECIMAL VARIABLE | %DECIMAL%::*1.99
4 | RUN ACTION | DEFINE DECIMAL VARIABLE | %DECIMAL%::/10.55
This syntax is also valid for defining DECIMAL variables:
1 | RUN ACTION | DECIMAL::1.0
define boolean variable
BOOLEAN VARIABLE objects evaluate conditions based on the value of the %BOOLEAN% variables (%BOOLEAN% through to %BOOLEAN99%) in use with Mini Mouse Macro. The DEFINE BOOLEAN VARIABLE action sets and defines the %BOOLEAN% variables for use within Mini Mouse Macro.
Boolean's can be one of two states:
1 | RUN ACTION | DEFINE BOOLEAN VARIABLE | %BOOLEAN%::TRUE
Here the string variable %BOOLEAN% is defined as TRUE. More information and detailed examples on working with the %boolean% variables within Mini Mouse Macro is located under the BOOLEAN VARIABLE heading in the object heading..
Consider the following BOOLEAN VARIABLE example statement below taken from a macro condition:
1 | IF | BOOLEAN VARIABLE | %BOOLEAN% | IS FALSE | DEFINE BOOLEAN VARIABLE | %BOOLEAN%::TRUE
This syntax is also valid for defining BOOLEAN variables:
1 | RUN ACTION | BOOLEAN::TRUE
Boolean's can be one of two states:
- True or False
- On of Off (On = True)
- 1 or 0 (1 = True)
- Yes of No (Yes = True)
1 | RUN ACTION | DEFINE BOOLEAN VARIABLE | %BOOLEAN%::TRUE
Here the string variable %BOOLEAN% is defined as TRUE. More information and detailed examples on working with the %boolean% variables within Mini Mouse Macro is located under the BOOLEAN VARIABLE heading in the object heading..
Consider the following BOOLEAN VARIABLE example statement below taken from a macro condition:
1 | IF | BOOLEAN VARIABLE | %BOOLEAN% | IS FALSE | DEFINE BOOLEAN VARIABLE | %BOOLEAN%::TRUE
This syntax is also valid for defining BOOLEAN variables:
1 | RUN ACTION | BOOLEAN::TRUE
define pixel range variable
A pixel range variable holds a captured pixel range bitmap. The captured pixel range bitmap can come from a bitmap image file or from a location on the screen.
Pixel range variables are best declared as an Action from the 'Add Condition' tool.
The command below with define the pixel range variable, '%PIXEL_RANGE%', at the location mouse Xpos 22, Ypos 122, with a width of 34 pixels and height of 43 pixels.
1 | RUN ACTION | DEFINE PIXEL RANGE VARIABLE | %PIXEL_RANGE%::At Location [X:22 Y:122 W:34 H:43]
The command below with define the pixel range variable, '%Player_Icon%', with the contents of the bitmap file at c:\Macro\Pics\Player_icon.bmp. This command also has a custom comment for the line 'Starting player icon'.
1 | RUN ACTION | DEFINE PIXEL RANGE VARIABLE | %Player_Icon%::From image C:\Macro\pics\Player_icon.bmp::Starting player icon
When a pixel range is declared it holds the current bitmap image within an internal pixel range bitmap array. As well as the bitmap image, a Pixel Range variable has the following variable properties which can be used within the macro:
%PIXEL_RANGE%: 0 The internal pixel range array index number of the variable
%PIXEL_RANGE.XPOS%: 22 The starting mouse X pos
%PIXEL_RANGE.YPOS%: 122 The starting mouse Y pos
%PIXEL_RANGE.WIDTH%: 34 The width of the pixel range bitmap
%PIXEL_RANGE.HEIGHT%: 43 The height of the pixel range bitmap
%PIXEL_RANGE.TIME%: 6:49:02 AM The time that the pixel range was declared
%PIXEL_RANGE.DATE%: 7/17/2021 The date that the pixel range was declared
The command also takes some optional parameters. These are to save the image to a bitmap bmp file when declared and also to add a comment to the end of the line.
The command below declares %PLAYER_ICON%, saves the file as Player.bmp, and has a line comment of 'Icon for player1'.
2 | RUN ACTION | DEFINE PIXEL RANGE VARIABLE | %PLAYER_ICON%::At Location [X:200 Y:150 W:50 H:100]::save image to c:\macro\Player.bmp::Icon for player1
Pixel Range Variables examples:
1. With the PIXEL VARIABLE If condition:
The PIXEL VARIABLE condition evaluates the difference between declared pixel range variables.
1 | IF | PIXEL VARIABLE | %BANNER_ORIGINAL% | MATCHES | %BANNER_NEW% | MESSAGE PROMPT | Pixel Range Match!
2. With the PIXEL RANGE SAVE action:
The PIXEL RANGE SAVE action saves the bitmap image from a declared pixel range variable to a file.
1 | RUN ACTION | PIXEL RANGE SAVE | From Variable %PIXEL_RANGE%::C:\Macro\pixel_range.bmp
PIXEL CAPTURE
The PIXEL CAPTURE action captures a single pixel RBG value at a given mouse position and then saves this value in a variable for use later on.
PIXEL CAPTURE can be used to compliment the PIXEL COLOR condition.
Pixel capture action is best declared as an Action from the 'Add Condition' tool.
In this example we capture the pixel at mouse X position 511 and mouse Y position 200 and save the RGB value to the variable %PIXEL%.
1 | RUN ACTION | PIXEL CAPTURE | At Location [X:511 Y:200]::To variable PIXEL
The pixel capture variables are best used with the PIXEL COLOR condition to evaluate the current RGB color of set pixels.
The example below uses the captured pixel RGB color stored within the variable %PIXEL% to check if the current pixel RGB color value at location X 511 and Y 200 is the same. In the example below, if the values are the same then the macro will continue. If they are not the same, then the macro will wait until they do match to continue.
2 | IF | PIXEL COLOR | %PIXEL%::At Location [X:511 Y:200] | IS THE SAME | CONTINUE
pixel range save
PIXEL RANGE SAVE is a simple condition that saves the bitmap image from a declared PIXEL RANGE VARIABLE to file.
In the example below the bitmap image from the variable %PIXEL_RANGE% is saved to the file pixel_range.bmp.
1 | RUN ACTION | PIXEL RANGE SAVE | From Variable %PIXEL_RANGE%::C:\Macro\pixel_range.bmp
The example below uses the PIXEL VARIABLE condition to evalute two PIXEL RANGE VARIABLES. If the pixel ranges on screen do not match the range is saved to player_change.bmp:
1 | IF NOT | PIXEL VARIABLE | %PLAYER_ORIGINAL% | MATCHES | %PLAYER_NEW% | PIXEL RANGE SAVE | From Variable %PLAYER_NEW%::C:\Macro\player_change.bmp
mouse to image
MOUSE TO IMAGE will detect an image from a file on the screen and optionally move the mouse to the location.
MOUSE TO IMAGE optionally can store the result of the capture location to variables for later use.
The Mouse to Image action operates the same as the DETECT IMAGE condition. The DETECT IMAGE condition can offer a follow on action and better suited over MOUSE TO IMAGE when it is unknown if the image will be found on the screen.
Mouse to image is best declared as an Action from the 'Add Condition' tool.
The example below will look for the bitmap pixel range within the file banner.bmp on the screen. If the picture if found, the macro will move the mouse to the center of the image:
1 | RUN ACTION | MOUSE TO IMAGE | image path C:\Macro\File\pics\banner.bmp::match quick::move mouse yes
Mouse to Image accepts multiple options:
- Match Quick - Match quick perfroms a partion pixel match
- Match Full - Match full matches 100% of the pixels within the range
- Full Screen - Find the image anywhere on the display
- At Location - Find the image from a region within the display
- Mouse Mouse Yes - Move the mouse to the center of the image when detected
- Mouse Move No - Do not move the mouse, instead save the value of the found image to X and Y variable coords for later use
- Offset - When moving the mouse to the image, off set the X and Y coords by a + or - pixel variation
- Comment - An optional line comment
mouse movement
The MOUSE MOVEMENT action takes a series of mouse X and Y coordinates and moves the mouse there.
The Mouse Movement action is best declared using the 'Add Condition' tool.
The example below moves the mouse to the mouse position X 100, Y 150 after a 10 millisecond delay.
1 | RUN ACTION | MOUSE MOVEMENT | 100-150:10
The example below moves the mouse to 16 mouse positions whilst including a delay after each single mouse movement.
2 | RUN ACTION | MOUSE MOVEMENT | 300-350:10, 375-400:10, 425-450:10,475-500:10,525-550:10,575-600:10,625-650:10,675-700:10,300-350:10, 375-400:10, 425-450:10,475-500:10,525-550:10,575-600:10,625-650:10,675-700:10
The Mouse Movement action can take variables for the mouse X, Y, and delay values.
Consider the following example. Here we have variables declared for each of the parameters.
3 | RUN ACTION | MOUSE MOVEMENT | %XPOS%-%YPOS%:%intDelay%
mouse click
The MOUSE CLICK action performs a single or series of mouse clicks at set mouse positions.
The Mouse Click action is best declared from the 'Add Condition' tool.
* | Basic Left, Right, and Middle button clicks
1 | RUN ACTION | MOUSE CLICK | Left Click at 900 470
2 | RUN ACTION | MOUSE CLICK | Reft Click at 900 470
3 | RUN ACTION | MOUSE CLICK | Middle Click at 900 470
The follow Mouse Click action will perform a Left Click at mouse X 900 and Y 470 a total of 100 times with a 50 millisecond delay between each click.
* | Left click 100 times with a 50 ms delay
4 | RUN ACTION | MOUSE CLICK | Left Click at 900 470 100 times with 50 ms delay
encrypt file/folder aes & decrypt file/folder aes
The Encrypt File/Folder and Decrypt File/Folder actions Encrypt a file or folder with AES 256 bit encryption and can un-encrypt (Decrypt) a file or folder that has been encrypted with AES 256 bit encryption.
NOTE that is you forget your encryption key, is may be impossible for you to recover your encrypted files.
NOTE the RECURSIVE_DIR option when encrypting/decrypting will encrypt/decrypt every file and folder starting from the chosen directory.
Encrypting a File
Consider the following ENCRYPT FILE (AES) example:
1 | IF | FILE | D:\Macro\PersonalMacro.txt | EXIST | ENCRYPT FILE (AES) | D:\Macro\PersonalMacro.txt::[PROMPT_AT_RUNTIME]::DELETE_ORIGINAL
This reads IF the FILE D:\Macro\PersonalMacro.txt does EXIST then ENCRYPT the FILE D:\Macro\PersonalMacro.txt with AES encryption. [PROMPT_AT_RUNTIME] for the encryption key (encryption passphrase) to be entered at run-time (by an input box prompt) and DELETE_ORIGINAL will delete the original un-encrypted file.
The encrypted file will reside in its current directory with the file extension .aes added to the file. So in the example above: D:\Macro\PersonalMacro.txt.aes
As well as the options [PROMPT_AT_RUNTIME] to enter the encryption key, another option is to enter the clear text encryption key directly into the macro.
Consider this example:
1 | IF | FILE | D:\Macro\PersonalMacro.txt | EXIST | ENCRYPT FILE (AES) | D:\Macro\PersonalMacro.txt::MyEncryptionPassword::KEEP_ORIGINAL
Here the encryption key is entered directly as 'MyEncryptionPassword' and also the option to KEEP_ORIGINAL will not delete the original un-encrypted file.
Consider this example:
1 | RUN ACTION | ENCRYPT FILE (AES) | D:\Macro\PersonalMacro.mmmacro::%STRING%::DELETE_ORIGINAL
Here the action to Encrypt the file is using the %STRING% variable value as the encryption key.
Encrypting a Folder
Consider the following ENCRYPT FOLDER (AES) example:
1 | RUN ACTION | ENCRYPT FOLDER (AES) | D:\Macro::[PROMPT_AT_RUNTIME]::SINGLE_DIR::KEEP_ORIGINAL
This reads: Perform the action to ENCRYPT the FOLDER D:\Macro with AES 256 bit encryption, PROMPT_AT_RUNTIME for the encryption key, and perform this encryption only on the root, SINGLE_DIR, of the chosen directory. Once a file has been encrypted, KEEP_ORIGINAL un-encrypted files.
Each encrypted file will reside in its current directory with the file extension of .aes added to the file.
Please see above under the Encrypting a File heading regarding [PROMPT_AT_RUNTIME] and options with encryption keys.
Encrypting a Folder Recursively
As well as the options to encrypt the SINGLE_DIR (files only in the root folder) the option exist to encrypt recursively with RECURSIVE_DIR.
Consider the following example:
1 | RUN ACTION | ENCRYPT FOLDER (AES) | D:\Macro::[PROMPT_AT_RUNTIME]::RECURSIVE_DIR::DELETE_ORIGINAL
This reads: Perform the action to ENCRYPT the FOLDER D:\Macro and [PROMPT_AT_RUNTIME] for the encryption key. Encrypt EVERY FILE IN EVERY FOLDER UNDER THE CHOSEN DIRECTORY TREE (be careful with this one) with RECURSIVE_DIR and also DELETE_ORIGINAL un-encrypted files.
So with the option RECURSIVE_DIR the directory tree of D:\Macro will be encrypted. All encrypted files will be in there home directory with the file extension of .aes added.
Decrypting a File
Consider the following file decryption example:
1 | RUN ACTION | DECRYPT FILE (AES) | D:\Macro\PersonalMacro.txt.aes::%string1%::DELETE_ORIGINAL
This reads: Run the action to DECRYPT the FILE D:\Macro\PersonalMacro.txt.aes with the decryption key being the value of the %STRING1% variable and after decryption DELETE_ORIGINAL, to delete the original encrypted file.
So the file D:\Macro\PersonalMacro.txt.aes will be decrypted with the key value of the variable %STRING1% and then the file PersonalMacro.txt.aes will be deleted.
Consider the following file decryption example:
1 | RUN ACTION | DECRYPT FILE (AES) | D:\Macro\PersonalMacro.txt.aes::[PROMPT_AT_RUNTIME]::KEEP_ORIGINAL
Here, like the example above the file is decypted, however the value [PROMPT_AT_RUNTIME] ensures that the decryption key will be entered at the time of this macro condition is evaluated in the macro queue. This will be in the form of a dialog box presented. The original encrypted file will not be deleted with KEEP_ORIGINAL.
Decrypting a Folder
Consider the following folder decryption example:
1 | RUN ACTION | DECRYPT FOLDER (AES) | D:\Macro::%string%::SINGLE_DIR::KEEP_ORIGINAL
This reads: Run the action to DECRYPT the FOLDER D:\Macro with the decryption key being the value of the %STRING% variable. Perform the file decryption ONLY on the contents of the root folder with the SINGLE_DIR option and DO NOT delete the original encrypted files with the KEEP_ORIGINAL option.
So this action will decrypt every file encrypted that has a .aes file extension in the root directory of D:\Macro and will keep the original encrypted .aes file.
Please see above under the Decrypting a File heading regarding [PROMPT_AT_RUNTIME] and options with encryption keys.
Decrypting a Folder Recursively
Consider the following folder decryption example:
1 | RUN ACTION | DECRYPT FOLDER (AES) | D:\Macro::MyDecryptionKeyPassword::RECURSIVE_DIR::DELETE_ORIGINAL
This reads: Run the action DECRYPT the FOLDER D:\Macro using the decryption key of "MyDecryptionKeyPassword'. The option RECURSIVE_DIR will decypt EVERY ENCRYPTED FILE WITH THE FILE EXTENTION .AES and also DELETE_ORIGINAL will delete the original .aes encrypted files.
message prompt
The MESSAGE PROMPT action is a simple action that displays a message box 'OK' button with your chosen text, style, and message box title.
Consider the following example:
1 | RUN ACTION | MESSAGE PROMPT | Hit OK to continue::Message Prompt
This action displays a message box prompt that says 'Hit OK to continue' and has the title of 'Message Prompt'.
The values can also be variables. For example:
1 | RUN ACTION | MESSAGE PROMPT | String1 variable is %string1% and integer2 is %integer2%. The date is %DATE% and time is %TIME%. Don't forget %RANDOM%.
Consider this example with a timeout value:
1 | RUN ACTION | MESSAGE PROMPT | This message prompt has a timeout value of 10 seconds::Message with a timeout::10
This action displays a message box prompt that says 'This message prompt has a timeout value of 10 seconds' and has the title of 'Message with timeout'. After 10 seconds this message prompt will timeout as if it were clicked.
Note: The value for the message title and timeout is optional.
Message box's come in 5 styles:
OK Only - A simple box with no style icon (OK Only message box's are the only style that can accept a timeout value)
Information - A blue information icon for general messages
Exclmation - A yellow exclamation icon for warning messages
Critical - A red cross icon for critical error messages
Question - A blue question mark for question based messages
Consider this example with the information style:
1 | RUN ACTION | MESSAGE PROMPT | This is my message box.'\n'There are many like it, but this one is mine.::My Message Box::0::Information
This message box prompt has multiple lines with each line deliminated by '\n'. The title of this message box is 'My Message Box'. It has the 'Information' style selected.
input box
The INPUT BOX action provides an input box at runtime to take input from macro users. This input can be stored into INTEGER or STRING variables for later evaluation.
Consider the following example:
1 | RUN ACTION | INPUT BOX | Run Macro 1 or Macro 2::Macro Run Selection::INTEGER
2 | IF | INTEGER VARIABLE | %INTEGER% | IS | 1 | GOTO MACRO LINE | 3 | ELSE | 2 | RUN ACTION | GOTO MACRO LINE | 200
This reads: RUN the ACTION to prompt an INPUT BOX. The user is presented the text: 'Run Macro 1 or Macro 2'. The title of the input box is: Macro Run Selection. The value the user enters at runtime will be stored into the %INTEGER% variable. The example above (macro line 2) continues to evaluate the INTEGER variable. Assuming the user entered the value 1, the macro is directed via the GOTO MACRO LINE action to line 3. If the user entered any other value the macro is directed to GOTO MACRO LINE 200.
When adding the INPUT BOX action via the 'Add Condition' page you are presented with options. Taking the example above, the options when added are shown below:
copy to clipboard
COPY TO CLIPBOARD copies a chosen text value to the local system text clipboard.
Consider the following example:
1 | RUN ACTION | COPY TO CLIPBOARD | %date%-%time%%string%%integer1%%random_4-14%
This example copies the values of %DATE%, %TIME%, %STRING%, %INTEGER1%, and %RANDOM_4-14% to be a combined string of %date%-%time%%string%%integer1%%random_4-14% and then copies this over to the system text clipboard. From within the system keyboard the a ctrl+v will paste out the value.
The string value can be any chosen text value.
Paste from clipboard
PASTE FROM CLIPBOARD performs a paste (effectively a CTRL+V) of the contents of the local system clipboard to the current window, or cursor, focus.
Consider the following example:
1 | RUN ACTION | PASTE FROM CLIPBOARD
This will perform the PASTE FROM CLIPBOARD action and the current contents of the system clipboard will be pasted (CTRL+V) to the object in focus.
Consider the following example:
1 | RUN ACTION | PASTE FROM CLIPBOARD
This will perform the PASTE FROM CLIPBOARD action and the current contents of the system clipboard will be pasted (CTRL+V) to the object in focus.
output to file
OUTPUT TO FILE outputs text to a file. The action must be passed with three values: A file name::Append/Overwrite::and the text value to output to the file.
1 | FOR | EACH | FILE IN | E:\docs | DO
2 | RUN ACTION | OUTPUT TO FILE | %file%::APPEND::[%integer%]-[%time%-%date%] %string%
3 | FOR | NEXT
This reads: FOR EACH FILE IN the directory of E:\docs, RUN the ACTION to OUTPUT TO the FILE '%file%' (%file% is the current file variable of the for loop iteration) and APPEND to the file the following text "[%integer%]-[%time%-%date%] %string%".
The example above makes good use of a FOR FILE loop in order to loop through all the files within a directory. Each of the files in the E:\docs directory will be appended with the text values within the variables.
Consider the following APPEND_NEWLINE example:
1 | FOR | I | = | 0 TO 10 | NEXT
2 | RUN ACTION | OUTPUT TO FILE | D:\Macro\OUTPUT\output.txt::APPEND_NEWLINE::%I%
3 | FOR | NEXT
4 | RUN ACTION | RUN PROGRAM | D:\Macro\OUTPUT\output.txt
This example loops ten times using a FOR I loop and for each loop appends with a new line the loop counter (%I%) to output.txt. The final line, after the loop finishes, opens the output.txt file. The result is a file that has the numbers 1 through 10, each on a new line.
Consider the following simple example
5 | IF | FOLDER | E:\docs | EXIST | OUTPUT TO FILE | E:\docs\output-%integer%.txt::OVERWRITE::%string% - COMPLETE
This reads: IF the FOLDER e:\docs does EXIST then OUTPUT TO the FILE at E:\docs\output-%integer%.txt and OVERWRITE the contents with %string% - COMPLETE.
So in this example only if the folder exists will the OUTPUT TO FILE action take place. Also, this example uses an integer variable (%integer%) to indicate the output file name.
OUTPUT TO FILE can also be used to create a VARIABLES INPUT.txt file for the INPUT FROM FILE action.
1 | RUN ACTION | OUTPUT TO FILE | D:\Macro\RX\INPUT.txt::OVERWRITE::%VARIABLES%
The line above creates an INPUT.txt file at the file path D:\Macro\RX\INPUT.txt with all declared variables for use with the INPUT FROM FILE action.
- File: The file to write to output the text to. If this file does not exist, the action will create the file. If the directory home of the file does not exist, the file will not be created.
- Append/Overwrite: Append will add to the file. Append can be used with APPEND_NEWLINE to add a new line (a carriage return and line feed) after each append. Overwrite will overwrite all the contents of the file, effectively creating a new file with the text value output.
- Output: The text value to output to the file.
1 | FOR | EACH | FILE IN | E:\docs | DO
2 | RUN ACTION | OUTPUT TO FILE | %file%::APPEND::[%integer%]-[%time%-%date%] %string%
3 | FOR | NEXT
This reads: FOR EACH FILE IN the directory of E:\docs, RUN the ACTION to OUTPUT TO the FILE '%file%' (%file% is the current file variable of the for loop iteration) and APPEND to the file the following text "[%integer%]-[%time%-%date%] %string%".
The example above makes good use of a FOR FILE loop in order to loop through all the files within a directory. Each of the files in the E:\docs directory will be appended with the text values within the variables.
Consider the following APPEND_NEWLINE example:
1 | FOR | I | = | 0 TO 10 | NEXT
2 | RUN ACTION | OUTPUT TO FILE | D:\Macro\OUTPUT\output.txt::APPEND_NEWLINE::%I%
3 | FOR | NEXT
4 | RUN ACTION | RUN PROGRAM | D:\Macro\OUTPUT\output.txt
This example loops ten times using a FOR I loop and for each loop appends with a new line the loop counter (%I%) to output.txt. The final line, after the loop finishes, opens the output.txt file. The result is a file that has the numbers 1 through 10, each on a new line.
Consider the following simple example
5 | IF | FOLDER | E:\docs | EXIST | OUTPUT TO FILE | E:\docs\output-%integer%.txt::OVERWRITE::%string% - COMPLETE
This reads: IF the FOLDER e:\docs does EXIST then OUTPUT TO the FILE at E:\docs\output-%integer%.txt and OVERWRITE the contents with %string% - COMPLETE.
So in this example only if the folder exists will the OUTPUT TO FILE action take place. Also, this example uses an integer variable (%integer%) to indicate the output file name.
OUTPUT TO FILE can also be used to create a VARIABLES INPUT.txt file for the INPUT FROM FILE action.
1 | RUN ACTION | OUTPUT TO FILE | D:\Macro\RX\INPUT.txt::OVERWRITE::%VARIABLES%
The line above creates an INPUT.txt file at the file path D:\Macro\RX\INPUT.txt with all declared variables for use with the INPUT FROM FILE action.
input from file
INPUT FROM FILE reads in data from a text file and assigns that data to Mini Mouse Macro variables.
The action must be passed with three values: [variable]::[refresh/no_refresh]::[File path]
- This file can be generated using the OUTPUT TO FILE action:
1 | RUN ACTION | OUTPUT TO FILE | D:\Macro\RX\INPUT.txt::OVERWRITE::%VARIABLES%
The line above creates an INPUT.txt file at the file path D:\Macro\RX\INPUT.txt with all declared variables for use with the INPUT FROM FILE action.
Here is an example INPUT file that defines all variables and the values:
INTEGER::10
INTEGER1::20
INTEGER2::30
INTEGER3::40
INTEGER4::50
STRING::Ant
STRING1::Bee
STRING2::Cat
STRING3::Dog
STRING4::%CLIPBOARD%
Consider the following VARIABLES example:
1 | RUN ACTION | INPUT FROM FILE | VARIABLES::REFRESH::D:\Macro\RX\INPUT.txt
2 | RUN ACTION | MESSAGE PROMPT | Value of STRING: %string%::String Value
INPUT.txt
STRING::Ants
STRING1::Bee
This reads INPUT FROM FILE all VARIABLES declared in D:\Macro\RX\INPUT.txt and monitor the the file for changes (REFRESH). Line 2 runs a MESSAGE PROMPT for the value of %string%. INPUT.txt declares the value of STRING to be Ants.
Consider the following single variable INTEGER example:
1 | RUN ACTION | INPUT FROM FILE | INTEGER::NO_REFRESH::D:\Macro\RX\INPUT.txt
2 | RUN ACTION | MESSAGE PROMPT | Value of INTEGER: %integer%::Integer Value
INPUT.txt
1000
This reads INPUT FROM FILE to the variable INTEGER declared in D:\Macro\RX\INPUT.txt and do not monitor the the file for changes (NO_REFRESH). Line 2 runs a MESSAGE PROMPT for the value of %integer%. INPUT.txt declares the value of INTEGER to be 1000.
The action must be passed with three values: [variable]::[refresh/no_refresh]::[File path]
- Variable: The variable to define. Valid options are:
- INTEGER - The '%integer%' variable
- INTEGER1 - The '%integer1%' variable
- INTEGER2 - The '%integer2%' variable
- INTEGER3 - The '%integer3%' variable
- INTEGER4 - The '%integer4%' variable
- STRING - The '%string%' variable
- STRING1 - The '%string1%' variable
- STRING2 - The '%string2%' variable
- STRING3 - The '%string3%' variable
- STRING4 - The '%string4%' variable
- VARIABLES - Any variables that are declared in the input file.
- This file can be generated using the OUTPUT TO FILE action:
1 | RUN ACTION | OUTPUT TO FILE | D:\Macro\RX\INPUT.txt::OVERWRITE::%VARIABLES%
The line above creates an INPUT.txt file at the file path D:\Macro\RX\INPUT.txt with all declared variables for use with the INPUT FROM FILE action.
Here is an example INPUT file that defines all variables and the values:
INTEGER::10
INTEGER1::20
INTEGER2::30
INTEGER3::40
INTEGER4::50
STRING::Ant
STRING1::Bee
STRING2::Cat
STRING3::Dog
STRING4::%CLIPBOARD%
- REFRESH/NO_REFRESH: To monitor the file for changes throughout running macro. Options are:
- REFRESH - Monitor this file for changes throughout the running macro. If any changes are made then the variable value is read in as the file changes
- NO_REFRESH - Do not monitor the file for changes.
- File Path: The input file path. Mini Mouse Macro is expecting a text based file.
Consider the following VARIABLES example:
1 | RUN ACTION | INPUT FROM FILE | VARIABLES::REFRESH::D:\Macro\RX\INPUT.txt
2 | RUN ACTION | MESSAGE PROMPT | Value of STRING: %string%::String Value
INPUT.txt
STRING::Ants
STRING1::Bee
This reads INPUT FROM FILE all VARIABLES declared in D:\Macro\RX\INPUT.txt and monitor the the file for changes (REFRESH). Line 2 runs a MESSAGE PROMPT for the value of %string%. INPUT.txt declares the value of STRING to be Ants.
Consider the following single variable INTEGER example:
1 | RUN ACTION | INPUT FROM FILE | INTEGER::NO_REFRESH::D:\Macro\RX\INPUT.txt
2 | RUN ACTION | MESSAGE PROMPT | Value of INTEGER: %integer%::Integer Value
INPUT.txt
1000
This reads INPUT FROM FILE to the variable INTEGER declared in D:\Macro\RX\INPUT.txt and do not monitor the the file for changes (NO_REFRESH). Line 2 runs a MESSAGE PROMPT for the value of %integer%. INPUT.txt declares the value of INTEGER to be 1000.
text to speech
|
TEXT TO SPEECH converts text to speech at playback.
Text to speech has options for: Voice: Male, female, or neutral voice Speed: From -10 to 10. -10 being the slowest and 10 being the fastest. Sync: Synchronous and Asynchronous. To wait or not to wait for the speech to end before continuing. Consider the following example: 1 | RUN ACTION | TEXT TO SPEECH | Hello World::MALE::5::sync 2 | RUN ACTION | TEXT TO SPEECH | %STRING%::FEMALE::0::async 3 | RUN ACTION | TEXT TO SPEECH | The End at line 3::NEUTRAL::-10::async Custom sound pitch can also be used IF (and only IF) you have the required language packages installed. By default the language packs required are not installed. Custom sound pitch enables: 1 | RUN ACTION | TEXT TO SPEECH | Hello World.::MALE::ADULT::5::async 3 | RUN ACTION | TEXT TO SPEECH | Hello World.::MALE::TEEN::2::async 4 | RUN ACTION | TEXT TO SPEECH | Hello World.::FEMALE::SENIOR::-5::async 5 | RUN ACTION | TEXT TO SPEECH | Hello World.::FEMALE::CHILD::0::async |

|
The YouTube example video above helps walk the user + or - 50 pixels to the target X and Y pixel at 978X and 390Y:
1 | IF | MOUSE POSITION NEAR | {X=978,Y=390}::50::50 | IS | GOTO MACRO LINE | 11
2 | IF | INTEGER VARIABLE | %MOUSE_X% | < | 950 | TEXT TO SPEECH | Right.::MALE::5::ASYNC
3 | RUN ACTION | WAIT MILLISECONDS | 100
4 | IF | INTEGER VARIABLE | %MOUSE_X% | > | 1020 | TEXT TO SPEECH | Left.::MALE::5::ASYNC
5 | RUN ACTION | WAIT MILLISECONDS | 100
6 | IF | INTEGER VARIABLE | %MOUSE_Y% | > | 420 | TEXT TO SPEECH | Up.::FEMALE::3::ASYNC
7 | RUN ACTION | WAIT MILLISECONDS | 100
8 | IF | INTEGER VARIABLE | %MOUSE_Y% | < | 350 | TEXT TO SPEECH | Down::FEMALE::3::ASYNC
9 | RUN ACTION | WAIT MILLISECONDS | 100
10 | RUN ACTION | GOTO MACRO LINE | 1
11 | RUN ACTION | TEXT TO SPEECH | You are on the mark!::NEUTRAL::3::ASYNC
play system sound
|
PLAY SYSTEM SOUND plays a sound from the to the local system at playback.
There are several included system sounds and the option to load a custom sound. The custom sound can be local to the computer or be played from a URL. Consider the following example: 1 | RUN ACTION | PLAY SYSTEM SOUND | Beep::ASYNC 2 | RUN ACTION | PLAY SYSTEM SOUND | https://www.pacdv.com/sounds/voices/hello-1.wav::SYNC In this example line 1 plays the pre-set BEEP sound asyncronously. Line 2 plays a sound directly from an internel URL syncronously. All custom sounds must be a .wav file extention or the sound will fail to play. |
|

